
We focused on beer and dwarves last time, but today it is all about elves.
Anirion, a relatively young elf from the Silverforest up north, made it his life’s goal to not only become as powerful as his mentor Alduriel, but to surpass him. After he read all the elven texts he could lay his hands on he soon realised that simple study will not make him an equal to the most powerful wizards in the realm. One of the few wood elves to ever leave the Silverforest he ventured out to seek secrets of old and to only come back after he unravelled them all.
It was late on this autumn day when he found his destination: The ruins of Jor-Adin, said to have housed an extensive library with copies of the works of the five arch wizards of the long crumbled empire of man. Calm lay the overgrown ruins before him, but no bird was signing, no deer passing through. He spoke a short prayer to Corellon and ventured deeper in the ruins, his senses sharpened, his goal clear…

Sculpting quality and pose
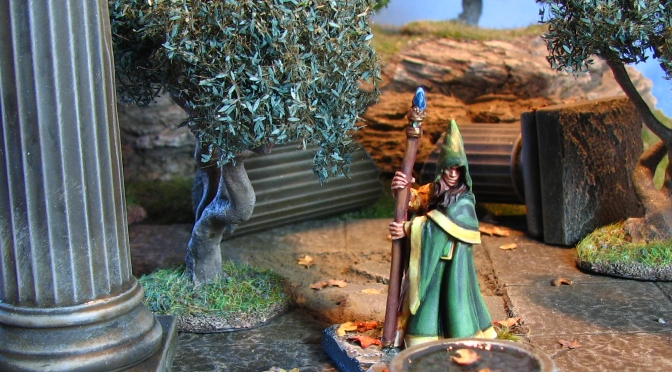
Anirion Wood Elf Wizard, a sculpt by Bobby Jackson, is a beautifully sculpted miniature with the right amount of detail to make it fast to paint, but also look good on the table. While his flowing cloak disguises his sex, the facial features suggest that we have a male in front of us, so does the name of the miniature. His face is full of character and really gives him a mysterious appearance. It translated well into the Bones material. His cloak is mostly unadorned, but the gifted painter could add free hands on the borders of the cloak. The soft folds look realistic and offer the opportunity to practise blending. His staff lacks a bit the fine detail one would expect looking at the face and it could be slightly thinner.

His pose is convincing and does look natural. He rests on his staff, slightly looking down, but one gets the impression that he is ready to cast a spell anytime. He is merely studying his opponent, waiting to unleash his powers. These subtleties make the model quite outstanding and I am really impressed that Jackson accomplished this.
He is well suited to depict a RPG hero, as he has enough presence to stand on his own. In a skirmish game his stance might be a bit too static for some, but he could still be used by people who like a more subtle hint at the prowess of a miniature than glaring steel. For rank and file he might be suitable as part of an elven unit, may it be as a priest or battlecaster, making him an excellent addition to any Fantasy army.

Casting
The casting is overall excellent and even difficult areas like his face were translated very well in the Bones material. The mold lines can be removed easily with this model as they are following the cloak and are thus easily accessible with a sharp knife.
The Bones miniatures come pre-assembled and with Anirion I assume the staff and hands were cast separately and put together with the body before shipping. Due to this the transition between cloak and hands seems to be a bit rough on his right arm, but it is in any case covered by the staff. The other details are all relatively crisp and well-defined, only the adornments on top of the staff are in part very flat and it is hard to see what is ment to be a jewel or bronze fitting .

Price
Anirion retails for 2.49 $ US. The cost-benefit ratio is working out and one gets a very nice miniature for a fair price. If you have a wood elves army or love to play them in your favourite RPG you could surely consider getting him.
Painting
Painting Anirion was pretty straight forward. His cloak offers plenty of surface to practise blending and given he is mostly cloak it doesn’t take long to finish him. One slight problem is that the miniature comes pre-assembled which makes it very hard to get to his robe at the front as it is covered by his hands and staff.
I used a mix of Reaper Master Series paints and Vallejo Model Colour and GW washes.
Cloak: Basecoat of RMS Grass Green and successive amounts of Vallejo Deep Yellow for the highlights.
Robe and cloak borders: Basecoat of Vallejo deep Yellow, followed by a wash with GW Reikland Flesh and successive amounts of RMS Pure White for the highlights.
Metal fittings on staff: Brown Base Coat (RMS Muddy Brown) followed by Vallejo Bronze and a wash with GW Reikland Flesh. I then mixed some Vallejo Bright Bronze in it for the first and the second highlight finishing of with some Vallejo Silver.
Staff: RMS Muddy Brown with a bit of RMS Blood Red as base colour. Vallejo Deep Yellow mixed in for the highlights.
Crystal on staff: Basecoat of RMS Sapphire Blue, wash with GW Agrax Earthshade and successive highlights with RMS Pure White.

Hair: RMS Muddy Brown with a bit of RMS Blood Red as base colour, highlights with successive amount of RMS Tanned Leather and RMS Fair Skin.
Face: 50:50 of Vallejo Medium Fleshtone and Vallejo Basic Skintone for the basecoat followed by a wash with GW Reikland Flesh. Successive highlights with Vallejo Basic Skintone and RMS Pure White.
Base: The base I sculpted myself using Sculpey. You can find a step-by-step tutorial here. The grass is MiniNatur Autumn Grass Tufts and the leaves are birch seeds coloured using different thinned down reds and yellows.

If you would like a constantly updated, themed PDF terrain building, painting and roleplaying guide consider supporting me on Patreon. There also other choice rewards for supporters.
![]()
If you are not keen on Patreon, but enjoy my content and would like to see me well caffeinated so that I can publish tutorials, reviews and guides more frequently click below and buy me cup of dark, mellow goodness.
![]()

Love, love, LOVE the leaves, especially floating on the surface of the ‘water’ in that little pool. It really adds a wonderful autumnal, abandoned feel to the scenery!
Also that leaf on the skeleton’s head 😉
LikeLike
Thank you! The leaves really add a bit of realism. Birch seed was made for modelling ;).
LikeLike
hi hi i bought some birch seeds expecting loads of those little leaves but its kind of just a little seed with a translucent leaf around it. some of them are the leaves as used on the base here, where do you get yours? im guessing you get the birch seed pods
LikeLike
Ahoi, most of the singular leaves are actually “harvested” from the MiniNatur foliage nets. Without varnish and acrylic medium they shed a bit, so I collect any fallen off leaves and use them for basing.
That said, I did use birch pods in the past. There are two birch trees in front of my door, so when the time is ripe I just collect some and extract the leaf shape part. It is a bit of work, but they do look very naturalistic.
If you want more variety in shapes you can also get a leaf punch from Greenstuff world. http://www.greenstuffworld.com/en/inicio/310-miniature-leaf-punch-punches.html
You will now be able to produce an endless supply of leaves and can even punch them out of actual leaves. They are scale appropriate and it only costs ten Euro. I will get one myself, given my supply of MiniNatur stuff is limited.
LikeLiked by 1 person
ahh funny you should link that leaf punch, its the exact one i have, ive also got the large and small branch bunch. come into some money recently enough to pay off a few debts so going to have a small spree. i measured one where i spend wisely. i got a stactic grass applicator now and four colours of flock just the four seasons, wasnt really sure what to do with those in regards to what colours to get.its a supringsly choice spoilt thing. thinking of getting some more rolling pins, they do a bundle of six pins ones a plain one and in one of the bundles i have one of the other rolling pins too.so it makes no diffrence to price at least with that bundle. with the other bundle it isnt as bad but i still get a plain one which i dont need two of.
LikeLike
The rolling pins are pretty sweet. I was thinking of making one myself: glue greenstuff press mold negativ to small rolling pin. The designs they have available do not include flagstones I like, but having a pin would make stuff much easier.
LikeLike
yeah i guess adding a bit more yellow than blue to the green stuff mix might help with it staying bendy. but seems to take a relatively long time to cure that way. it can be a bit fiddly pressing patterns in to be perfect with rolling pins even so save a awfully long time. i am quite anxious that the pattern might look obviously repeated by using the whole design of the rolling pin rather than just bits and bobs like on my graveyard.
LikeLike
I think you will need a bit of refinement in any case. After the bulk of stones is put down, you can go in again and add some stones that are higher than the others, split stones etc. with greenstuff. Even if you only add a handful, some moss, etc. I don’t think a repeated pattern can be recognized.
LikeLiked by 1 person
yeah i was thinking too simply about that, forgetting that we can cover things and change things and vary things up quite easily. seen alot of people kind of snap up the baked sculpey kind of getting semi random naturally occurring cracks.
LikeLike
actually you’ve just given me an idea how i can make use of a second plain rolling pin. im just working on a rock face to put a mausoleum entrance into, using the white polystyrene and pva paper towel method just rying to make the stone door fit seamlessly into the frame.
LikeLike
If there is a gap between entrance and rockface you can also just use some woodfiler and carve it to resemble the surrounding rock.
LikeLiked by 1 person
im going to sculptamold these gaps as they are like 1/2 a cm, plus i can push the item into it and get the exact shape. With far less mess than wood filler would get stuck to the peice, however it is far harder to carve once dry but i wont need to carve it so thats okay, but fixing mistakes with sculptamold is rather hard because its pretty damn strong material.
LikeLike
Sounds like a plan. The sculpamold sounds like a good product. If you let it harden somewhat and texture it you may be able to avoid having to deal with the hardened stuff. That said a brush attachment for a rotary tool might do the trick.
LikeLike
Yes it is very useful and cheap, a bit like papier mache, airdrying clay and plaster of paris. You do have to bear in mind the short working time though, half an hour is not too terrible.
LikeLike
weird thing about this sculptamold as hard as it is dremmeling it would send chunks flying, but that is with the hard sanding type things, a brush is a good idea though, apparently that is great for balsa texturing too.
LikeLike
Nice work
LikeLike
Thank you, glad you like it!
LikeLike
Great paint job, and I love the atmosphere you have created in those photos.
LikeLike
Thank you and I am glad the atmosphere came across. I really enjoy making such photos, they really bring to life the miniatures and provide some inspiration for upcoming quests.
LikeLike
Great series of photos and narrative, really makes you feel like you are part of the campaign 🙂 also love the painting the cloak really pops with the deep shadows and highlights but my favourite element is the lighter blends of the yellowy white inner parts of the cloak. Great job!
LikeLike
Thank you for the comment. The cloak was an attempt of blending with slightly more dilute paint than usual and I think it turned out nicely, but obviously there is still room for improvement. The yellow parts really worked out better in this way, but I used only Reikland Flesh for the shadows so I guess this is fairly bright on the yellow basecoat from the outset and it was easier to highlight it without having too strong shadows.
LikeLike