
Bruce Hirst is known in the wargaming community for his high quality silicon rubber molds that, employing a system not unlike Lego, allow the construction of dungeons, egyptian tombs, roman temples and much more. So far I only own the Cavern Accessories mold 85.
I already made some attempts to cast this mold in plaster and achieved some nice results. Last week I did experiment with some resin casting and was quite pleased with the outcome: Almost no trapped bubbles, all details are crisp and mixing and pouring of the resin was easy.
The finished pieces on their own are simple, yet provide an excellent basis for further refinement. Making use of a number of techniques I tested creating my Crypt of the Damned I made a point of improving the designs by the addition of moss, roots, candles, scenic bases and the one or other detail such as critters and water effects. I finished with a garnish of weathering powders. Apart from showing you the finished pieces, this is also an introduction to / review of the accessories mold.
The Frog Prince – Fountains for the Dungeon!
Every dungeon needs some magical fountains, may they be derelict or still gurgling. The accessories mold steps in here and provides the means to construct some very appealing fountains of two different designs: One with a wider basin, the other with a much slimmer hand basin. The water comes forward from a lion head, which could obviously also be used to adorn doors (I could see it with a door knocker in its jaw) or other architectural elements.

As you can see the lion’s head and the basin are mounted on a rock wall / door, which is also provided in three parts in the mold. While the pieces fit extremely well, you might want to use some filler to make the seams disappear entirely. You might have guessed it, the small bucket is also part of this versatile mold. My only additions are the vegetation, the water effect, the little frog (can you spot it?) and the base. Check out my Crypt tutorial to get an idea how I achieve the moss effect. For the base you’ll find a short tutorial of how to make a press mold template on my blog.
Bruce Hirst not only makes cool molds, he also offers free tutorials on his website. It is there where I found an excellent method to make the water effect shown above. The idea is to cut a piece of translucent fishing line to size and cover it with Acrylic Gloss Gel. I used three strands in the picture above, but you can use more or less, depending how wide the stream of water is supposed to be.
Finally, I used the extremely useful Busch Kleintierset to add the frog. This set is meant for 1:87 scale model railroad layouts, but works perfectly with 28mm and even 15mm scale. I can only recommend it, as it offers not only frogs, but also fish, butterflies, lizards, hedgehogs, snakes and even bees to name only half of the animals in this set.
Talking of butterflies and lizards…


To add a bit of variation I also modelled one of the wells as being slowly, but steadily overgrown by roots, the source of water at long last run dry. Again, roots and base follow closely the techniques described in great detail in my crypt of the damned tutorial.

Barrels, urns and crates – because storage can be fun!
The mold not only offers all you need to fit out an entire dungeon with Fountains of Rapid Respite or Fountains of Detrimental Doom, no it also offers a wide selection of barrels and crates, in different sizes, broken or intact, for all your dungeon decor needs.

Some I filled with water effect, some are overgrown by roots and moss, while others provide poison ivy or mushrooms a place to dwell.

As you can see the mold also offers one urn or pot. I painted it up as a bronze vessel heavily affected by verdigris, but it would surely look good as a clay pot, too. Some bigger cubic crates and rectangular ones add to the mix:

Finally, some fun can be had with the already mentioned fishing line and one of the barrels:

My preciousssss! – Treasure tokens
If fountains, crates and barrels are not yet enough for you, you will be pleased to read that the mold also enables you to cast treasure chests and gold piles. Using chests alone or paired up with urns and gold coins one can create some very nice treasure tokens. It is also a good idea to go to your local pharmacy and pillage the manicure and nail art section. Some of the rhinestones make good jewels.

Beyond the mold – dungeon vignettes
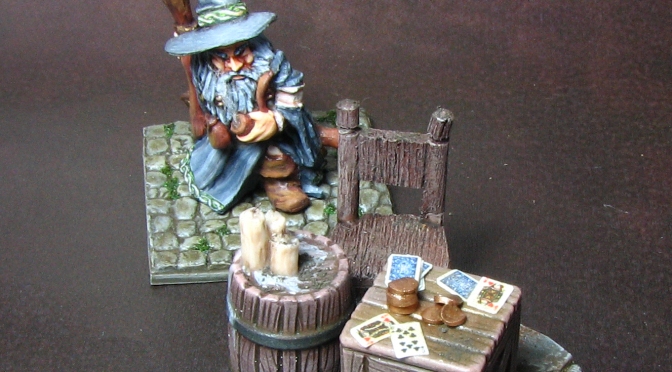
The most fun during the last week I had with creating two little vignettes using one of the crates the mold provides as a table.

The crate has the perfect height to use it as a makeshift table. The candle holder and candle are entirely scratch built using green stuff, a toothpick and acrylic matt gel. Have a look at my Crypt tutorial to learn how to make the candles. This time I used a thin piece of wire as a basis instead of a piece of plastic sprue. I cannot say enough how useful this kind of toothpick is I found in a Japanese dollar store in Auckland.

The detailing around its neck cannot only be used as a candle holder, but also as a chair leg or handle. That leads us to the last of the lot: Another makeshift table, this time with a chair and barrel.

All the playing cards you see are obviously free hands. I used a one hair brush for it. Just kidding. They are scaled down print outs of historical cards I found pictures of on the web. 3mm width for each card works quite well for 28mm. Depending on your printer a resolution of up to 1200ppi might prevent the design to turn into a blob. 300ppi might be sufficient to give a reasonable result. To scale the pictures down Photo Shop or Gimp come in handy.
What else there is
We already saw that the accessories mold is a one stop shop for all your dungeoneering desires, but wait there is more! The mold also allows to cast a steel door, stalagmites, hay sacks, a bridge, a fireplace, crystal shards, levers, crystal balls, and various designs of braziers. These items I will focus on the next time I venture down in the dank darkness of my dungeon.
Feel free to leave a comment below if you made your own experiences with this mold or have general suggestions or remarks.
If you would like a constantly updated, themed PDF terrain building, painting and roleplaying guide consider supporting me on Patreon. There also other choice rewards for supporters.
![]()
If you are not keen on Patreon, but enjoy my content and would like to see me well caffeinated so that I can publish tutorials, reviews and guides more frequently click below and buy me cup of dark, mellow goodness.
![]()

Poor Khael – this is why you never play cards with the Paladin… 😛
I absolutely love this stuff – I think you’ve done a fabulous job with the details on all the pieces, and the wine stream is excellent – gave me a laugh!
So…if there’s a fountain of Detrimental Doom…does that mean there’s some sort of Water Source of Non-Detrimental Doom?
LikeLike
Thank you very much! The detailing is indeed the most fun as it really makes the pieces stand out.
I am not entirely sure, after all the D&D universe is a big place. We all know how much it sucks if you drink the water of a perfectly fine looking fountain only to realise the doom is detrimental, but depending on your alingment and prefered god it might well be non-detrimental for you. I guess if you worship Bhaal than you might find it awesome to be doomed!
LikeLike
Looks interesting, and might be the thing that finally pushes me to the point of buying some Hirst moulds (they’ve been on my “get around to it one day” list for about three or four years now.) Are all of the element-things like gravestones and fountain artifices flat-backed from the pour side? That’s the only thing that gives me pause, as I’m looking at the graveyard set, and would much prefer for it to be properly 3-d.
LikeLike
As far as I can judge from the Hirst Arts website the gravestones will have a flat backside. The bases for the monument can be made out of two casts, so will be fully three-dimensional. I would not say it is a big deal to add a bit of structure to the back of the gravestones with filler. If you use plaster the slight coarsness of it will give a convincing stone texture right away.
The lion head and the basins do have a flat backside, but given you either mount them on something or make a brazier / well out of them it does not matter much.
In the end it might be easier to buy some gravestone resin casts if you only need a few. If you plan to cast quite a lot you might go for the mold. You can also break the plaster pieces and have some ruined gravestones to add some variety.
The other set I am looking at is the one with books and bottles. To get his stuff right wit green stuff is timeconsuming and for a library of a mad mage I would need way too many resin pieces. So I guess these three molds really give you the best bang for your buck if it comes down to fit out a dungeon or terrain pieces or even bases.
LikeLike
Nod. I had planned to buy a couple of sets of the GW Garden of Morr (aka Skull Kingdom Cemetery) to make some themed wargaming scenery. Since I’m not GMing anything Fantasy at the moment, I’m more after stuff that will work on a larger scale wargaming table than for a dungeon bash – either for a Cemetery or more generic fantasy/modern stuff. Filler for gravestone backs wouldn’t be a problem.
LikeLike
I’d say go for Hirst Arts. Cheaper than GW and if you use resin the fence comes out nice, too. The Morr stuff has way to many skulls for my taste, which means you might need to do a lot of sanding and filling if this is not your cup of tea either.
LikeLike
I’m still keen for a pair of Morrs regardless of anything else I get – Sho3box is to blame, with the great work he did here:
http://sho3box.wordpress.com/2012/04/04/st-craniums-cemetery/
He managed to make a typically ridiculous and over the top GW kit somehow have the softer look of World of Warcraft – specifically looking strongly reminiscent of Raven Hill Cemetery – a virtual “place” that I still have many fond memories of running around with my wife and friends.
Hirst stuff would be used to add to it. Just imagine an entire Warhammer/Kings of War table that was set up as a Cemetery…
LikeLike
Great work indeed. I do like the crypts and with some minor adjustments the would fit my bill, too. Anyhow, lookimg forward to the fusion and yes, a battle board with a graveyard theme would be awesome.
LikeLike
These are very creative and, as usual, nicely done. Thanks for sharing.
LikeLike
Thank you, you are welcome. The nice thing about these molds is, that they really make you think how to improve them or how to combine them to make something out of them, that might not have been intended.
LikeLike
Those look very nice, definitely another name to add to my wish list.
LikeLike
Thank you for your comment. This mold delivers. I am keen to test some more in the future.
LikeLike