

Ancient trees with their often haphazardly growing branches, bulbous trunks and weathered appearance always fired up my imagination. Inscribed in their bark are stories of times long past, combined with a certain mysticism and deep respect for such an old being. To depict such a tree on the gaming table can add such qualities to our games and add narrative potential as well as a welcome change to young or middle-aged deciduous trees that are most commonly depicted.
For this two-part tutorial I chose to model an ancient yew tree. With their broad, often hollow trunks they allow us to use the tree as cover or as a mission objective, adding further to the appeal. I also decided to magnetize two of the main branches for easy transport and storage. Per usual I will provide some botanical background, some facts about owls, a list of the materials needed, followed by detailed step-by-step instructions. Part I will cover the trunk and branches as well as the scenic base, while Part II will focus on different options to depict the foliage.
Through a Forest,Darkly
The earthy smell of dew covered moss and fallen branches endowed with wild mushrooms filled the brisk morning air. Red and orange coloured leaves mixed with amber needles to form a delightful carpet for Anirion, bringing back vivid memories of his treasured home; the Silverforest.
Deeper and deeper in the woods he went, his green robes brushing against dense copse. He moved silently, swiftly – almost a match for Lykaion. He could see his grey shadow from the corner of his eye rushing through the underwood. Anirion felt his companions excitement to run free again after the constraints of the city they had to pass not three days ago. He often wondered how it would be to see the world with Lykaion’s eyes, embrace it fully with his keen sense of smell, forget about the trite business of man and only live for the hunt. A smile flickered on his face when the grey shadow disappeared between two gnarled oaks. Soon he would be back with his prey.

He paused for a moment and listened to the faint cry of an owl, the rustling of verdant canopies above him and the close burbling of a stream. Effortlessly he danced across a hollow tree log, startling a small lizard hunting for beetles with maroon backs. Passing through an oak grove the burbling became louder and he finally reached a clearing, a majestic yew tree in its middle. Tall gnarled branches made their way from the bulbous ancient trunk, sprawling across the moist soil. The trunk seemed hollow with a wide opening to one side and a faint glimmer was discernible from inside. Moss covered trunks and crates were strewn around the yew, nature slowly claiming back the work of man. A small owl sat on one of the thicker branches, tilting its neck to take a long look at the odd creature disturbing its home.

Anirion stepped out of the shadows only to find his skin warmed by the sun breaking through the sparse foliage. The glimmer increased in intensity when he closed the distance between the oaks and the yew. Moving to the opening in the bark he brushed away some of the lower branches, only to loosen a water bag, the leather half rotten away.
A sudden squeal of the Owl made him look to the left, only to see a shadow bursting towards him. In a heartbeat he raised his staff, a moment later he flew against the yew’s rough bark, pain emanating from his shoulder. All he could see were blurred shadows dancing in front of him, all he could hear a guttural roar.
Botanical background
The European yew (taxus baccata) is a conifer native to western, central and southern Europe, but it can also be found in northern Africa, the middle east and southwest Asia. It follows that we can use it in a variety of historical contexts and many fantasy settings. Naturally other yew species exist worldwide, but they often have different phenotypes to the European yew. For instance the Canadian yew resembles more a tall shrub.

The European yew is an evergreen with a height between 10 and 28 meters, with the trunk between 2 and 4 meters diameter. The bark is thin and scaly brown, coming off in small flakes.


Whit woo – some facts about owls
Per usual I add some wildlife to my tree using the Busch Kleintierset. This time I decided to add an owl and its nest, as well as a rat that is attempting to steal one of the eggs. What kind of owl would be appropriate for a European forest? The Eurasian eagle-owl (Bubo bubo) is a sensible choice. It inhabits many temperate regions in Europe and parts of Asia. It has distinctive ear tufts and plumage that comes in a variety of shades and colours. It ranges from dark brown and black mottling to lighter colours such as light brown and beige. They eyes are of an amber colour.

The Busch Kleintierset does not state which species of owl it depicts, but the Eurasian eagle-owl is a good guess. Athene noctua might be an option, but it has not as pronounced ear tufts as the eagle-owl, which are clearly visible on the model.
The eagle-owl does not built its own nest, rather it often nests on the ground. However, the eagle-owl is known to sometimes use nests of other birds to nest. As I imagine the yew tree to be part of a heavily forested area it is likely that the owl would find an abandoned nest to use. In addition a nest on the tree is more interesting than one on the ground, where it might be hard to spot. The eggs are off-white in colour and oval-shaped.

The most common food source of the Eurasian eagle-owl is the brown rat (Rattus norvegicus). Brown rats inhabit every part of the world, with exception of Antarctica. Their fur colour ranges from grey to brown and they are significantly larger than a house mouse. The brown rat is thus an excellent addition as both prey and danger for the eggs our owl has laid.

Initial Considerations
Looking at the characteristics of the European yew tree it becomes clear that we have to change our approach in comparison to the oak trees I presented in an earlier post. The bulbous yew tree can be separated into three sections, each requiring slightly different techniques:
- The main trunk can be sculpted out of oven-hardening clay, such as Fimo, without a wire frame. This allows us to depict a hollow trunk with a good thickness that will fit many 28mm miniatures, while providing enough strength to support the other sections. Given the trunk is rather large, greenstuff or air-drying clay would not work as well, given that both will dry or cure rapidly. Greenstuff is also relatively expensive, whiel air-dry clay is often brittle. However, greenstuff or Milliput are an option for detailing, for instance bark dwelling mushrooms.
- The magnetized bigger branches require a modification of my usual technique. Their thickness is similar to the main trunk of some of my oak trees, but they will be handled a lot and need to be able to support themselves. I decided to use a wire frame surrounded by Fimo for them. This has also the advantage that we can sculpt the bark texture immediately. The magnetic connection points need to be reinforced with greenstuff after baking to withstand constant handling, to add a slight flexibility at the joint and to assure a good fit.
- The smaller branches follow closely the techniques outlined in my oak tutorial. They are supported by wire, with the bark sculpted using acrylic caulking and woodfiller.
It stands to reason that we start with the parts made of Fimo, bake them and then move on to sections that cannot be baked. I also felt that fallen branches are often a feature of old yew trees, so I decided to make two scenic bases that can be used separately or in combination with the yew tree. For these I used the same techniques I use for the magnetized branches.
What you need:
For the trunk and finer branches:
- A heavy-duty wire cutter.
- Garden gloves to protect your skin from the rather sharp wire ends.
- About 60 pieces of thin wire, each about 20cm in length. We will twist them to get armatures for the bigger ramifications and insert them into the main trunk before we bake the clay.
- A roll of tin foil to support our trunk while it is still malleable.
- Oven-hardening clay such as Sculpey or Fimo. I recommend a product that has a high tensile and impact strength after it is baked to avoid breakage and to provide a solid base for the other branches. Avoid air-dry clay, as it is often too brittle.
- Thin copper wire for the finest of ramifications.
- Super glue to temporarily attach the wire branches to the main body of the tree before the bark texture is applied.
- If you want to make scenic bases with fallen trees you need some more wire and plastic card bases.
For the bark:
- A selection of sculpting tools. A needle tool is a must to carve the bark.
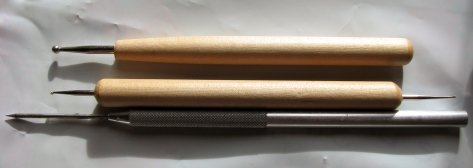
A selection of sculpting tools. The ball tip is quite good to smooth the clay and to make organic looking indentations. - Acrylic caulking paste. With some added paint we will use it for the first layer of “bark”.
- Wood filler to create a realistic bark texture.
- Greenstuff to cover specific sections of the tree.
- More oven-hardening clay to sculpt the bark of the magnetized branches.
For magnetizing the branches:
- Rare earth magnets and strong Epoxy glue to fasten them.
To paint the tree:
- Acrylic paints: Black, grey, brown and white to paint the bark. Craft paints are absolutely fine for this.
- (Optional) If you have an airbrush this will come in handy to paint the large surface area, but a large brush will work well, too. If you use an airbrush Tamiya acrylics spray very well. You may want to thin them with some Isopropyl alcohol, about 2:1 paint – alcohol.
- A selection of broad brushes for drybrushing and some finer brushes for detailing.
- (Optional) AK Interactive Slimy Grime Light Enamel based paint. This is excellent to depict light moss and can be used as a glaze over the bark. You need some enamel thinner, however, as water will not work with this paint. A separate brush is also useful to avoid contamination of your acrylic paints. Alternatively a green acrylic wash or glaze would have a similar effect.
To depict moss and creepers:
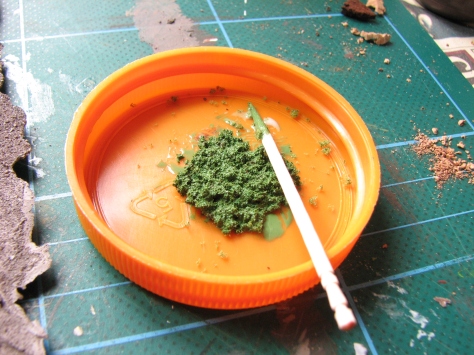
- Very finely ground foam clusters in a medium or dark green. With added PVA and green paint this will make a nice ‘moss’ paste. The foam clusters can be bought, but you can also make them yourself. I recommend Woodland Scenics Fine Turf, as it can be hard to grind foam really fine with household appliances.
- (Optional) MiniNatur/Silflor or Army Painter poison ivy foliage net. The latter is repackaged MiniNatur with a mark up, so if you don’t need it right now order it directly from the producer.
To depict the foliage:
- (Optional) MiniNatur/Silflor pine tree foliage net. The tree is rather big so you might need one and a half medium-sized packs, which cost 20 Euro each. So while not the cheapest solution out there, it is hard to find a replacement that will look as convincing.
- Alternatively you can use more of the fine turf to depict the foliage. If you go this route you also need to get some synthetic filter wool, often used in aquarium filter systems and readily available in pet shops.
- An airbrush to slightly tint the foliage to give it a more natural appearance is of advantage, but a spray can can be used in a similar fashion.
Further detailing:
- Acrylic mat gel, dried basil, finely cut seamoss and black tea for an owl’s nest.
- Fimo or greenstuff to sculpt some eggs.
- (Optional) Busch Kleintierset to add some wildlife and critters. I went for an owl and a rat that is stealing one of the eggs.
- Greenstuff or Milliput to depict some bark dwelling mushrooms.
For the bases:
- Plastic card.
- Construction adhesive to glue the branches to the plastic. I use Selleys Liquid Nails.
- Small rare earth magnets to make the tree detachable from the base. This will make it easy to place a miniature inside.
- Acrylic gel or caulking mixed with sand and brown paint to bulk out the base.
- Different shades of soil to depict the groundwork.
- AK Sand and Gravel Fixer. Alternatively Isopropyl Alcohol to wet the soil and acrylic medium or PVA to fixate it.
- Ground spices, leaves or tea to depict fallen and rotten leaves. If you use MiniNatur nets you can use any loose leaves for this, too.
- Thin wire, greenstuff and acrylic paint to make mushrooms growing around and on the branches.
How you do it:
The trunk:
- Take a reasonably sized piece of oven-bake clay and knead it until it softens and becomes malleable and smooth. You can use coloured clay and mix different shades to arrive at a perfect basecoat colour saving you time later on. In addition, should there be a chip in any point it will be hard to see.
- Crumble up and densely pack several pieces of tin foil. Shape the ball until it resembles a bulbous trunk. You can already add the main branches at this point where the magnets will later connect.
- Place the tin foil on a silicon baking sheet.
- Using sculpting tools and your hands apply the clay onto your tinfoil base. Insert any supporting twisted wire into the clay and embed it properly. Add more clay to hide any transitions.
- Now refine the shape using the sculpting tools only. Smooth out any finger prints, add texture and structure alike. You can also add openings in the bark and obviously an entrance that is roughly 28mm sized.
To properly show off the bark texture I painted the trunk before adding further branches. You should instead paint the entire tree only in the end. As you can see I integrated four major branches, all of them supported by wire. 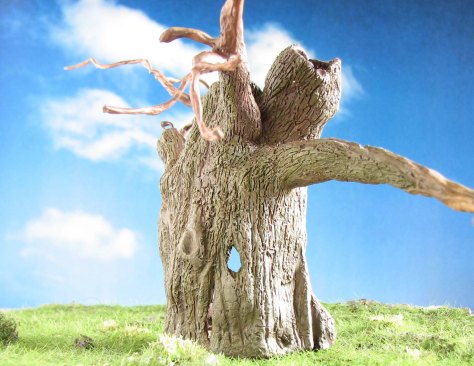
I added several openings in the bark to allow miniatures inside to have a line of sight out. This should lead to interesting gaming situations. - When you are happy with the shape of the trunk you can add indentations on the bottom that will hold rare earth magnets. Just push the magnets in and remove them again. They should not go into the oven as they will lose their magnetic properties when heated too much.
- Using a needle tool you can now start adding the bark texture proper. Given that yew trees lose their bark you do not have to add a bark texture everywhere. You could also use a texture stamp for this to save time. Try to remove any small pieces of clay that still cling to the bark.
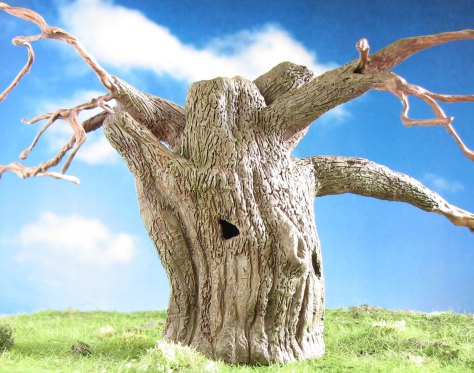
Closer to the bottom the surface becomes smoother, while higher parts and branches are heavily textured. 
A human sized 28mm miniature on a standard 25mm base fits well inside the trunk. - Now bake your creation at 130 to 150 degree Celsius for about thirty minutes to an hour. As long as the oven is not too hot the clay should not burn. Remove the tin foil with your hands or some tweezers and use a soft brush to remove any small pieces of hardened clay that may still cling to the trunk.


The branches:
- Now continue with the finer ramifications. Twist copper wire to depict these and glue them into place.
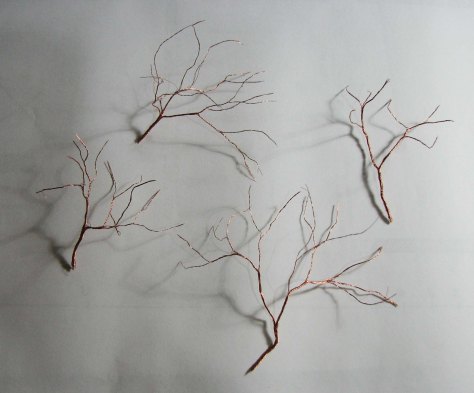
The fine copper wire is flexible and will in combination with the caulking create resilient branches, that rather bend under stress than simply break. 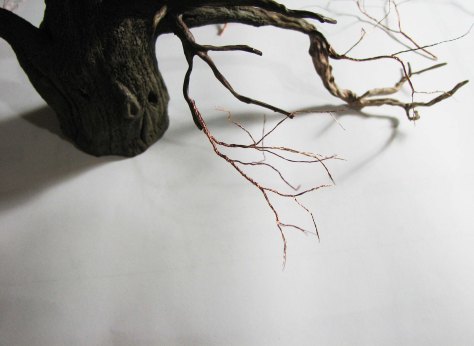
Using super glue I fixate the copper wire. - Now it is time to apply the caulking followed by woodfiller. This is the same technique I use for the oak trees.
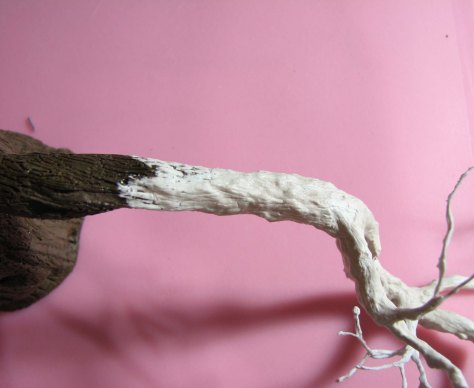
The woodfiller is then carved and covered with a protective coat of thinned acrylic gel. 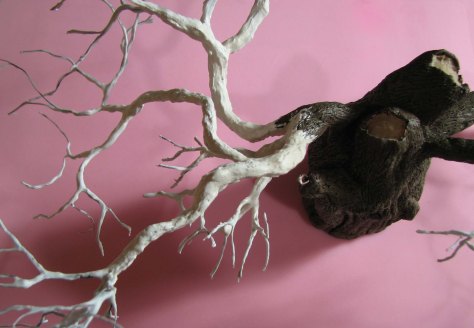
Slowly, but steadily the branches take shape. There is no need to texture the finest branches, as they will be covered by the foliage. - Repeat these steps for all other branches, the fallen branches and the branches that will be magnetized. Given the magnetized branches were thicker and prone to a lot of handling I used oven-bake clay to texture them instead of woodfiller.

As you can see the fallen branches are very similar in construction to the magnetized ones. I use construction adhesive to glue them to the base. - After the soon to be magnetised branches are baked, sculpt, reinforce and fit the joints with greenstuff. It is likely that at first they will not be a perfect fit. The greenstuff will solve this problem and does not require further baking. You can now also place the rare earth magnets. Press them into the greenstuff and put a piece of glad wrap between the magnet in the main trunk and the one in the branch. Connect the two and let the greenstuff cure. Now you will have an excellent fit. Glue the magnets down using Epoxy. Make sure to cover them with a light layer of the Epoxy, otherwise they might pop out of the greenstuff, given the magnetic force is so strong.
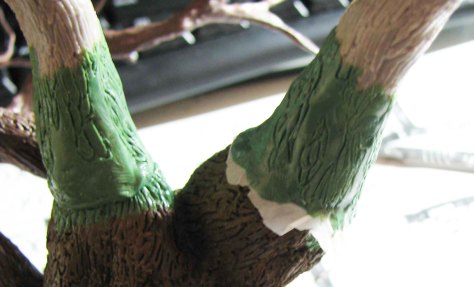
Smooth the greenstuff and try to make the transitions as subtle as possible. I did not add texture everywhere, as I intend to cover the plain areas with moss paste. 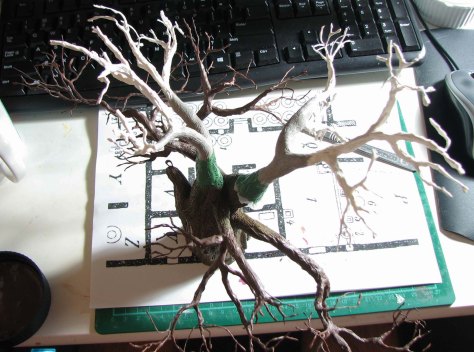
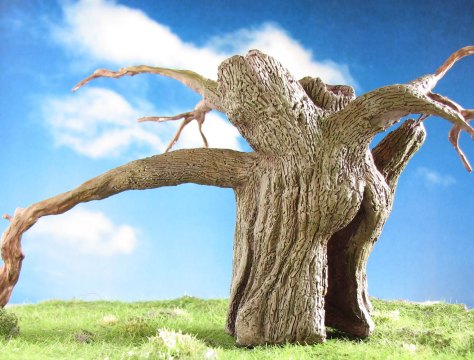
The entire tree in its full glory. If you have sufficient storage space you could sculpt it as one piece and leave the magnets out.


The mushrooms
- If you want mushrooms you can now add them to the bark. I think this works better than adding them while you sculpt the bark given you might press down to ahrd and deform the main trunk.
- Prepare some greenstuff and separate it into small balls. Now flatten those and set aside.
- Take some more greenstuff and roll it out flat to a thin string or stripe. Now attach the mushrooms to the rolled out piece. You can secure the rolled out piece with a bit of wire.
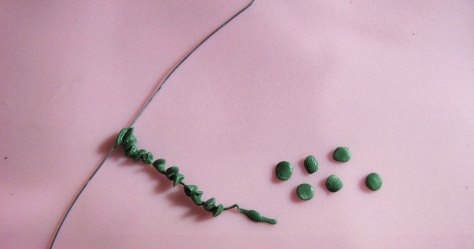
- Now separate the string into several pieces and attach those to the bark. Use a thin sculpting tool to accomplish this. You can obviously start on the bark, but I found you have more control if you start on the baking sheet. Press the string firmly into the crevasses in the bark and finalize the mushrooms. Let cure before you continue, as you might touch the mushrooms while they are still malleable.

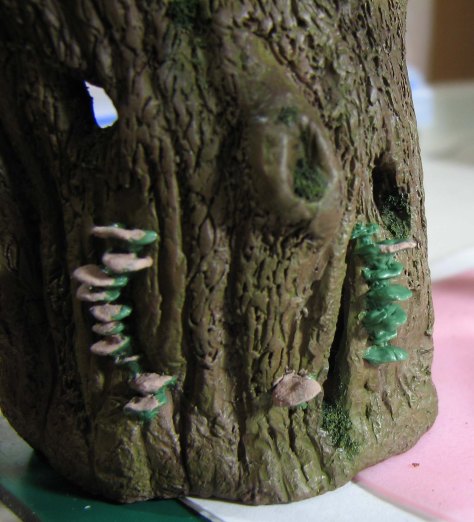
Transfer the string of mushrooms to the bark and press the string into the crevasses. Proceed shaping the mushrooms and let cure.


Painting the tree
- Now we paint the entire tree. If your clay is pre-coloured you can skip the basecoat and start with drybrushing. An airbrush will speed the basecoating up, but a brush will work well, too. A grey-brown works best for trees in my opinion.
- Mixing in some grey or white drybrush the bark with succeedingly lighter shades.
- Apply a heavy brown wash and let dry.
- Add a final drybrush to accentuate the bark texture.
- Paint and highlight the mushrooms using an off-white, followed by a wash.

The drybrush brings out the bark texture, while a wash on the mushrooms adds depth. 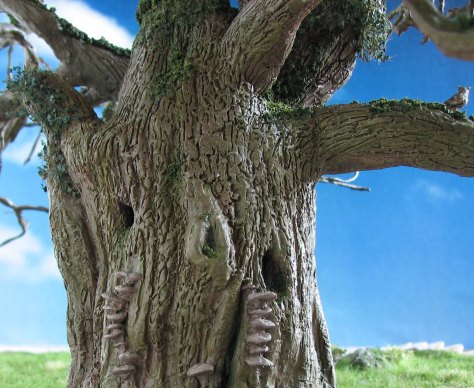
- Using the AK Interactive Slimy Grime enamel paint or a green wash or glaze, add a green tint to the bark to depict light moss. I apply the Slimy Grime directly from the pot and then load the brush with thinner to push the paint around. Let dry completely.
- Spray varnish the tree with a good matte varnish. I use Testors dullcoat for this. I took the pictures in this post before this last step, so the tree has a bit of a satin finish.
- Repeat these steps on the fallen branches.


Detailing: Moss, ivy and critters
- Now mix in equal parts PVA, dark green acrylic paint, and fine turf. Apply this mixture to any place where you would like to depict moss. Let this try over night. I used this to hide any visible seams where the magnetised branches join the trunk. It stands to reason that any parts that will be covered in moss do not need a bark texture. So keep this in mind when you work on the bark.
The moss paste after application. A brown wash and highlights with bright green and yellow will add depth. - Wash the moss with a brown wash and let dry. Mix the dark green with yellow and apply successive drybrushs to highlight the moss.
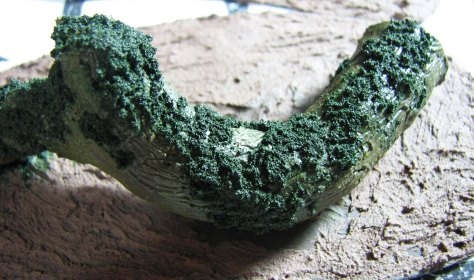
- You can now also add MiniNatur poison ivy to certain areas. Here again I used the ivy to hide any seams and to add interest to the higher branches. Just spread a bit of super glue where you want the ivy and press a strand of it into the glue.
Here you can see how the moss and poison ivy add interest and also obscure any joints. - Apply a coat of spray fixative to the ivy to assure that the tiny leaves stay in place.
- Mix acrylic mat gel, dried basil, finely cut seamoss and black tea and fashion an owl’s nest. First make a ball and then make an indentation with a ball tip tool. Let dry completely.
- Apply a brown wash and lightly highlight the nest.
- Sculpt some eggs using greenstuff or Fimo. If you use Fimo try to achieve an off-white colour. Otherwise paint the greenstuff off-white, followed by a brown wash and some subtle highlights. Glue the eggs into the nest, but place one of the eggs on a lower branch.

The nest is placed between the two bigger branches. Here you can also see the magnetic attachment points. - If you have the Busch Kleintierset paint up an owl and a rat. Place both on the tree, the rat close to the fallen egg.
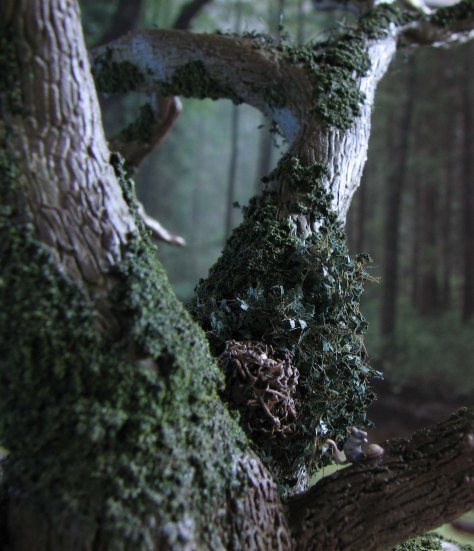
The rat is a nice way to tell a story with the model. The owl is placed on a nearby branch, so there is still the possibility of the owl to interfere and to reverse the fortunes.


The scenic base
- All we have to do now is the scenic base. First off glue the small rare earth magnets in the slots in the bottom of the tree you made earlier using Epoxy glue.
- Cut a piece of plastic card to size and cover it generously in a mixture of acrylic gel or caulking, sand and brown acrylic paint. Place a piece of glad wrap over the piece, attach another magnet to each glued down magnet and press the tree into the mixture. Let dry over night.
- Remove the tree and the glad wrap. You now have a perfectly fitting scenic base for the tree. Glue rare earth magnets into the slots in the base, but make sure you get the polarity right.

The magnets are glued in place after the acrylic paste is dry. I also drilled some holes for the mushrooms and placed them on the base. - Add PVA to the base and add a very light cover of soil, mixing different shades of soil, smaller and bigger stones. After this is dry apply a top coat using the AK Gravel and Sand Fixer or your preferred medium. You can cover the magnets without affecting them much, just don’t overdo it.

A fine layer of sand adds realistic groundwork to the base. Try to keep the layer thin. - Fashion mushrooms out of wire and greenstuff. Paint them and drill holes for the stems in the base. Glue the mushrooms down.
- Use either static grass or bushes to add further interest to the base. I fixate those with super glue.
- Add PVA to parts of the base and apply a mixture of dried herbs, ground up leaves and tea to depict fallen leaves. You can also add any loose MiniNatur leaves.
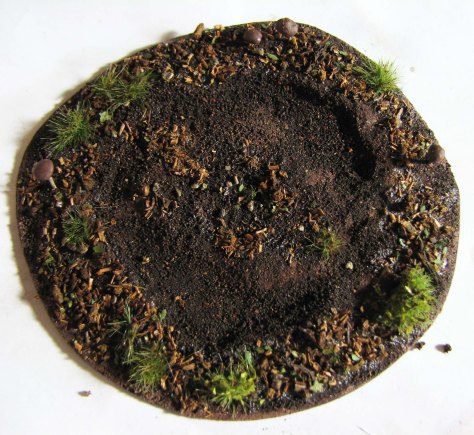
Dry tea and MiniNatur brushes add variety and produce a nice “forest base” look. Rooibos tea works very well to depict fallen leaves. - Apply a coat of fixative. Let dry and apply a last coat of matte varnish to eliminate any remaining gloss.


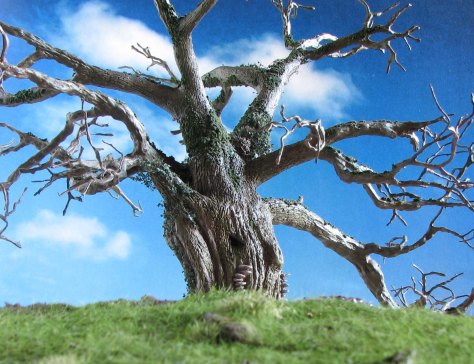
Congratulations, your ancient yew tree is almost finished. All we need to do now is adding some foliage and then you can place snipers inside to the detriment of your opponent.


I hope you enjoyed this tutorial and got inspired to give it a try yourself. If you have questions, suggestions or general comments just leaves them below. Until next time!
If you would like a constantly updated, themed PDF terrain building, painting and roleplaying guide consider supporting me on Patreon. There also other choice rewards for supporters.
![]()
If you are not keen on Patreon, but enjoy my content and would like to see me well caffeinated so that I can publish tutorials, reviews and guides more frequently click below and buy me cup of dark, mellow goodness.
![]()

This is brilliant! Mate, you are an artist, I love your eye for the details.
LikeLike
Thank you for your comment Jacksarge, much appreciated. I always consider it handicraft, but someone asked me once if a lake I made could be used as a decorative object for the mantle piece, so maybe I should reclassify as sculpture ;).
LikeLike
Mad genius! Beautiful work. Thank you very much for sharing.
LikeLike
Thank you for your comment Arkie. Glad you like the yew. I shall make my way back in my mad artist lair.
LikeLike
Sehr geiles tutorial.
LikeLike
Freut mich, dass es dir gefällt Kawe!
LikeLike
Holy moly! That’s fantastic!
LikeLike
Thank you kindly Marinealrose. Glad you like the yew!
LikeLiked by 1 person
This is a beautiful piece of work! It is way to big for me to store and transport around, but the tutorial contained a lot of useful hints for other terrain building projects (e.g. the mushrooms). Thansk for that!
LikeLike
Thank you Strand. I think if you magnetise more branches you should eb able to transport it easily. As it is now a 30cm by 20cm box is enough to store it. However, I am glad this is of use for your projects. A dead hollow tree trunk might be something compact to make and you could even add some green sprouts here and there to show that the trunk is regenerating.
LikeLike
Great work! I really like the mushrooms and the moss and ivy on it. It gives it such a natural appearance. And those last two staged pictures are just fantastic!
LikeLike
Thank you Brian, much appreciated. I agree, the overgrowth really adds to the tree. The funny part is, that I added it at first to hide any visible joints, but then it spread ;).
LikeLike
Simply brilliant! Very well done and thank you for sharing your techniques! 🙂
LikeLike
Thank you for your comment tinpotrevolutionary. Glad you like the tutorial and no worries, one of the main goals of this blog is to share techniques and to inspire people.
LikeLike
Ok, people have already said that you are an artist, a mad genius and even ‘holy moly’ – what can I say except second those learned commenters? 🙂 Incredible work!
LikeLike
Thank you Captain! Glad you like the ancient yew. Looking at the many hours it took me to make this tree I do sometimes wonder if madness does play into it. 😉 Gladly it is always very satisfying to see the finished piece on your table. If I make another one I might make it a bit smaller, so it can be used with 15mm.
LikeLiked by 1 person
Honestly this is amazing totally using it (hopefully, some day…) haha
LikeLike
Thank you for commenting Guildenstern. I encourage you to do so. Please link to your project in the comment section when you are ready, I am always interested in seeing other peoples work.
LikeLike
Now THAT is awesome. Well done and thank you for the tutorial.
LikeLike
You are very welcome ccglazier and thank you for your comment.
LikeLiked by 1 person
Thank you for the shout out. If you are interested in some terrain that has a more phantastic feel to it, have a look at this thread where Ingo is presenting his wonderful Fantasy village. it is in German, but the pictures speak for themselves.
LikeLike
An amazing and detailed tutorial. I know I’ll never get around to following it, but it was a pleasure just to read as I enjoy the background, research and well thought-out rationale behind each decision and choice. I’d say “museum quality” but having seen what works in quite a few museum dioramas vs what the dedicated hobbiest can produce, I think it’s both safe and honest to say that this is well beyond that.
LikeLike
Thank you Azazel. “Museum quality” is indeed oftentimes what I would not deem a very convincing diorama or model, but then you also get stunning displays (funnily enough often done by wargamers, e. g. the WWI displays at Te Papa and the Dominion Museum in Wellington or the Perry twins’ work in English museums. In any case, I always liked the label and I am glad you consider it on par with a good museum display. Much obliged. I would actually not mind if a diorama of mine would find its way in a museum some day.
LikeLike
this is a great tute for the ultimate fantasy tree.
Thankyou!
LikeLike
Thyank you for your comment Vicki, glad you like the tutorial and the result.
LikeLike
this is awesome and i had to have a go at this myself. i have made trees that are an inch and a half tall but the branches are quite thin and you cannot get in there and make chunky grooves and bark lines. But i had one question though i have got some summer ivy by mininatur, do you think this would work as good as the poison ivy?
LikeLike
Thank you fo commenting Shane and excuse the belated reply. I never worked on such a smalls cale, but I think with such small structures the appearance of bark can be achieved with some texture paste (acrylic chaulking with tea leaves, sand etc.).
Depending on the scale I would say that it will work fine for poison ivy. The 1:84 stuff works well with 28mm miniatures, but if the leaves need to be bigger you could also consider the 1:54 stuff.
I thought of using the plane tree nets to depict wine ranks, so you can also have look at suitably shaped leaves in the 1:84 range or even 1:160.
LikeLike
i did not realise they did mininatur leaves in different scales but on the site i got mine from it said 1:45+ so I am ok there. Also I was not really working on a small scale, it was just a kind of fruit bush tree sappling type thing I was not really sure I was making it up as I went along.
LikeLike
I would actually recommend to buy th directly from the MiniNatur website. Shipping is not vry expensive, given the items are so light and you also get the Mehrwertsteuer (GST or VAT) deducted.
LikeLike