
Crumbling gravestones covered in moss, faded letters, weathered by rain, wind and ice, a gnarled tree, the cry of an owl in moonlit night; who does not enjoy adding an eerily beautiful atmosphere to a base that will hold a vampire, ghost or necromancer? But how to go about it, what materials can you use and how should you arrange the scene?
Fear not fellow enthusiast of the dark arts, I shall answer these questions in a detailed step-by-step tutorial. In part one I will build a base for a Vampire Lord based on Reaper’s Judas Bloodspire sculpted by Werner Glocke, but naturally you can use the techniques presented below in any project, may it be a scenic base or a gaming board to add a somber, yet unsettling feel to your terrain.
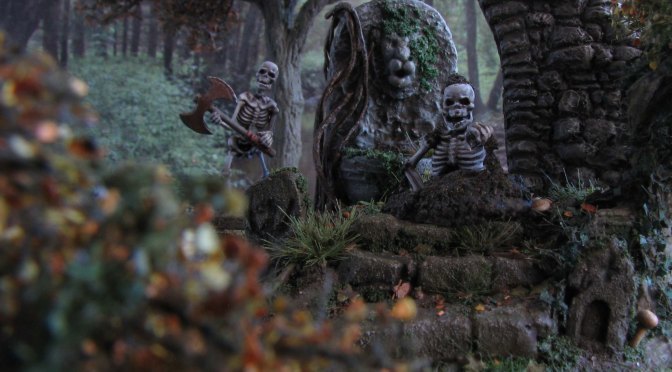
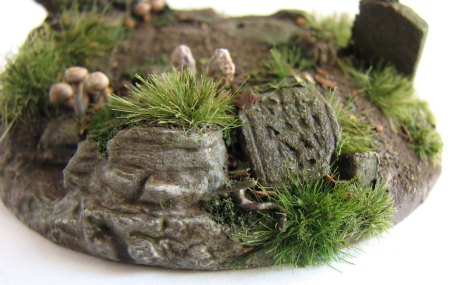
Part II will focus on an objective token using the same techniques, namely a long forgotten shrine with a tumbled over statue and we will also look at generic flagstone bases.
Finally part three will present the painted miniature. We will also add some further details, such as walls and bats.
Initial considerations
For starters we have to figure out what kind of graveyard we want to depict and what elements signify the eerie atmosphere we strive for. Throughout history gravestones or monuments for the dead were used by almost all cultures. Roman gravestones were placed outside the cities along roads, so that the passers-by would learn of the deeds of the deceased. In medieval times graveyards would often be placed outside the city or if they where within the city walls they where walled off and could often be found close to a church or chapel. In other cultures the idea of a gravestone or memorial slab is entirely foreign and other forms of commemoration of the dead are used.
Long story short, you have to decide which period of time you want your graveyard to be placed in or if it is a Fantasy project what period of time you would like to reference. The Victorian era provides ample examples for eerie monuments, richly decorated with skulls, skeletons and DEATH himself, while modern tastes are much more reserved. The style of inscriptions will differ, embellishments may be elaborate or simple and finally the age of a gravestone will also affect its condition.
Another thing to consider is, if you want to make your own gravestones or use some commercial headstones. This is up to you, depending on available time and budget. I went for the former, but check out Renedra’s injection plastic offerings and Dark Art’s resin pieces.


As I wanted to fashion a base for a Vampire Lord both medieval and later styles would fit well, depending on what kind of vampire one would like to depict. I decided to go back to the times of Vlad the Impaler (or Vlad Țepeș) who was a Wallachian prince that lived 1428/1431 – 1476/77. Contemporary and later sources describe him as a cruel and ruthless politician, some go so far to paint him as a sadistic monster that reveled in drinking the blood from his impaled enemies. It does not come as a surprise that Bram Stoker got inspired by this historical figure for his Count Dracula novel. A famous portrait of Vlad exists which is apparently based on an original made during his lifetime. An excellent source to base the conversion on.
I had this idea of a fictional family graveyard of the Drăculești, going even further back to the House of Basarab. This would allow to depict weathered gravestones that are a hundred years old, some tumbled over and overgrown, the walls of the graveyard in disrepair. I imagine the entire family to be cursed by the gods with vampirism based on Vlad’s cruelty. Embracing this curse, or ‘gift’ as he likes to refer to it, he may have chosen the graveyard as a resting place. He cares little for its condition and revels in the decay surrounding him.
Accordingly the graveyard should feature:
- Heavily weathered gravestones of various simple designs reminiscent of the period, avoiding a Victorian look.
- Inscriptions or symbols that refer to the family. I thought a dragon would be a fitting choice. While not being the actual arms of the House of Drăculești for this fantasy scenario it would be a pity to not use it.
- A graveyard wall or gate in disrepair, overgrown by ivy and moss. The actual family crest could be placed on the gate.

- Brush, moss, roots and other signs that nature is taking this place back.

Scene arrangement
Based on the miniature of your choice you will need to decide how to arrange the scene. This depends on the pose, so my suggestions will not always apply to your model, but I try to give some general ideas. Obviously this will influence all aspects of the base and I would recommend to create it while or before you paint the miniature. This way you can test fit and try out different scene arrangements before you get out the crafting materials and commit to a version. If you create the base as an afterthought it may well look disjointed.

In my case the miniature’s original sword was held at such an odd angle that its point was lower than the cast-on base. Instead of cutting off the arm and adjusting the weapon I kept the angle and decided to put the miniature on the edge of some stone steps. This works also very well with his raised knee and outstretched left arm.

Accordingly if your miniature has an odd pose or would really benefit from being put on an elevation do not hesitate to make the base conform to your miniature. If you need to alter your initial ideas for the scenic base this may be frustrating, but your miniature will fit much better in the scene and you will not run in the problem that the pose looks odd or the miniature looks unbalanced.
In the end I decided to replace his long sword with a Hungarian sabre or szabla, which I carved from a two-handed sword that was part of the Northstar plastic gnolls set using a scalpel. The historical Vlad Țepeș would most likely have used an european style sword, but his immortal counterpart may have adopted a saber when it became more acceptable among the nobility a hundred years after his “death”. Excuse me, you said something? Ascension? Ok, vampire Vlad, lets call it ascension then *rolls eyes*.

The size of the miniature will also dictate how much of a graveyard you can depict. In my case the elaborate cloak did ask for a large base (6 cm diameter), so did the integration of some steps. If you have only a small skeleton or ghoul to base just add the essence of the scene to the base. The obvious choice for a graveyard is a gravestone or memorial slab. Why not place the miniature on a tumbled over gravestone or perched on a monument? The size of the base should not limit your creativity, rather get inspired by the pose and size of the miniature and break the scene down to its most basic elements that really bring across an eerie feeling.
Finally some framing devises for your scene may be a good idea. This is especially true if it is a large creature base. Think of the base as a three-dimensional photograph. What is happening in the background, what in the foreground? Is there something on the left and/or right to frame your miniature? What kind of story do you want to tell with your piece?
I came up with the following scene arrangement:
- Foreground: Steps leading up to the entrance of the graveyard, flanked by gravestones and a rock face.
- Midground: Vlad framed by gravestones to the left and a small tree to the right. The small tree could feature a bat hanging from it, the gravestones to the left could feature bats flying past them.
- Background: Part of the ruined graveyard wall and a bat swarm flying through the ruined archway.
With such a scene arrangement we should achieve a visually pleasing composition that is framed to three sides, focusing the gaze on Vlad. The bats in the background are a nice theming element and work well with the outstretched arm and pointing finger: “Fly my pretties! Fly!”
Provisions for your crafting adventure
Tools needed:
- Sharp implements: A scalpel and a needle tool to carve rock faces and the stairs
- Paint brushes of various sizes to apply paint and wood glue, but also to drybrush.
- Wire brushes (steel and brass) to add texture to the rock faces.
- Sculpting tools to shape greenstuff and XPS. A ball tool and colour shaper is a good start.
- Some bunched up tin foil to add a rock texture to the XPS.
- Scissors.
- Hand-drill.
- Dremel to bevel the MDF base (optional). If you don’t have one some coarse and fine sanding paper will also do.
- An airbrush or sprayer bottle to apply a fixative (e. g. matte medium) to the finished piece.
- A palette knife to spread out wood filler.
Glues needed:
- Wood glue.
- Super glue. I use Insta Cure+ by Avetek.
- AK Interactive Sand and Gravel fixer (optional). Thinned acrylic medium with a bit of flow release will also do.
- Styrofoam glue. Be careful here to choose an appropriate product, as many glues react with styrofoam and dissolve it. I use Selleys Liquid Nails Fast.
For the groundwork, stairs, rock faces and gravestones:
- A circular or rectangular base. Really depends on your system of choice or your preference. I used some laser-cut 3mm MDF this time as I would build up the base and thus did not worry too much about thickness. Alternatively you can use 1mm polystyrene, cork or other materials. Just make sure they don’t warp.
- Shellac to seal the MDF and to prevent warping.
- Extruded polystyrene (XPS). That is the dense stuff for construction, not the crumbly stuff you use as packaging.
- Wood filler. Either ready-made or as powder. I use Bostik Fill-and-Fix. We will use this to add texture to the stairs and gravestones, but also to depict rock faces.
- Finely sieved soil from your garden or backyard. Can be any colour, but a darker brown-grey works well for a graveyard. Different pigments ranging from dark brown to light brown. Either bought or simply soil you collected so that we can add some variation to the dark soil.
- Small cork pieces to depict larger rocks.
- Craft paints (browns, grays, black) to paint the stairs.
- Vallejo Smoke to add contrast to the stone if necessary (optional).
- Matte varnish to mix with pigment and water to fashion a brown wash for the stone.
- AK Interactive Grime/Slime effect paint to depict light moss (optional).
Vegetation: Moss, ivy, small gnarly tree, mushrooms:
- MiniNatur grass tufts, ivy and autumn birch foliage nets (optional). I used a selection of autumn and summer grass tufts. You can use any tufts you have at hand and also clump foliage. The ivy can be depicted using birch seed pods, too ( a sweet tut by Zaboobadiboo hiding behind the link). Whatever floats your boat.
- Matte spray varnish to reduce the shine of the grass tufts and foliage. I use Testor’s Dull Coat.
- Brown acrylic spray paint to slightly darken the tufts or alternatively a brown wash to dull the shine of the tufts and grass.
- Thin wire to make an armature for the tree.
- Brown-grey craft paint to paint the tree.
- AK Interactive Grime/Slime effect paint to depict light moss on the bark (optional).
- Acrylic caulking as a first layer followed by wood filler to depict the bark.
- Fine turf e .g. Woodland Scenics range of fine turf in dark green or any other fine turf. This is basically very finely ground colored foam. We will use this to depict moss.
- Dark or medium green, yellow and beige acrylic paint and Vallejo Umber wash. We will use this to add depth to the moss.
- Dried basil to depict fallen leaves.
- Assortment of dry tea to depict roots and leaves.
- Some singular leaves from the MiniNatur foliage nets (optional).
Critters (optional):
- Small snake. The Busch Kleintierset is your friend.
- Lizard. Same here.
- Bats. Reaper has a bat swarm as well as a single bat in one of its familiar sets. The quality of the Bones versions is bad to average, so go for metal if you can. If it is for background effects only consider the Bones version, as it is half the price.
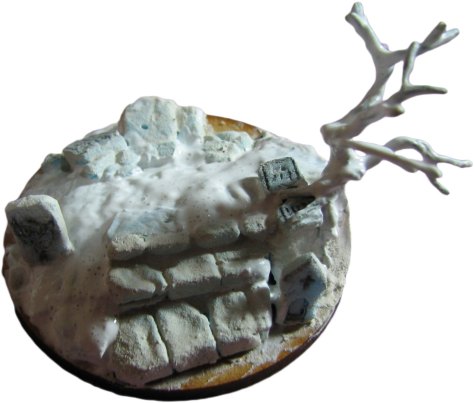
Let’s get down to the nitty-gritty!
- Cut the MDF to size or if you use laser-cut shapes make sure the piece of MDF you are using is not warped. Bevel the edges of the MDF if you desire. I did this only later to make it easier to integrate the rock faces, however, without a Dremel this is very hard to do, so you are better off doing this in the beginning, if you only have sanding paper.
- Apply a protective coat of Shellac. This will seal the MDF and prevent warping. I always use this when working with MDF and so far I had no problem with warping caused by moisture. Still look out for warping caused by mechanical stress, especially if you want to make a bigger base or gaming board.
- Take a small piece of XPS and rough out the shape of the stairs and rock faces. Don’t overthink this step. Just combine whatever XPS you have lying around until you achieve a pleasing result. You can temporarily fixate the foam with toothpicks and cut it to shape. If you want to add a tree and make it an integral part of the base you can already twist an armature and glue it to the base. Alternatively you can also magnetize the tree, so that you can remove and exchange it (see my hill tutorial to get an idea how to magnetize the base).
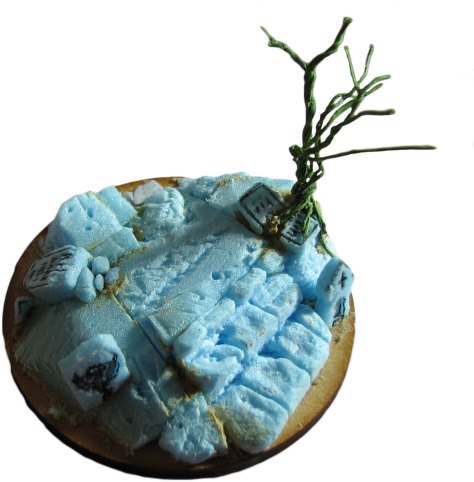
The foam does not need to be perfectly smooth in places that will be covered up later. The stairs and gravestones need more attention, as they will only be covered with a thin layer of wood filler. - When you are happy use some styrofoam glue to fixate the XPS.
- While this is drying cut some gravestone shapes out of the XPS using a sharp scalpel.
- Use a needle tool or fine pen to inscribe weathered adornments, inscriptions or symbols. The results will be better if you score the shape first with the scalpel and only then widen it with the needle tool. This will prevent the XPS to develop fine fissures.

On one headstone I tried my hand at a dragon design. - Keep in mind that any designs inscribed in the XPS will not be very sharp. This is perfect to depict weathered stone, but if you want the gravestones to be newer I would recommend to make them out of greenstuff or to add a layer of greenstuff to the XPS and inscribe letters or symbols with a lubricated needle tool.
One of the gravestones is split down the middle by the tree roots. This is easier to depict when the tree is not removable. 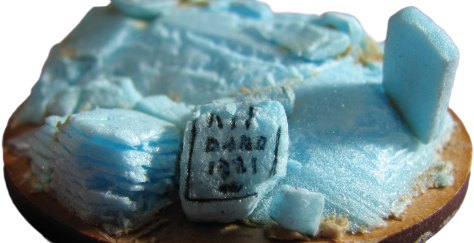
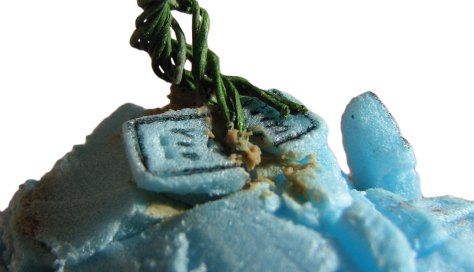
You can also lightly texture any surfaces that will depict rock faces. - Now it is time to coat the headstones, stairs and rock faces with some thinned down wood filler to add a stone texture. You can also use the bunched up tin foil and roll it over the XPS to add even more texture. The rock faces need a thicker mix, as you will carve them further.

The wood filler adds a nice texture to both the rock face and the headstone, but as you can see the letters blur. - Now cover any remaining surfaces and the tree armature with some thinned down acrylic caulking.
- After this is all dry we focus on the rock faces. The dry wood filler can be carved using a needle tool and textured using wire brushes. This will produce a more naturalistic rock texture.

This is how the filler looks after it has been applied. You may need to add more in some places, depending what kind of rock you want to depict 
After some carving and adding more wood filler the texture looks much more realistic. I also painted some of the rock surfaces to see the detail better. - While you have some wood filler ready cover the tree trunk and carve a bark texture into the dry filler. For inspiration check out this tutorial on all kinds of trees.
- Onwards to painting all the stone surfaces. I use some brown-grey as a basecoat, drybrush with succeeding amounts of beige mixed in the base color and finish off with a mixture of brown pigment, matte varnish and water (a sprinkle of pigment to 1 part varnish, 2 parts water). You can drybrush a last time if you feel it is all too dark now, but that is up to you.
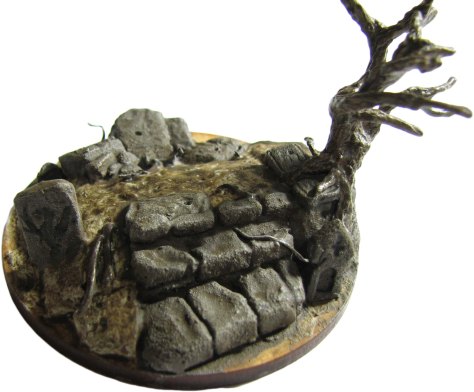
If you feel that the details on the headstones or the gaps between stones need some more contrast after you finished you can use Vallejo Smoke to darken these areas. - If you did not already do so, bevel the edge of the MDF, shellac it and cover with acrylic caulking. I already extended the rock faces over the rim of the base, so I won’t need to add anything or paint them again. This is optional and you can do it first if you feel you could destroy some of the detail while sanding.

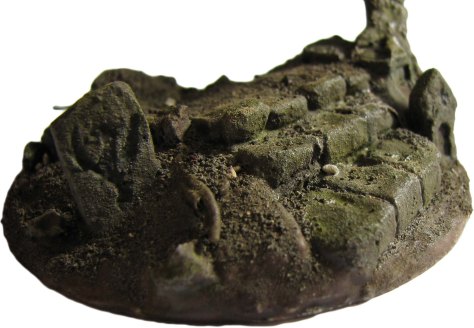
I also added some cork pieces to depict single rocks at this stage. - Now it is time to paint the ground brown to prepare it for the next step and paint any remaining rocks. You can also start painting the bark. A brown-grey with some beige highlights works well for a generic tree. You can also use some AK Interactive Grime/Slime effect paint to add a light moss effect. Apply it to the stairs or the tree with a brush and thin it on the model with some odorless thinner.
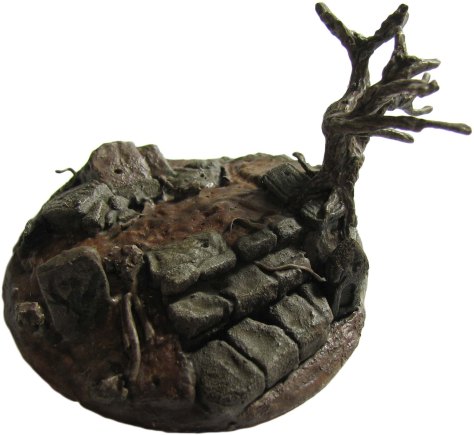
- The main reason to paint the ground is to avoid white sections showing through the soil, which we will apply to the piece now. Apply wood glue to the areas that will show soil, then dust on fine soil from your garden. You read right, nothing beats soil to depict soil! Let dry and carefully remove any excess.
- Using either Ak Gravel and Sand Fixer or some matte medium (about 10 parts water, 1 part medium and a drop of flow release) to fixate any remaining loose soil. You can also add some lighter shades of soil and coarser sand to add variation.
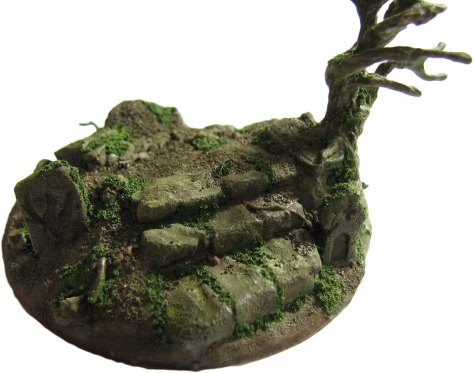
You can see a light green tint to the stone steps, depicting light moss growth - Now you can apply some more moss growth using a “moss paste”. This is entirely optional, depending what kind of moss you want to depict. Mix fine turf, green acrylic paint, wood glue and water to a paste. It needs to be sticky enough to adhere to the stone, but also easy to spread. Don’t worry if the paste looks bright green, it will darken quite a bit when the wood glue tries. With a toothpick (a brush is not very suitable for this kind of work) take some of the paste and apply wherever you would like to add some moss. Now spread the paste with the toothpick and press it down.
- After the paste is dry add a brown wash and drybrush with yellow to highlight it.
- Finally we get to add some tufts, foliage and fallen leaves! This is always the exciting part, as everything comes together. Place tufts to your heart’s content using super glue and fixate single leaves, made of dry basil, tea or from MiniNatur nets with thinned down wood glue. Add foliage to the tree and fixate with super glue. I went for autumn birch tree nets by MiniNatur, but you can use fine turf or clump foliage. In these cases use some filter wool as a substructure.
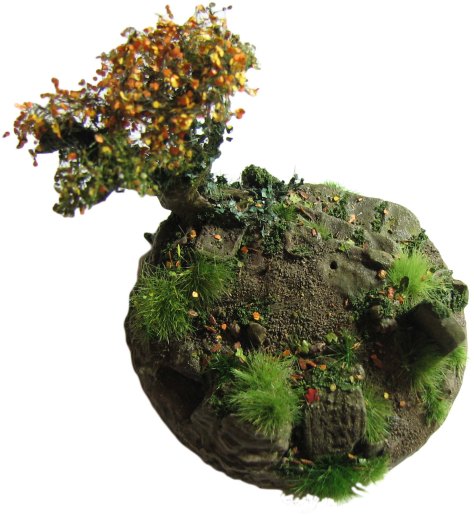
Getting there. Still a bit too vibrant for my tastes. 
- To finish the piece we apply either by hand brush or with an airbrush some brown wash to fuse it all together and to tone down the lustre of the tufts. This is followed by a fine misting with thinned down acrylic medium (10 parts water, 1 part medium, one drop flow release).
- But wait there is more! Shrooms! Fashion some mushrooms out of greenstuff and wire. Put the wire stem in some left over XPS, add a mushroom head with greenstuff, let cure and then coat the whole thing with acrylic medium. I got some good results covering the stem with liquid greenstuff, but the medium will do fine. To be honest, so far that is the best use I found for the liquid greenstuff.
- Paint the mushrooms up and drill some holes in the base to secure them. Glue them in the holes with super glue.

I tried to depict some Morchella and some Honey Fungi. 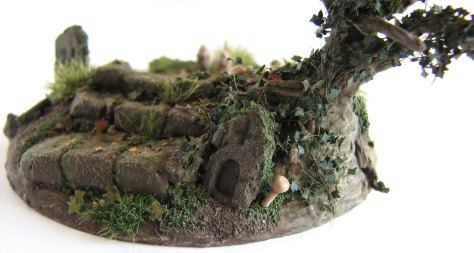
I also added a small snake to the base. It is supposed to be a blotched snake Elaphe sauromates, that is endemic in Romania. 
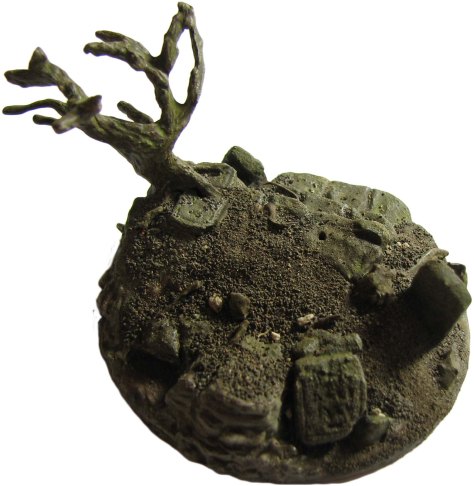
The almost finished base. The hole in the middle is naturally to attach Vlad.


There we go! We have a nice graveyard themed base that needs only a few additions and it will fit Vampire Vlad quite well:
- As you can see the gap on the base will fit the graveyard wall. I think I will use a magnet to attach it to simplify transport.
- I also need to add the bat swarm to the background and another gravestone to the front left. This one was the bottom part of the bat swarm. I cut the Bones version in two pieces to be able to mount the swarm on some clear acrylic rod. Given the gravestone had a skull with batwings on it…*cough* I decided to add some new design with greenstuff. I had a flying dragon in mind to mirror the headstone behind it.
- I also want to add another hanging bat to the lower branch of the tree. This will most likely be the bat from the Reaper familiar set.
- A nice touch could be a tumbled over statuette that was originally placed in the little alcove of the gravestone on the front right. I’ll see what my greenstuff skills can produce.
Until next time and always wield your brush with honor!

If you would like a constantly updated, themed PDF terrain building, painting and roleplaying guide consider supporting me on Patreon. There also other choice rewards for supporters.
![]()
If you are not keen on Patreon, but enjoy my content and would like to see me well caffeinated so that I can publish tutorials, reviews and guides more frequently click below and buy me cup of dark, mellow goodness.
![]()

Beautiful work! Nothing looks more like dirt than, well, dirt. Your ground looks fantastic, and the moss paste is a great idea, that I’ll be stealing forthwith.
LikeLiked by 3 people
Thank you arkie, much appreciated. In the past I used the traditional PVA and sand and painted it afterwards. It never looked quite right. I guess you can’t get the same subtle differences in texture and hue with painted stuff. Please go ahead and use the moss paste idea. For an even more subtle texture I sometimes use super fine foam “dust”. If you have an old blender to make clump foliage sharpen the blades and “overblend” the foam. The fine dust that will result just has enough texture to stand out on a piece.
LikeLike
Gawd, that is insane talent! Very inspirational. I especially like the tree, but fixating every single leaf would push a man over the edge I fear! Amazing.
LikeLiked by 3 people
Thank you crittersmasher! To be fair, I mainly sprinkled the leaves on and fixated them. I placed two or three by hand for effect, but placing all of them by hand would be insane.
LikeLiked by 1 person
Impressive, and the post was a bit of a tour de force. 🙂
LikeLike
Thank you for your comment Ann.Glad you liked the post.
LikeLiked by 1 person
Fatastic work! Really like those mushrooms!
LikeLike
Hi Brian. I love mushrooms, both on the dinner table and in my models. They add interest and are really evocative, if you want to depict an overgrown area with decaying wood logs etc. I think the morchella could be a bit better. I used woodfiller to depict the lamella, but greenstuff would have worked better. Next time, next time…
LikeLike
Absolutely splendid!
LikeLike
Thank you for your comment Somet, glad you enjoyed the read!
LikeLike
Beautiful work as always with your terrain and detailed articles. The final image looks like a photograph of an actual real-world location somewhere rather than a diorama. Certainly the lighting adds to it, but good lighting can’t make something that doesn’t look especially realistic appear so.
While I’m almost never willing to go to the lengths that you do for things like trees or the level of fine detail in your scenery (DIY mushrooms!) due to the “triage” nature of my wanting to get as much painted and finished in my collection as possible, your work is always in the back of my mind inspiring me to push a little harder and further to make simple work look more realistic. Those Conan barrels being a perfect case in point.
LikeLiked by 1 person
Thank you Azazel for your thoughtful response. Much appreciated.
It is indeed the lighting and perspective that adds a lot of realism to the pieces, but then it is still only daylight, in my opinion the best to show off the real colours.
I am not too big a fan of light boxes for scenic shots. They wipe out all shadows and while we have to add contrast on that scale, a painted miniature in a scale environment still benefits from some shadows and reflections.
To show off a paintjob only a light box is still good, as it focuses the gaze on the actual paint application.
The DIY mushrooms are funnily enough the part that was least time involving. A bunch of say 20 mushrooms takes about an hour to sculpt and paint (curing time not included). It is mostly a Bleached Bone or Flat Brown with a wash and some subtle highlights.
I am glad that the tutorials, despite the implied time involvement, are still useful to you. Obviously nothing stops you to pick and choose. Adding a bit of moss here and there or a lizard etc. already makes a base more interesting and one does not need to go all the way, all the time.
LikeLiked by 1 person
Your tutorials have been intriguing and informative. It’s even more of a treat and practical exercise to watch you, “putting it all together”. Thanks for the inspiration and instruction.
LikeLiked by 1 person
Ahoi horrid74. Pleased to read the tutorials are of use to you. Any comparable projects you are working on at the moment?
LikeLiked by 1 person
Simply superb as always!
Cheers Roger.
LikeLiked by 1 person
Thank you Roger! Much obliged.
LikeLike
Hi me again, you must be sick of me by now ha ha. I am unclear of something in step 13, are you dry brushing on the pigment, varnish and water mixture? or just brushing it on. I am sort of thinking it is either that or like a wash to sort of unify colours a bit. cheers
LikeLike
No worries, the whole point of the blog is to give advise and to help people.
It is indeed more of a wash. I use AK Pigments (Dark Earth), water and Golden Acrylic matte varnish. Just mix it to a consistency of a wash and apply.
At first it looks like you applied too much and it is all glossy, but it dries to a nice matte finish with subtle texture and hues of brown to it. I indeed use it to unify colours. If you look at the before and after picture it should be more clear how it makes the drybrushed rock look more naturalistic. It adds brown, tones down any gloss and unifies. This way you won’t have stark highlights or very grey rock, which can destroy the illusion.
LikeLiked by 1 person
ive got a bunch of vallejo pigments, ill see if i can match to the ak pigments. never used pigments before this may be interesting lol. i can always get the isopropanol out and strip it all back and start again.
cheers
LikeLike
i went for natural umber, just applied it now and as you say it is very glossy but its becoming more matte by the minute, guessing when all the water has evaporated is when it will really look the ticket unless ive done it wrong.
LikeLike
Well I learned how not to do it ha ha, it went ok on one part in fact on all 3 of the smaller things. Areas where it did not go right I can hide with bits of terrain and leaves and moss paste and such. Did you end up sculpting something to modify one of the hirst arts lion statue things?
LikeLike
Sounds good so far. I liberally coated the Hirst Arts stuff with woodfiller to add texture and hide seams. Other than that I only added roots, moss and dirt (pigment).
LikeLiked by 1 person
i am trying again with one part going to use airbrush thinner instead of water though. Also I remembered wrong it was not the lion statue you were going to greenstuff up it was the little arch thing next to the steps with the cross at the top, would love to see what you did with that if you have got chance yet, also I have been looking at cameras to start documenting things as I do them. I can maybe do some how to not do it tutorials lol
LikeLike
The small gravestone with cross is finished. I will add a little statuette to the alcove. On the left another gravestone with a flying dragon will be placed. The dragon I need to sculpt. The post will be updated when I did this (or I feature it in another post).
LikeLike
Hey there
I have got to the part where i am doing washes on my moss, finding some of the moss comes loose. Guessing the wood glue is not waterproof, not sure it is supposed to be, Obviously the dry brushing will use more force so I am concerned it is just going to flick off the moss. Did you seal your moss before washing or dry brushing?
Cheers
LikeLike
Ahoi. I actually did not seal it. I use wood glue that is used by carpenters, not the school variety which I read is sometimes water soluble. I would make a mix of water and matte medium and apply some drops. That will harden it and glue it in place. Then you can drybrush.
LikeLike
Hmm, I am a bit disappointed by this glue then, I got it from a hardware store and it was not the cheapest. I was thinking about using AK sand and gravel fixer, I think I will use my Golden’s matt gel rather than the Winsor and Newton, as that seems a tiny bit shiny, it is more student grade I think. Thanks
LikeLike
I think PVA is to some extend water soluble, but I never encountered this problem with just a wash applied. The acrylic paint in the moss paste also adds some strength. I would think the fixer should work, but I didn’t use it with turf so far. Matte gel should be your best bet. Thin it well and apply it sparingly, lustre should not pose a problem then.
LikeLike
It does seem to become stronger once it has all dried out again though, I left it for a while to dry then had a test to see if it all flung off but it has survived so far. The problem might have been that I wet the moss with water so the wash would sink in better. I also got my mininatur order today, it had been sat in the warehouse but they sent it the other day at turbo speed. Plus there was a bag full of bonus stuff as an apology I guess, it is all loose out of packet and not all labelled, I think some maybe rejects but they are free so I wont complain.
LikeLike
Always good to get some extra stuff. If they are indeed seconds I’d use them for conversions.
LikeLike
I think mostly its just been manhandled. Ranges from perfect to folded over and leaves missing. Parts that didn’t quite make up a full packet. It’s all useable though, especially the grass tufts which will be the first to get used.
LikeLike
Oh, sorry, I thought you talk about the Reaper Bones stuff. I got some extra stuff, too. Seems they do this now once in a while. I, too, got nice selection of products and it does actually make it easier to decide if some of their nets are suitable for a specific effect.
LikeLike
Oh haha, I thought you just meant that you would naturify miniatures with them. On the subject of reaper though, I am going to incorporate one of the minis I got from them into my current scene, but I am going to make it a surprise what I am cooking up 😉
LikeLike
I intend to do this, too. I have this Reaper Spirit of the Forest miniature that will benefit from some foliage nets added.
Looking forward to your creation!
LikeLike
I really like the spirit of the forest guy, considering whether or nor to buy one. I have seen people do nurgle with foliage and mushrooms and things on them, but I just bought http://elementgames.co.uk/games-workshop/warhammer-fantasy/daemons-of-chaos/nurgle-rotbringers-putrid-blightkings plus loads of paints. I do not like the games workshop paint-pots though, they are a lot harder to mix as getting quantities right is tricky.
LikeLike
You could consider getting some empty dropper bottles and put the GW paints in those. I had a number of paints dry on me, so I only use their washes, as I get through them quicker.
LikeLike
Yes I have a few of those, just committing the time to actually do it is the trick, I do not have enough to do them all yet so I will stick to the open ones. I ended up getting the forest spirit. Were you planning to do a how to paint it or how you have converted it type tutorial by any chance?
LikeLike
Time is unfortunately always the limiting factor. I indeed plan on doing a guide on converting and painting the spirit on the blog, especially given the theme fits well with the Patreon guide and would lend itself to some cool scenic pictures. Maybe in a month time if everything works out as intended.
LikeLike
I guess you could just take pictures as you go along, then if you decide later if you want to do a tutorial or get the time to later. You can always go back to it, that’s if you can remember all the paints you used and other materials. Perhaps you could have different sorts of tutorials some proper in depth and others more shallow for want of a better word. Not sure how hard it would be to edit in scenic backdrops after the fact, as those are a bit more time consuming than the photos i do, in which you see all the glue and tools and messy cutting mat haha.
LikeLike
I made it a habit to take WIP pictures with a neutral backdrop. Anything else is a nightmare to cut out. I think I’ll show WIP pictures on Twitter in my feed with detailed instructions to follow on the blog. That allows more updates and synergies.
LikeLike
So just like a sheet of foam board or coloured paper or something? then save the actual scenic backdrop thing for full on finished things?
LikeLike
Indeed. I would recommend something matte to reduce shine and a neutral colour or something that can be easily cut away like green or blue.(depends o the miniature). I only do the scenic stuff with finished pieces given it takes a significant amount of time to get the right shot done and edit the photo if necessary.
LikeLike
Yes hopefully it won’t be long until I am doing scenic photos myself, I am going to be doing one using LEDs so it will need to be dark to really show them off so it probably won’t be easy.
LikeLike
It mostly depends on the camera you use and the possible exposure settings. 20 sec was on the short side with two led light sources. So maybe go for more exposure time or add another light source.
LikeLike
I guess the idea is to keep the ISO under the point where it goes grainy, I went for a quite substantial camera at least for my budget, Nikon 3300D.
LikeLike
Indeed. I always use the lowest ISO setting.
LikeLike
Ive only taken pictures where the camera does all the work so far. I got my spirit of the forest mini in the post the other day, he is bigger than i thought i knew he was going to be bigger than all the others but not by this much. He was going to be the first i painted, but this space marine has taken that title, I messed up on the shape though so i have to touch it up. I have done a dead tree stump for my scenery I painted it all up but it is shiney. I matt varnished it but it didnt take the shine off enough, so i tried heavily watered matt medium which made it even shinier So I am not sure what to do with that.
LikeLike
It is possible that the surface is porous. This can lead to matte varnish being slightly glossy, as the matting agent does not settle where it should. Also try to apply very thin coats of matte varnish. The gloss protects, the top layer is decorative.
The brand of varnish is also important. You could dry applying a gloss varnish first and then some matte varnish. Testors Dullcoat and Army Painter Anti Shine are both known to reduce luster significantly. I had good experiences with both.
AK Interactive also has a Super Matte Varnish. It is indeed very dull, but only thin layers work in my climate, anything else tends to fog up.
LikeLike
I wonder if vallejo matt varnish behave differently because of it being citadel paints for a change, or if it reacted with the sculptors vasoline as I did not wash that off before base coating. Anyway I gave it another thinned coat of varnish and another dry brush to lighten it again, it dulled it a little but I ordered some army painter antishine to finish it off. It is the cheaper option of the two but that is not always a bad thing. cheers
LikeLike
Sounds good, I hope it turns out as intended!
LikeLike
Absolutely inspiring! I love the amount of research you put into these. Also a big fan of the efficient use of a small space. I enjoy seeing compact vignettes/dioramas that really pack in a lot of detail. And this is absolutely killing it in that regard.
Definitely will be watching everything you have to show off. I could certainly use the knowledge/inspiration 🙂
LikeLiked by 1 person
Thank you for your comment Souls in Miniature. I am pleased to read that the vignette is to your liking.
I think for character miniatures such as Vlad or a Necromancer a mini diorama is a good match. Naturally the techniques can also be used for more restrained troop bases or even on a much larger scale. I agree with you, that not matter if big or small, it is all in the details.
LikeLike