

Many ancients rule sets require players to depict a field camp as part of their army. This is no different for Field of Glory or compatible systems (that is base size wise) like the DBX series.
Field camps are a wonderful occasion to be creative and add a vignette style element to one’s army. While many gamers go for a free interpretation of a camp element, for instance having a ruined temple, villa rustica and so on, I decided to go down the more conventional route and actually built part of a field camp with tents and small scenes of camp life.
This tutorial and the techniques covered are not only useful for a camp scene, but can be easily adapted for any of your projects.
Part one of this tutorial will feature historical considerations, cover the basic layout of the camp element and step-by-step instructions up to the point were only details and miniatures have to be added. Part II will then move on to converting the miniatures and placing all the details and bits and bobs.
Historical considerations
While we know a great deal about the layout of Roman military camps during or shortly after the Second Punic War, thanks to Polybios’ famous description (Plb. 6.26-32), there is not that much information handed down to us about Carthaginian field camps.
So what do we know? First I must thank the users of the Tiny Soldiers Forum, especially Leosthenes and Ariovist, for their comments, suggestions and knowledgeable advise.
Looking at one of the many theatres of the Second Punic War it is in the descriptions of the campaigns carried out in Spain that we learn quite a number of facts about Carthaginian camps.
Appian, a roman historian writing in the 2nd century CE, reports of an incident in 207 BCE during Scipio’s campaign in Spain, in particular the lead-up to the battle of Carmone:
Hasdrubal [Son of Gisco and one of the remaining generals in Spain, both named Hasdrubal] ordered all the remaining Carthaginian forces in Spain to be collected at the city of Carmone to fight Scipio with their united strength. Hither came a great number of Spaniards under the lead of Mago, and of Numidians under Masinissa. Hasdrubal had the infantry in a fortified camp, Masinissa and Mago, who commanded the cavalry, bivouacking in front of it (App. Hisp. 5.25).
Appian uses here the term ὑπὸ χάρακι in the Greek original, that means “under pointed stake” and is translated as “fortified camp”. This does suggest the use of stakes, but could be just a figure of speech. We also learn that the cavalry, rather then staying in the camp, bivouackes in front of it.
In his “Punic Wars” Appian describes the elements of a Carthaginian field camp in more detail on the occasion of a roman night attack on a certain Hasdrubal’s field camp, resulting in a total defeat:
At the third watch the trumpet sounded lightly and the army moved, observing the most profound silence until the cavalry had completely surrounded the enemy and the infantry had arrived at the trenches. Then, with shouts mingled with the discordant blast of trumpets and horns for the purpose of striking terror into the enemy, they swept the guards away from the outposts, filled up the ditch, and tore down the palisades. The boldest, pushing forward, set some of the huts on fire. The Africans, starting in consternation out of sleep, fumbled around for their arms and tried confusedly to get into order of battle, but on account of the noise could not hear the orders of their officers, nor did their general himself know exactly what was happening. The Romans caught them, as they were starting up and trying to arm themselves, with confusion on every hand. They fired more huts and slew those whom they met (App. Pun. 4.21)
Again, in the Greek original we have “τάφρον” which translates to “trenches”, “σταυρώματα” that is “palisades”and finally “σκηνη” meaning “tents”. The translation uses “huts” here, which are possible for a permanent field camp, but “tents” might be more likely here.
Livius also reports of an attack on a Carthaginian camp during the prelude to the battle of Illipa in Iberia that features a rampart or earthworks:
Not far from the earthwork were the Romans; and by such momentum they would have captured the camp if, after a blazing sun, such as shines out in the midst of clouds heavy with rain, there had not been so extraordinary a downpour that the victors with difficulty retired to their camp, and had not some been beset by scruples also against any further attempt that day. The Carthaginians, although night and pouring rain invited them to needed rest, being weak from exertion and wounds, nevertheless, because fear and danger gave them no time to be idle when the enemy would attack the camp at daybreak, raised their earthwork by gathering stones from near-by valleys all round, intending to defend themselves by a fortification, since in their arms they would have no sufficient protection (Liv. 28.15.12-14).
Livius uses here “vallum” which can be translated as “a line of palisades”, “palisaded rampart”, “intrenchment” or “circumvallation”. As the Carthaginians add stones to the ramparts to fortify them the translation with “earthworks” might be more fitting than palisades.
While describing the aftermath of the battle of Ilipa Livius also indicates that there were irregular camps (castra tumultuaria), when time was short:
The Carthaginians hastily fortified an improvised camp on a very high hill and from it they defended themselves without difficulty, since the enemy had tried in vain to come up the steep slope (Liv. 28.16.7-8)
Here the remains of the Carthaginian army, after their crushing defeat, are followed closely by the Romans, resulting in the hastily made camp.
We can thus conclude that Carthaginian field camps were in most cases fortified by means of a ditch, stakes, palisades or ramparts and featured tents for the soldiers, but could also be of irregular character, potentially resulting in a less structured layout or a lack of fortifications.
We have also some evidence for separate field camps for different allies of Carthage when on campaign. One year before the battle of Illipa, Scipio sends Marcus Silanus to attack Mago, a Carthaginian general operating in Spain. Mago was able to recruit a large number of Celtiberians, but decided to let them camp separately, due to their lack of training:
From the same informants it was learned, when they were about ten miles from the enemy, that there were two camps, one on each side of the road along which they were moving; that, on the left lay the Celtiberians, a new army, over nine thousand men, on the right the Carthaginian camp; [8] that this was strongly defended by outposts, sentries and all the protection usual in the field, while the other camp was lax and carelessly guarded, as belonging to barbarians who were raw recruits and less afraid because they were in their own country (Liv. 28.1.7-8)
However, this must not have been always the rule, as there are numerous examples for Hannibal having only one camp, despite his polyglot army (cf. Plb. 3.107; Plb. 3.72).
In terms of the actual layout we can only make an educated guess. I assumed a layout that would be in general similar to a roman field camp of the time. Some order and structure is necessary to allow the camp to be made and to be broken in a timely manner. In addition decades of exposure to Roman camps would suggest the adaption of such an efficient system, if it was not already in place.
Using Polybios’ description of the layout of an ideal Roman camp and a Dobson’s excellent study of Roman field camps at Numantia and in Spain I decided on the dimensions of the tents, each fitting six men, while two are on duty. I allotted again the same space for equipment and armaments in front of the tents. Gary Brueggeman’s website on the Roman army camp is very helpful to visualise the dimensions given by ancient sources and provides a lot of inspiration.
Concerning the materials used for the tents one can again only guess. Wood for the frame seems very likely. The cover of roman tents of the imperial era were seemingly made of oiled leather, but that does not imply that this is true for the tents used hundreds of years earlier or for Carthaginian tents. Because of this I went for linen as a reasonable material. Treated with wax or some other water-repellent material I could see this being a sensible solution to protect one from the elements. According to Plinius (Plin. Nat. 18.3) and Caesar (Caes. Gal. 8.15) straw for the floor seems likely, as we have them talking about the use of straw as bedding and it being plentiful in Celtic field camps.
What you need
A piece of 2mm styrene sheet as a base for the camp.
For the tents:
- Tissue paper to depict the tent covers.
- Wood glue
- Thin wire to depict the tent frames.
- Copper wire to depict the guy ropes.
- Loose sisal rope to depict straw.
- Acrylic gel mat to cover the wire and increase adhesion of the wood filler.
- Wood filler to cover the wire and give it a “wood” texture.
- Brown and beige acrylic paint to paint the frames and the covers, a brown wash (e. g. Vallejo Umbra Wash) to weather the “wood”.
- Different shades of brown powdered pigments or pastels to weather the covers.
- Pigment fixer.
For the groundwork and undergrowth:
- Various kinds of tufts and static grass.
- A brown wash to tone down the shine of the tufts.
- Smaller and bigger stones.
- Fine sand or soil.
- Gravel and Sand Fixer (optional).
For the lean-to:
- Thin wire for the frame.
- Sisal rope to depict straw.
- Acrylic gel mat to cover the wire.
- Wood filler to give the wire a wood texture.
- Brown acrylic paint and brown wash (e. g. Vallejo Umbra Wash) to paint and weather the frame.
- Super glue.
- Seamoss to depict fine branches.
- Dried basil and a selection of autumn colours to depict fallen leaves that will form the cover for the lean-to.
For the covered shields:
- Three shields.
- Greenstuff to depict the tarp.
- Small stones to depict weights to hold the tarp down.
- Beige acrylic paint to paint the tarp.
- Pigment powder for weathering effects.
For detailing:
- A variety of amphorae, baskets, vessels etc. to add interest. You can use the superb 15mm Baudea set of ancient supplies or sculpt these items yourself.
- Shields of various kinds.
- A selection of miniatures, depending on what scenes you would like to depict.
- Some animals from the Busch Kleintierset (optional).
- Tissue or greenstuff to depict a blanket.
- Two very small pieces of metal to depict the dice. You can cut those from flash.
- Miniature food items. Either get casts in metal or resin or try your hand at Fimo miniature food.
Coming up with a prototype
Given this was the first time I attempted to make some tents and wanted to try out some new techniques, I decided to first create a prototype. After all the miniatures for the scenes would need to be slightly converted and I did prefer to do this work only once.
Using some spare Corvus Belli miniatures, cardboard, blue-tack and a handful of details I put together a rough version of the camp element:

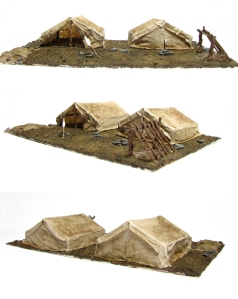
The Idea:
As you can see the idea was to make a double sized camp so that I could add the camp road and a beast of burden. During play the section with the oxen can be easily removed. It is even possible to add more elements to give the impression of an actual camp, not only a very small section of one.
The Scenes:
I thought of three scenes for the main module: An Iberian Scutari, Bagarok, and a Numidian, Micipsa, are playing a dice game. A veteran spearmen would start his guard duty and finally a Gaul would paint a shield design on one of the scuta (not pictured). It would also be nice to have a soldier crawling in one of the tents, after his guard duty is over. The left tent will be open and one can look inside, maybe with a sleeping soldier wrapped in his cloak.
I might add a slave who cares for the oxen, and a woman coming down the road at a later point, when I tackle the second module of the camp. This will also be the time to add fortifications.
To add some interest Baueda amphorae, a spit roasted fish, a little singing bird (both from the Busch Kleintierset) and various shields were added.
It begins…
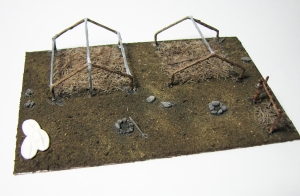
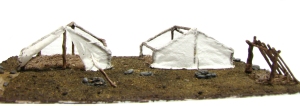
After this rough plan was all set out I started to experiment with wire, tissue paper and the usual scenery products and got this:

As you can see in this early attempt the tent fabric did not look quite right. I used two layers of tissue soaked in PVA, cut to size, and had as an end result a number of unrealistic folds in it.
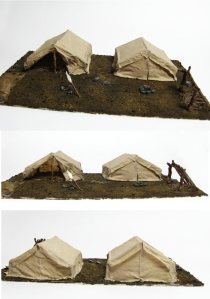
I tried again with only one layer of tissue and lo and behold it produced a much more convincing look of stretched fabric:

I did also experiment with pigments to weather the fabric and to depict ash and soil. Naturally the dice players would need something to play and lie on, so I also added a bit more tissue. A first attempt at covering one of the shields with a leather tarp was promising, but needed more volume.
The guy rope and nails were way out of scale, so I decided to not use thin thread, but rather very thin strands of copper wire.
I also decided to add a lean-to on the other side for some more variation, but assuming this would be fiddly I wanted to wait till I put the actual model together.
I learned some lessons during this process and would always recommend to make a prototype first if you have the time, as it will eventually save you exactly that.
The camp takes shape
The Base:
- Cut the styrene sheet to size, making sure that all corners are straight, so that you can easily add more camp modules.
- Apply PVA glue to the styrene sheet and sprinkle the fine sand or soil on it. Add some coarser sand and small pebbles for variation. Let dry.
- After the soil is fully dry, apply either watered down PVA or Gravel and Sand Fixer to fix any remaining loose sand.
The Tent Frame:
- Cut the wire for the frames to size and shape it until you are happy. I used seven pieces per tent: Two for the front and back, three horizontal connector pieces and two vertical support poles. Fix them in place with super glue and make sure they are attached on the inside to avoid unsightly protrusions.
- Drill holes in the base where you want your tents and glue the wire frames in place
- Cut the sisal rope into fine strands and sprinkle on the floor of the tents. Apply a heavy layer of watered down PVA. Let dry. Weather the straw with brown wash.
- Apply acrylic gel mat to the frame. Let dry.
- Apply woodfiller with a bit of PVA and brown paint mixed in to the frame.
- Apply a brown wash to the frame.
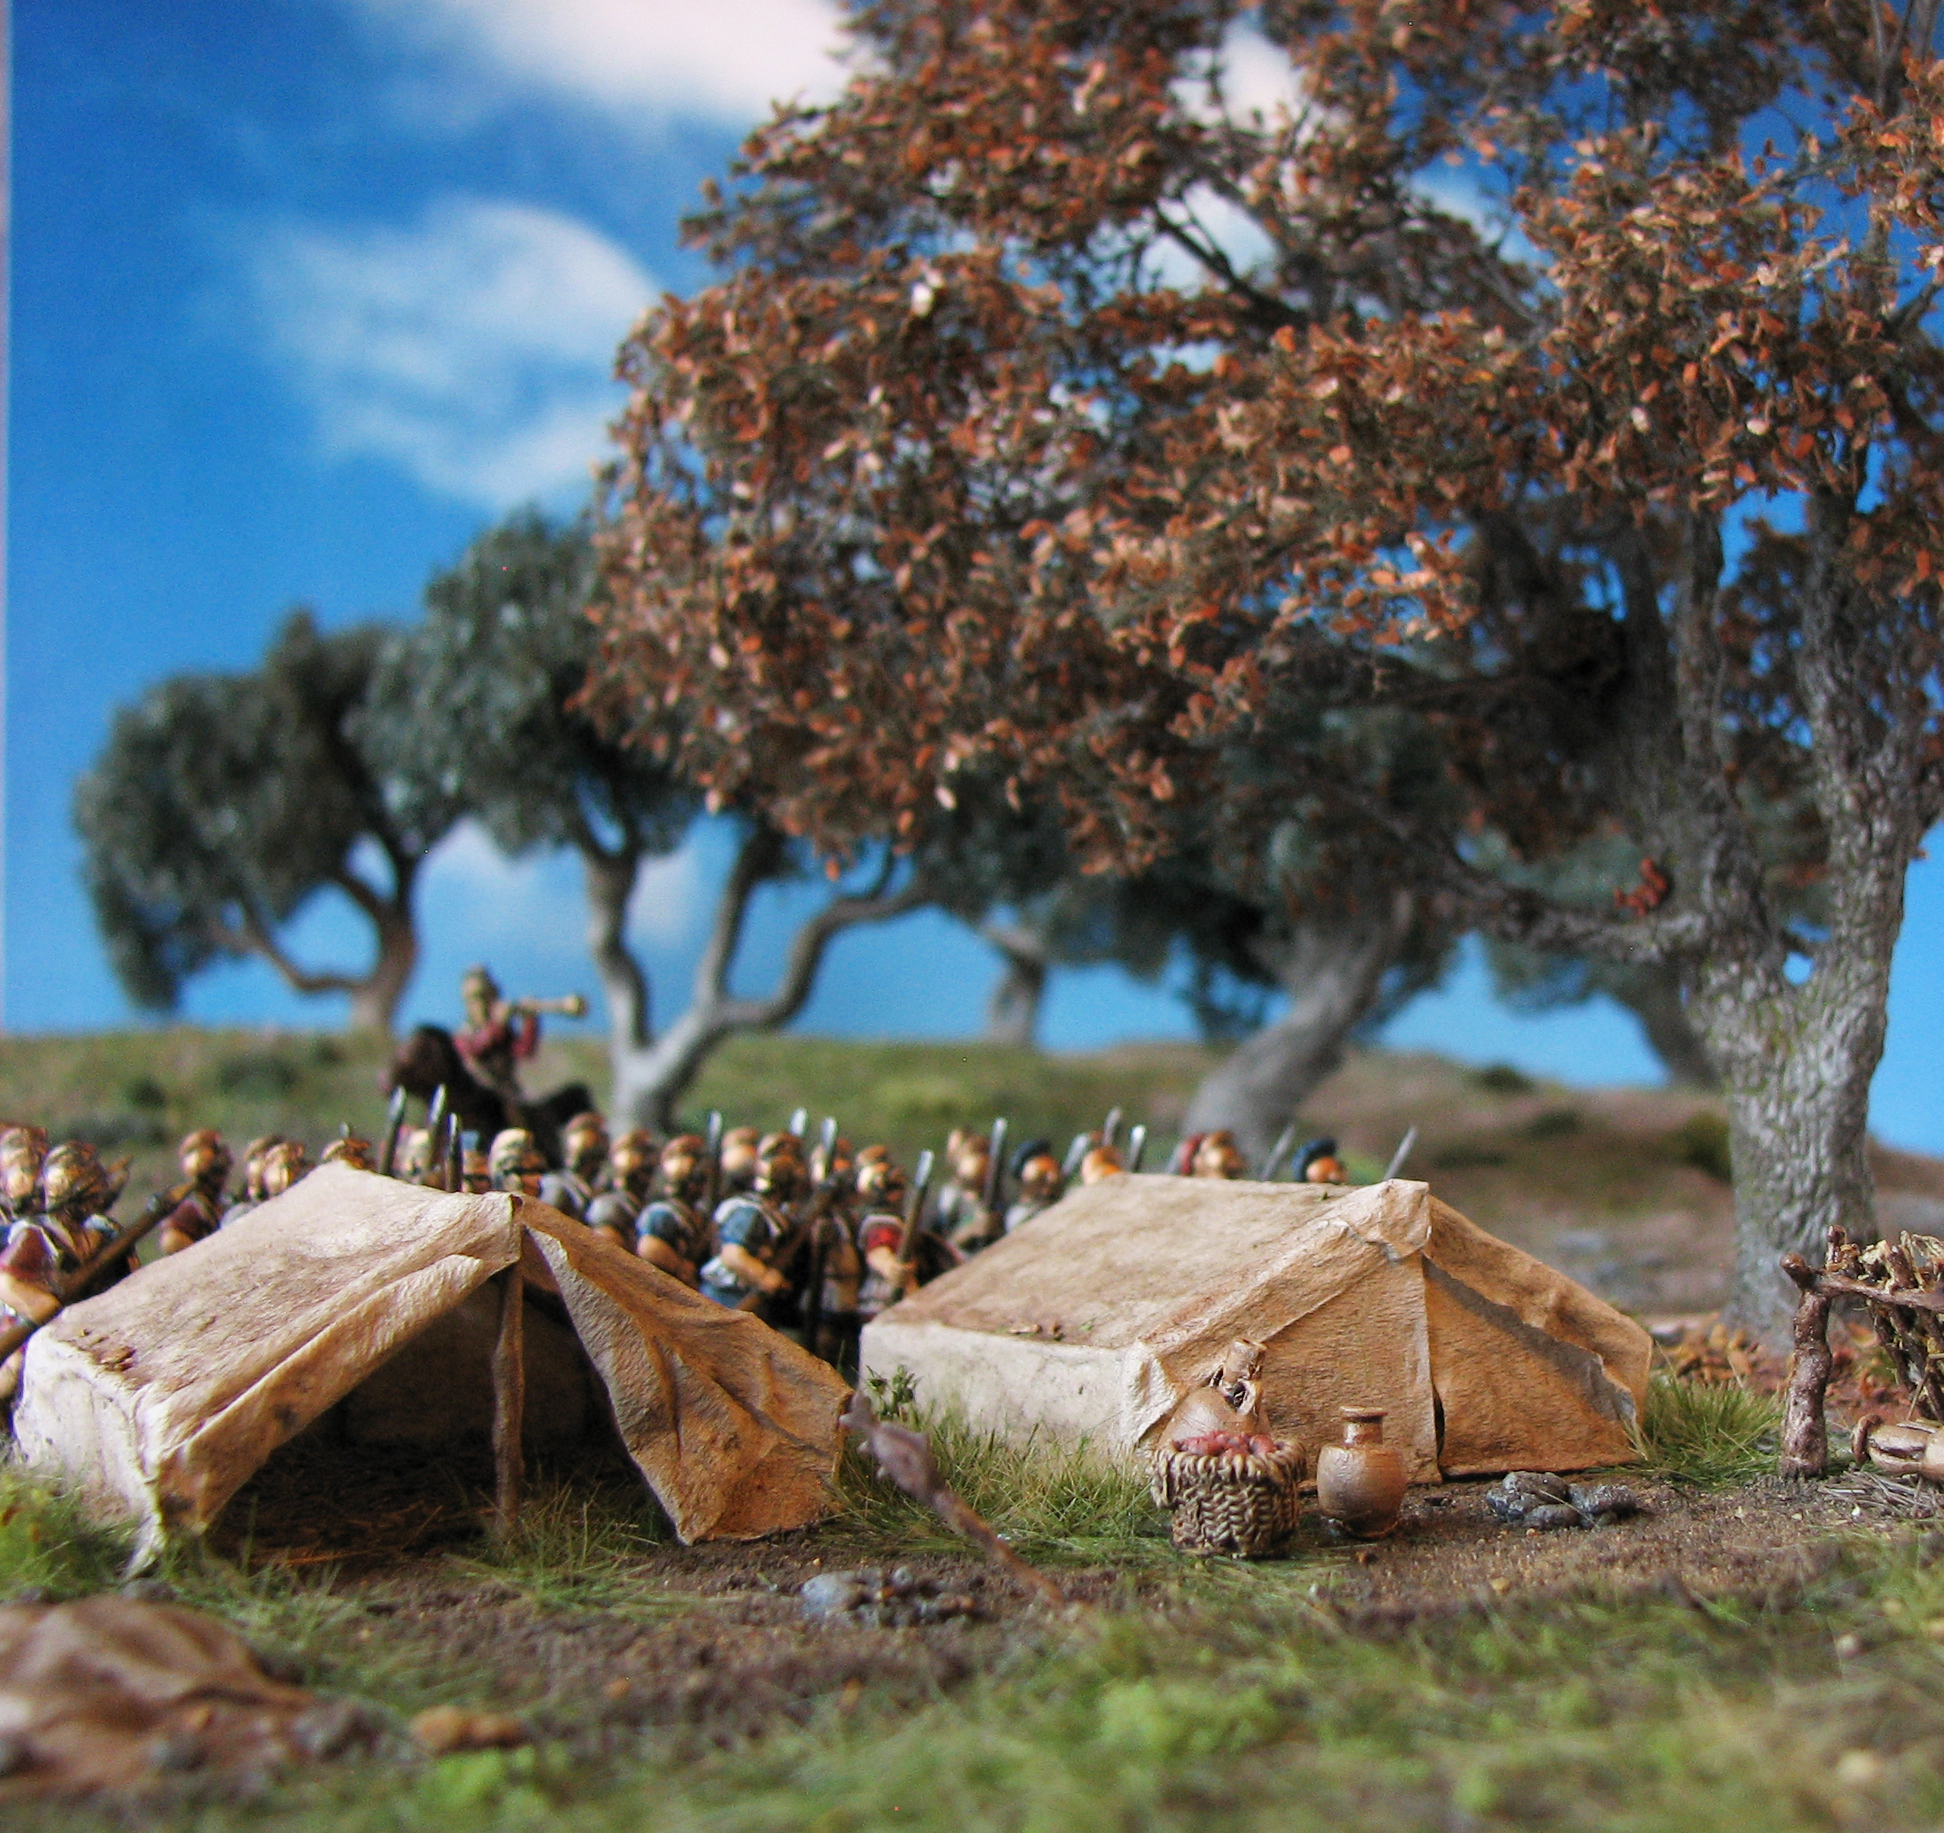
Roasted fish and fireplaces:
- Now is a good time to add details such as fireplaces or the roasting fish on a stick.
- The fireplaces are just pebbles arranged in a circle with some very fine seamoss twigs added as firewood. Blacken the centre with dark pigment powder and fix in place.
- The stick on which the fish is roasting is a thin pin. Just drill a hole in the mouth of the fish with a pin vise and attach with super glue.
Tarp and lean-to:
- Glue the shields in place that will later be covered with the tarp.
- Using the same techniques as we used for the frames and tent floor we construct the lean-to. You can use a temporary base for this step or assemble it right on the base.
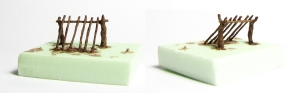
- Remove the lean-to from the temporary base and glue to the base.
- The lean-to still needs a cover. Glue some fine seamoss pieces in place to depict fine branches. Apply a heavy brown wash.
- Colour the dried basil with acrylic paint and apply these “dead leaves” to the lean-to as a cover. Just use super-glue that you spread all over the fine branches and sprinkle the leaves on.
- Using some green stuff apply a first “tarp” on the shields, followed by tissue paper to give it some texture. We do this to bulk the tarp a bit out and give it the appearance of stiff leather, instead of soft cloth.
- Glue some small pebbles in place to depict stones that weight the tarp down.
- Use some pigment powder and thinned down brown wash to weather the tarp.
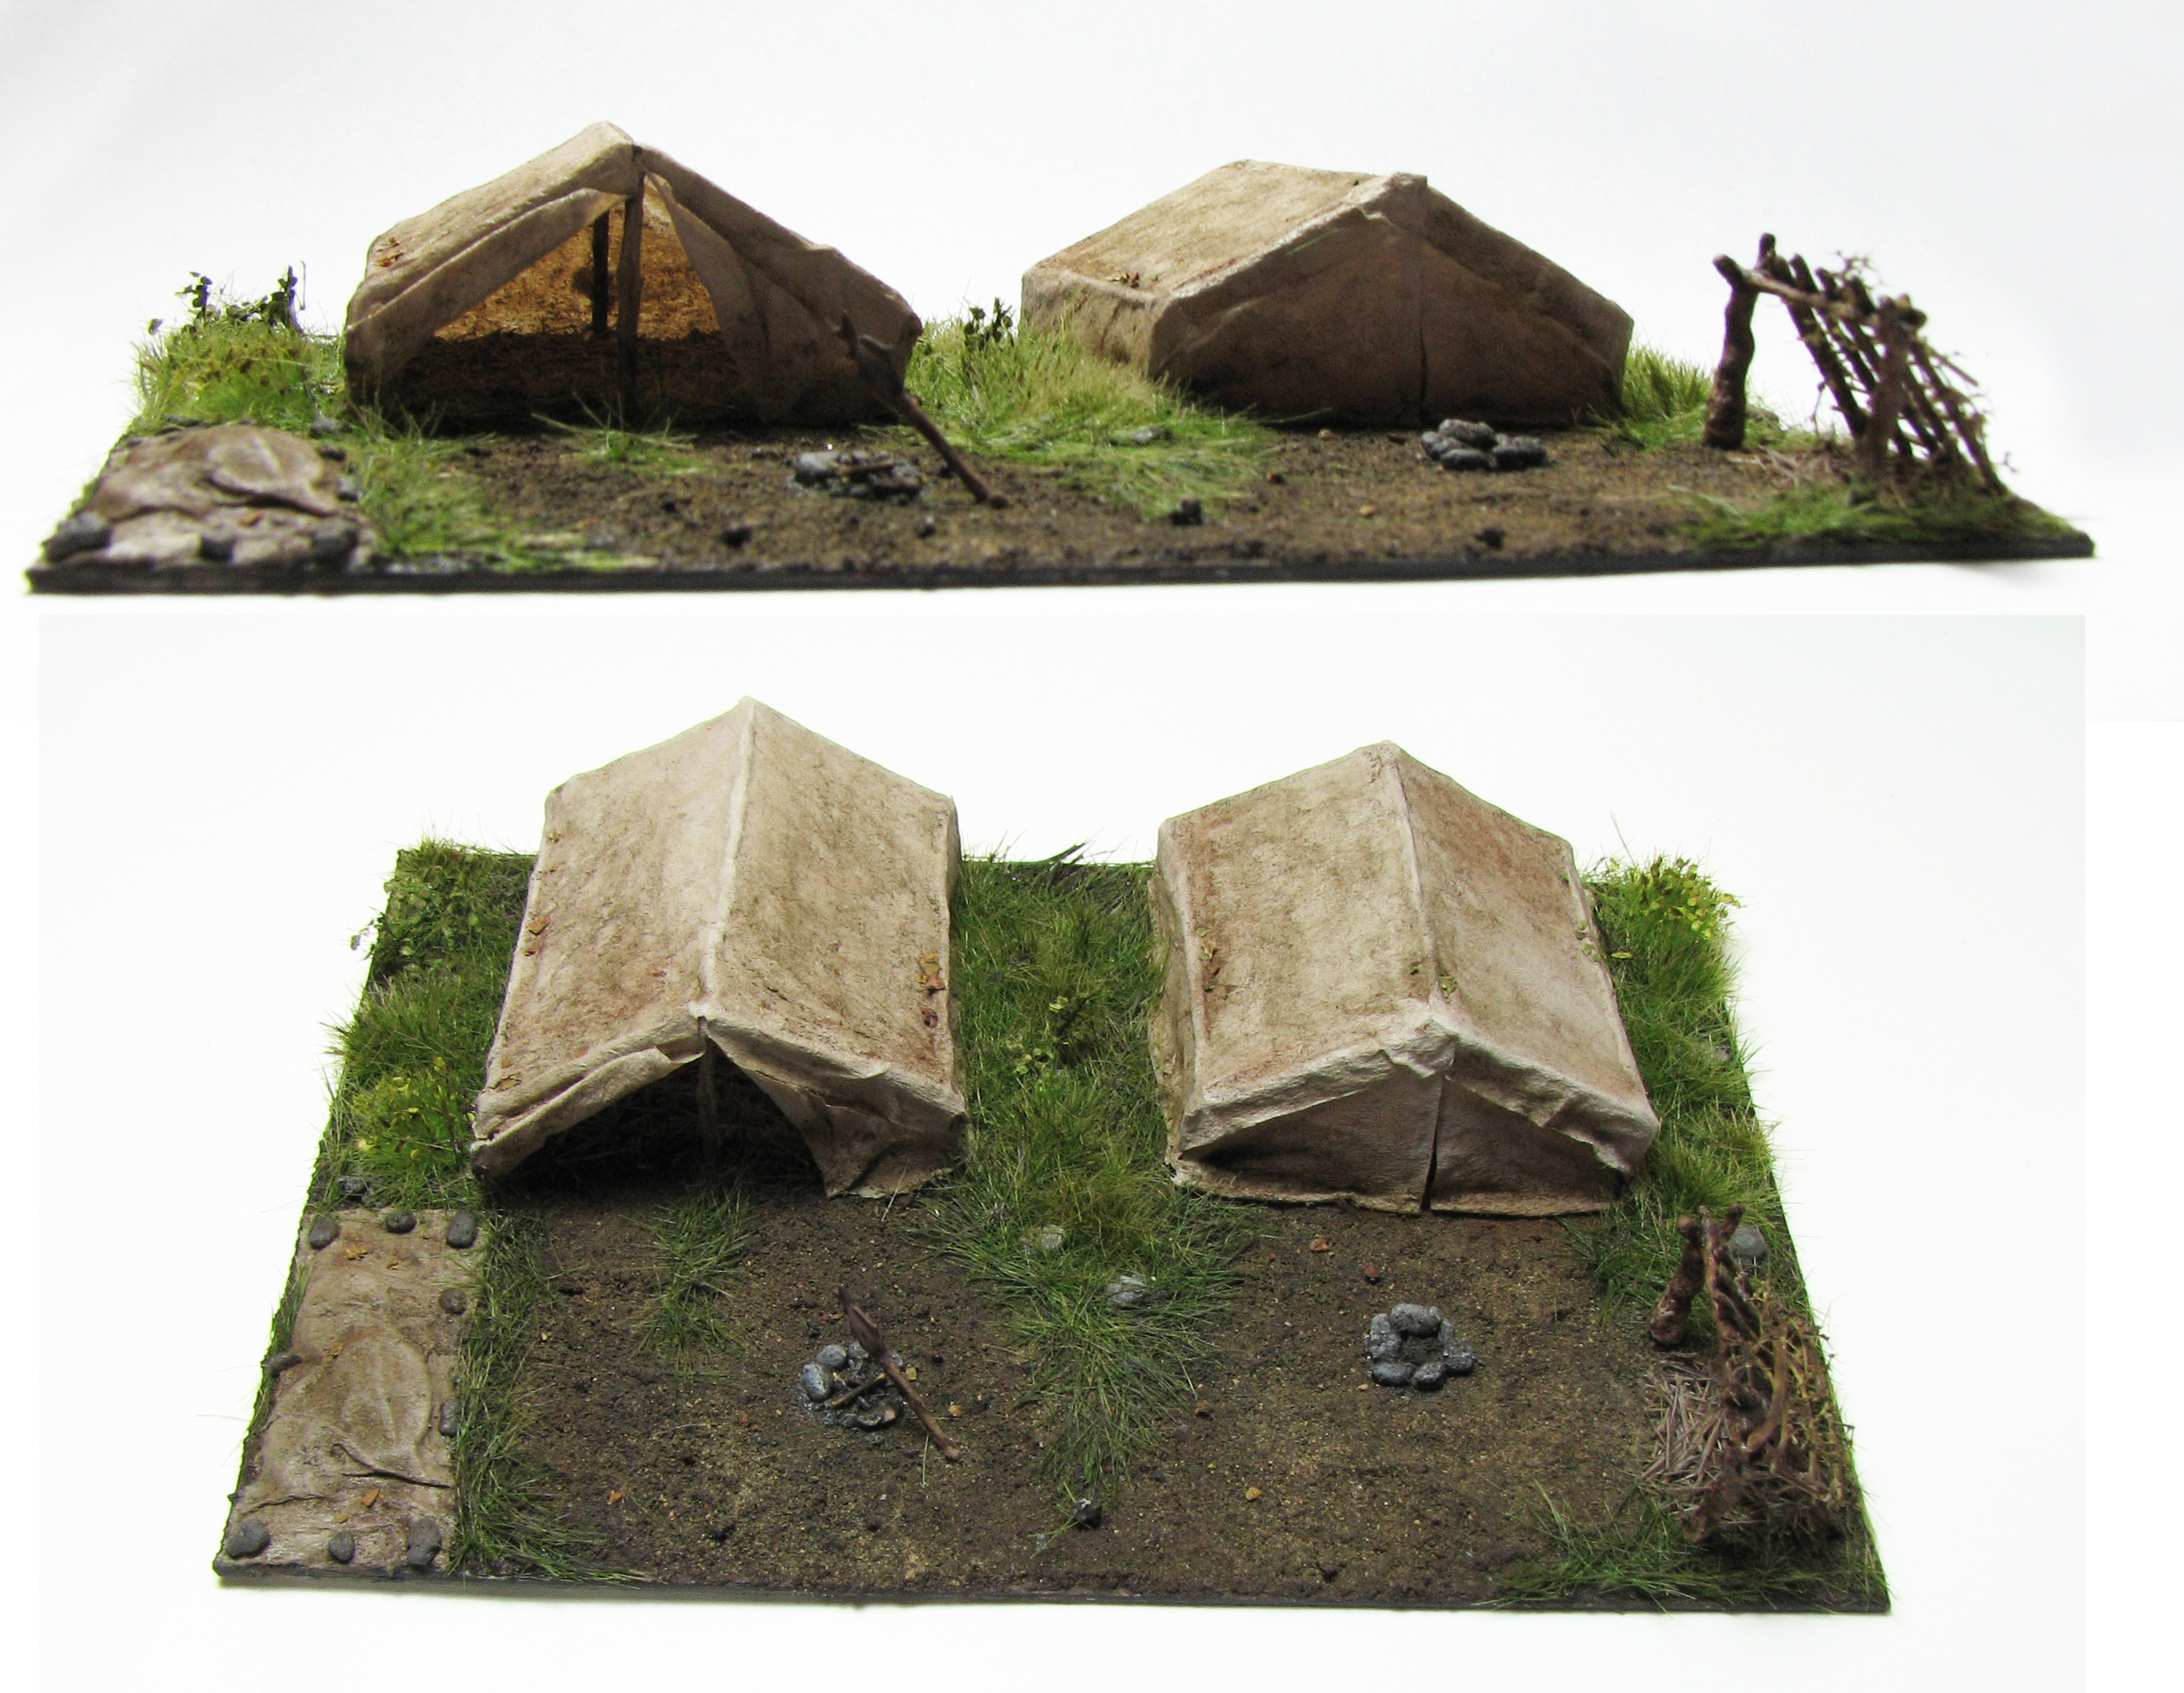
Tent Covers:
- Cut three pieces of tissue to size: One for the front, one for the back and one for the top of the tents. The front obviously needs to be cut in a bit for the entrance. I made the top cover hang over a bit to the front and back, to add a bit more interest.
- Holding the tissue in place soak first a point were it touches the frame with watered down PVA. Go ahead and apply it all over the tissue. Be careful, as the tissue can easily rip. If it looks a bit wrinkly don’t worry, it will pull itself straight when drying. Do not apply a second layer of tissue or you will end up with wrinkles. One layer of tissue, fully hardened, is stable enough to survive normal handling and gaming.
- After everything is fully dried, paint the tissue beige.
- Weather the cover with pigment powders.
- Finally add some dead leaves here and there for added realism. The leaves would collect in crevasses, so see where you have some and place some leaves there.


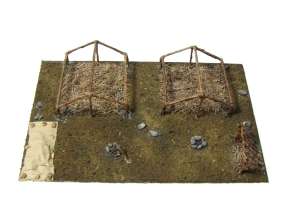
Ground cover:
- Now we have to apply the ground cover. Place a variety of different bushes on the soil and fixate with super glue.
- Now add some PVA where there is still a gap and apply static grass. This way you get the even bushes and slightly more wild static grass, resulting in a more natural appearance. You can also depict some trampled down grass in this way. Just push it down into the PVA.
- Finally apply some brown wash to get rid of some of the shine of the static grass and also draw all the different bushes together.
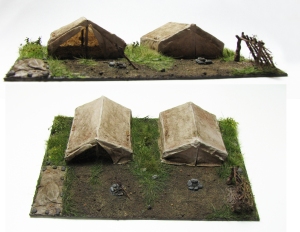
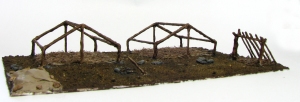
Here we go. The basic layout of our module is finished. Now we need to move on to the details, such as amphorae, baskets and naturally the miniatures.
I hope you enjoyed this tutorial. If you have some suggestions, comments or would like to add to the historical discussion please feel free to comment below.
References:
Primary sources:
Appian. The Foreign Wars. Horace White [Trans.]. New York: Macmillan, 1899.
C. Julius Caesar. Caesar’s Gallic War. W. A. McDevitte and W. S. Bohn [Trans.] New YorkL: Harper & Brothers, 1869.
Livy. Books XXVIII-XXX With An English Translation. Cambridge, MA: Harvard University Press, 1949.
Pliny the Elder. The Natural History. John Bostock [Trans.]. London: Taylor and Francis, 1855.
Polybius. Histories. Evelyn S. Shuckburgh [Trans.]. London, New York: Bloomington 1962.
Secondary literature:
Dobson, Michael J. The army of the Roman Republic : the second century BC, Polybius and the camps at Numantia, Spain. Oxford, UK, Oakville, Conn. : Oxbow Books, 2008.
If you would like a constantly updated, themed PDF terrain building, painting and roleplaying guide consider supporting me on Patreon. There also other choice rewards for supporters.
![]()
If you are not keen on Patreon, but enjoy my content and would like to see me well caffeinated so that I can publish tutorials, reviews and guides more frequently click below and buy me cup of dark, mellow goodness.
![]()

Impressive levels of research daggerandbrush, plus a great finished product too.
Great job.
LikeLike
Thank you very much sho3box. Much appreciated. The research is always one of the fun parts for any given historical project. There is something about reading writings of people who lived thousands of years ago.
LikeLiked by 1 person
Bravo, sir! Superb final product, and your methodical approach to research and experimentation is to be applauded. The shields covered with tarp weighted down with stones is a brilliant touch.
LikeLike
Thank you very much! Glad you like the tarp.
This was the first time I made a proper prototype before starting with the actual model.
I think the more complex the model, the more time one saves in making a prototype. For instance the one layer or two layer tissue issue would have ruined the model, if I would not have tried it before on the prototype.
LikeLike
Great! As always, an exemplary combination of research and modeling. Looking forward to reading the second part.
LikeLike
Much obliged! Glad you enjoyed reading part one. I look forward to add the miniatures at last!
LikeLike
Epic post is epic! Loving all the historical sources, so properly referenced of course 😉 I bet all those soldiers marching past are envious of the ones that already have their tents set up, and hoping that whoever is on latrine digging duty at their camp area is already there and digging. It’s been a long march, after all…
LikeLike
Thank you! Well, I do like my references. The problem with that latrine digging might be, that they didn’t do it all the time. In combination with the beasts of burden I could see such a camp being quite an olfactory sensation…
LikeLike
Heh, yes, well, when you gotta go, you gotta go. I wonder if, upon arrival, somebody declared the officially unofficial dumping ground… I mean, you don’t exactly want people just letting loose in the tent area, or in the berry bushes you hoped to forage from, or in the stream you wanted to drink from…
I suppose actual latrine digging depended on how long they planned to make camp there! And no, I have no idea why Carthaginian camp latrine logistics fascinate me so much….
LikeLike
I think you should write a journal article about it or maybe a nice book :). I’ll help with the diorama building.
LikeLike
Seriously inspiring stuff sir 🙂
LikeLike
Thank you! Glad you like it!
LikeLike
very scenic and inspirational! Thanks for sharing this Project
LikeLike
Glad you like it. Still one of my favourite projects!
LikeLike