
You will be all familiar with the famous caulking method to make beautiful flexible wargaming mats. However, this technique does not only come in handy to cover an entire gaming table, but can also be used for scatter terrain, such as rough terrain, roads, villages and even hills. It can also be used to create a very versatile photography mat.
In this first installment I focus on making some flexible rough terrain featuring some rocky outcrops, brush and small bushes. I took my inspiration for this piece from ekimdj, who not only has a very nice blog, but also wrote a tutorial for flexible desert terrain on the Sweetwater-forum, so if you are able to read German check it out (it is pretty picture heavy, so you can follow it easily in any case).
This tutorial will also come in handy if you want to learn how to create basic groundwork, flexible or not. This technique can be applied to a small base or an entire terrain board.
Per usual I will give an overview of the materials you need, followed by detailed step-by-step instructions and finally some ‘action’ shots showing off the piece’s flexibility.
Preliminary considerations
The most beautiful terrain piece is worthless if you are unable to place miniatures on it, assuming you don’t model some impassable terrain like a lake or cliff. However, if you make your terrain too ‘gamey’ it pretty much will be flat and featureless, gentle hills turn into staircases and everything will look very stylised to accommodate regiment bases and the likes.
There is no real solution to this dilemma, but as is often the case in life: in taking the middle ground one fares best. Keeping this in mind I tried to create a nice looking piece of rough terrain that can still accommodate regiments or single miniatures, but is a bit more interesting than a featureless plain.
To spice it up a bit I also decided to embed some magnets in the flexible piece, so that one can place trees and other features without them falling over all the time. This way one can make full use of the flexibility of the piece while not being limited by the fear of trees falling over.
My own addition to ekimdj‘s concept is the use of some ‘Self-adhesive fibreglass drywall joint tape’. This tape, or to be more precise fibre glass netting, does lent some impressive tensile strength to the caulking. I tried to rip a test piece apart and using all the force I could muster I was not able to rip it. This also works if you encase extruded polystyrene. What formerly could be easily ripped apart is afterwards very strong (but not crush resistant, for that you need a resin shell or something similar).

What you need
For the groundwork:
- Self-adhesive fiberglass drywall joint tape. About 1.5 metres (if that) to strengthen the gap filler. A roll costs about 25.35 NZ $.
- A tube of caulking/ gap filler. I use Selley No More Gaps. You could use already coloured filler, but that is not necessary. A plain white no-name brand will do. You won’t need the entire tube, maybe 50g or so of a 475g tube, depending how thick you apply it. A tube costs about 4.50 NZ $.
- Different kinds of sand or soil, ranging from very fine to coarse.
- Bark pieces and coarse cork pieces to depict rock outcroppings.
- Different shades of brown and grey acrylic paint.
- Neodymium magnets (optional).
For weeds, brush and moss:
- MiniNatur grass tufts and birch foliage nets. I used a selection of autumn grass tufts. The foliage nets can be used to depict floor creepers and bushes.
- Static grass. If you have different brands mix them all up for a more nuanced and realistic appearance.
- Matte spray varnish to reduce the shine of the static grass. I use Tamiya Flat Clear.
- Brown acrylic spray paint to slightly darken the tufts or alternatively a brown wash to dull the shine of the tufts and grass.
- Fine turf e .g. Woodland Scenics range of fine turf in dark green or any other fine turf. This is basically very finely ground coloured foam. We will use this to depict moss.
- Some fine sprigs of seamoss (optional).
- Wood glue.
- Dark or medium green, yellow and beige acrylic paint. Vallejo Umber wash.
- AK Interactive Grime/Slime effect paint (optional).
- Dried basil to depict fallen leaves.
- Assortment of dry tea to depict roots and leaves.
- Water.
- PVA.
Tools needed:
- Scissors.
- Caulking gun.
- Hand-saw.
- Plastic bag.
- Nitril-gloves.
- Spatula.
- Brushes.
- Scotch tape.
- Small strainer.
How you do it:
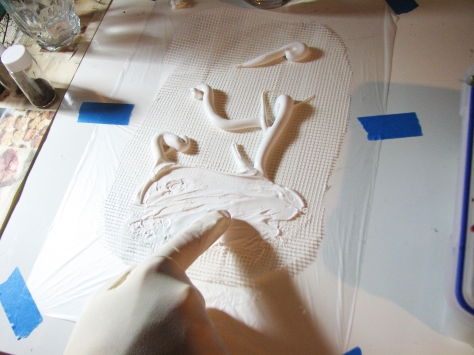
- Cut as many pieces of fiber tape as you need to cover the base of your terrain piece. Slightly overlap each strand of tape.
- Shape the edge with a pair of scissors to achieve a more natural appearance.

The tape has impressive tensile strength, but can be easily cut using a pair of sharp scissors. - Cut the plastic bag open, glue it to your work surface with some scotch tape and place the fiber tape on the plastic bag.

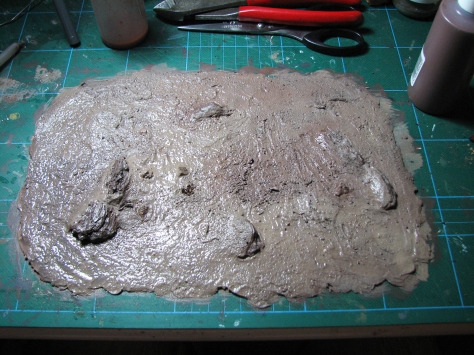
- Now follows the fun part: Squeeze some of the caulking onto the fiber mesh. Using gloves and your fingers spread the paste until you have covered the entire piece. You must use gloves for this step, as it will be near impossible to getthe the caulking off anything it touches. Given there are more fun activities than washing your hands for two hours (or your carpet etc.) it really pays to be careful during application. You can also use a spatula to even out and smooth some of the areas.
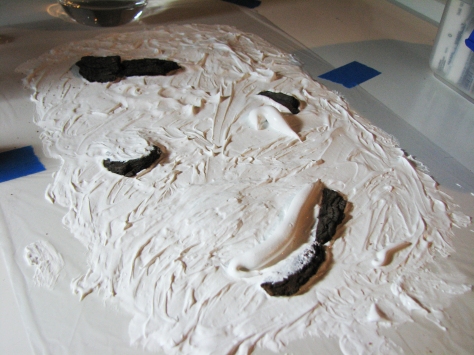
The amount of gap filler necessary will vary, but what you see here is enough to apply a first thin coat. - After you applied a first coat embed bark pieces and the magnets. Just push them into the caulking and smooth the transitions out. I covered the magnets with a thin coat of caulking, Given they are rather strong this does not inhibit their ability to attract things. I use small bark nuggets you often find in the gardening section of your local DIY store. Put them in the freezer for some weeks to kill anything that may dwell inside and then cut them to size using a handsaw.
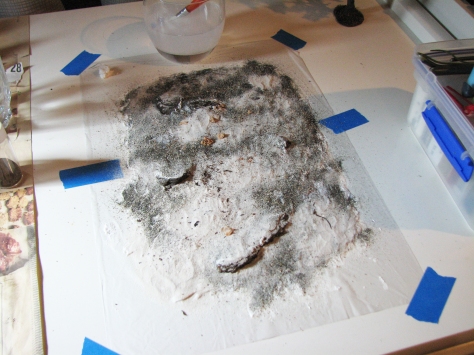
- After you smoothed out the caulking use a small strainer to drizzle different grain sizes of sand onto the terrain piece. You can also add some dry tea leaves to depict roots and dirt. Gently push the sand into the caulking when you are finished, but don’t overdo it, as you could leave an impression. You can also add some coarse cork pieces to depict bigger rocks.
- Let completely dry for several days. This is important. If you try to peel your piece off too early it might deform, so give it plenty of time.
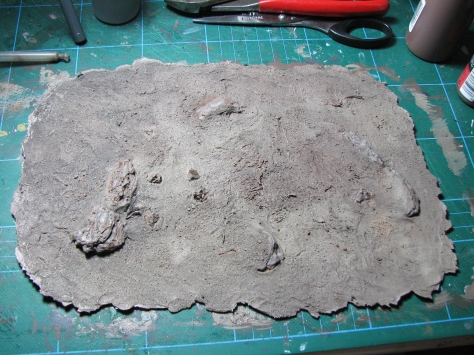
- When everything is dry, peel your piece off the plastic bag and remove any sand that did not catch. Keep this sand for future pieces.
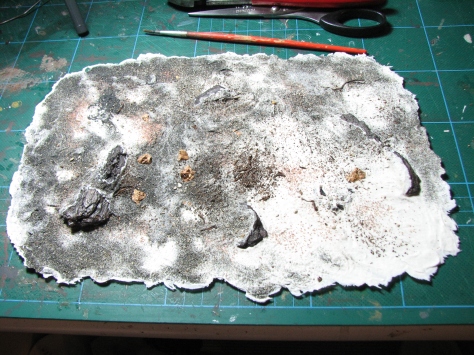
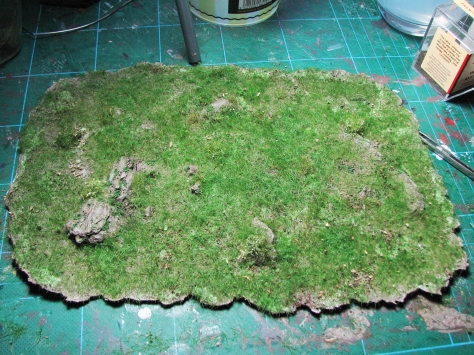
- Now we need to paint the piece. It is not necessary to colour the caulking. Adding too much paint can make the caulking brittle and given the piece is very flexible there will be no chips or cracks that could reveal the white base. Using different shades of slightly diluted brown acrylic paint apply a goodbasecoat. Through the different grain sizes and colours of the sand one can already achieve some variations as the sand takes the paint differently. You can also add a wash in some places at this stage to add more depth and colour variations. When everything is dry, you can also give the soil a gentledrybrush. Do not go crazy, a subtle dry brush will look more realistic.
It does remind me of something unsavoury…but hey, I assure you it will look good in the end…. 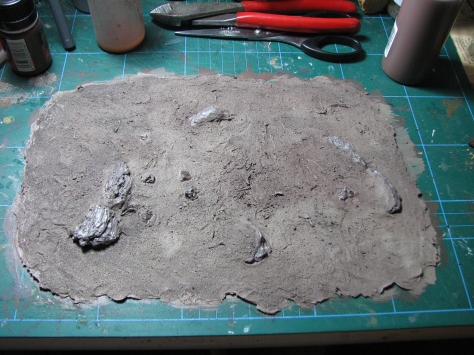
As you can see there is already a bit of colour variation and different textures. - Next are the rock outcroppings. Using different shades of brownish-grey paint followed by a brown wash we already achieve some definition.Drybrush them withsuccedingly lighter shades of your base paint. Here it is important to not make the rocks too grey and to not overdo it with thedybrushing. Too stark contrasts will look unnatural.
Here I applied a brown wash to the rock faces. Not only does it remove any lustre, it also makes them look more natural. - Time to add more interest to the rocks. Using some thinned down green paint or the excellent effect paint by AK Interactive, we add some green to the crevasses, giving the impression of some light moss. The AK effect paint is enamel based which gives you better control. You can also go back and rework an area with some enamel thinner on your brush.
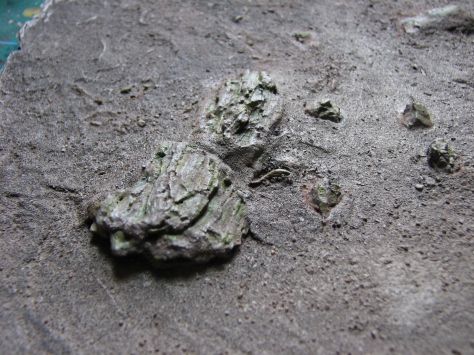
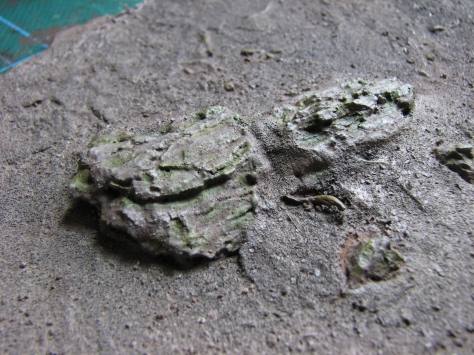
- If subtle moss growth is the idea, then you can keep it at that, but if we want to depict a more humid environment some more moss can be added. Here I used my trusty moss paste (check out my Crypt of the Damned tutorial for details).
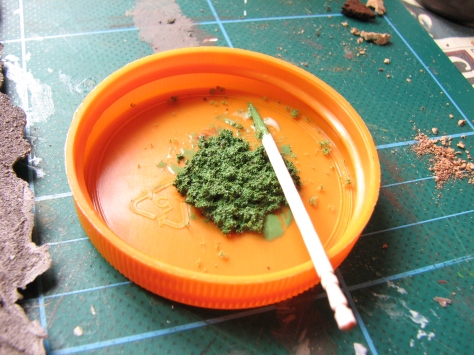
The moss paste is a simple mixture of finely ground turf, water, PVA and green paint. Best applied with a toothpick. 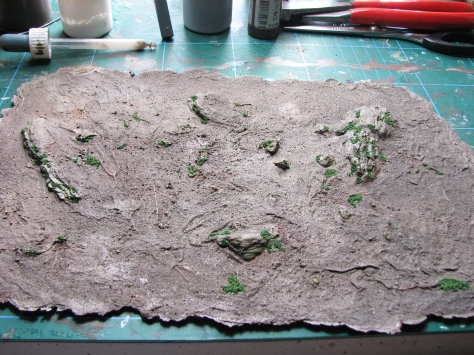
I concentrated on the rock outcroppings and some patches on the ground where roots can be found. 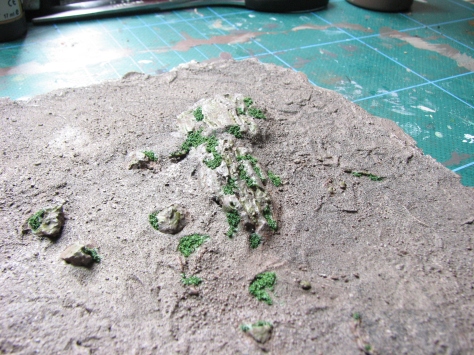
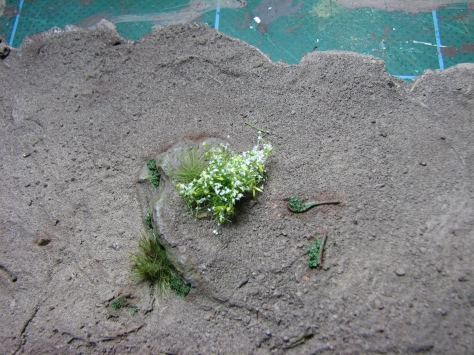
- After the moss is toned down with a brown wash and drybrushed we move on to placing some of the brush, floor creepers and tufts. Here we aim at placing the plants in a more or less random fashion.
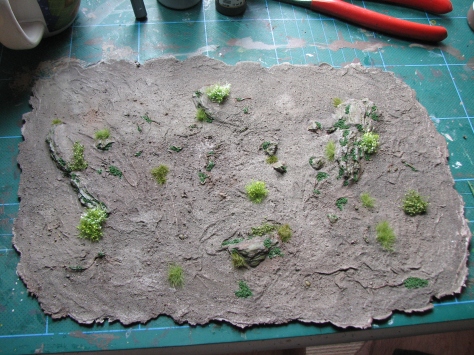
- The vegetation is still a bit bright and has a lustre to it. To fix this we first spray a thin coat of matte varnish over the whole piece, followed by applying a brown wash to the plants.
Before the wash…. 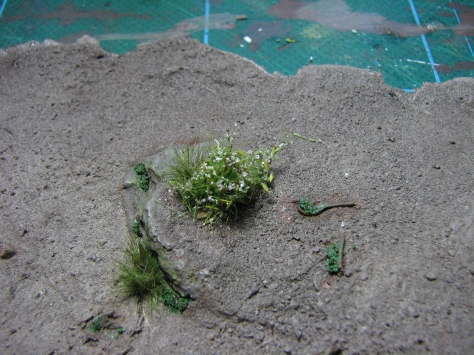
…and after the treatment. - We do this with all remaining plants and achieve a nice naturalistic look.
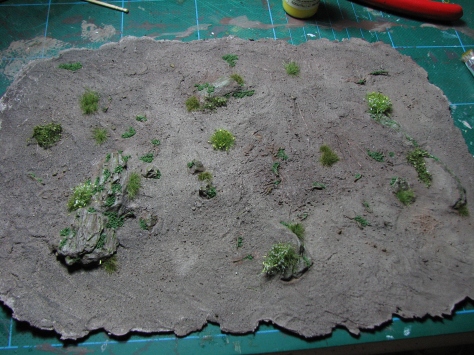
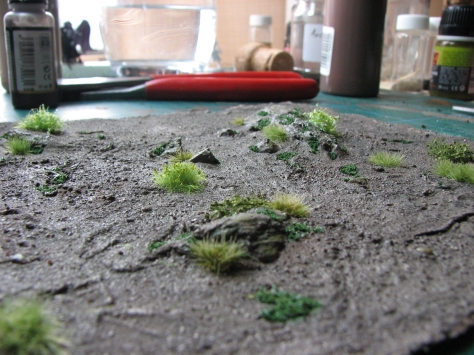
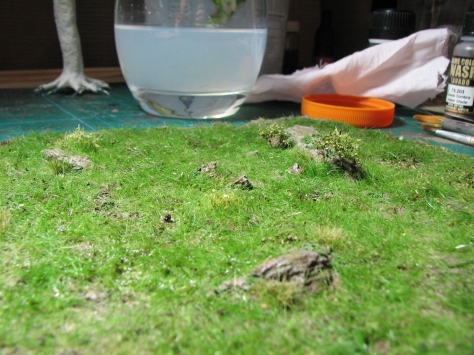
- Now it is time to add loose static grass. If you have a static grass applicator you will be able to achieve better results than I did. I am planningto built one myself, but as of now I use a plastic bottle and spray the fibers in the thinned down PVA.
It is recommended to do this step on a plastic bag. Having static grass turning up everywhere is surely interesting, but I am sure you don’t want that stuff in your dinner. 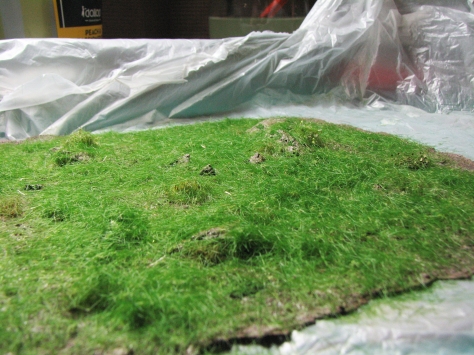
- Remove any excess with a vacuum cleaner (if you slide some old stockings over the hose you can even reuse the grass without getting it mixed up with dust). Repeat the process if you want denser growth. You can also add some dried basil to depict fallen leaves or different kinds of tea.
- Finally we have to tone down the lustre again using matte varnish. A brown wash in places adds some colour variations and will result in a very realistic appearance. As a final touch I added some seamoss twigs and MiniNatur foliage nets to depict two taller bushes. This is naturally optional.
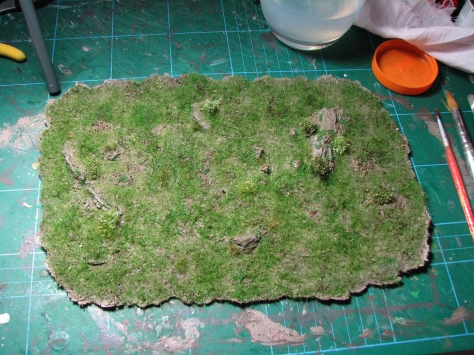


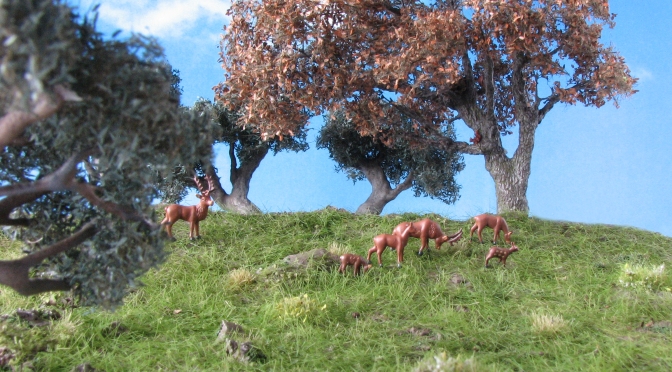
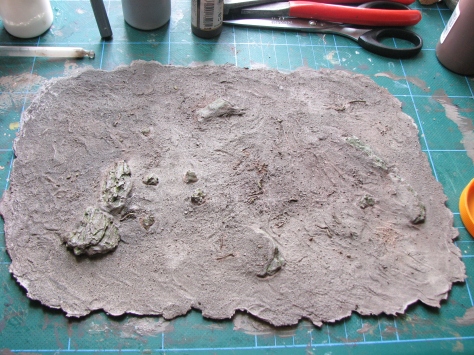
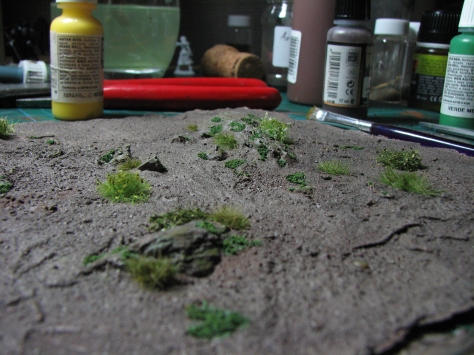
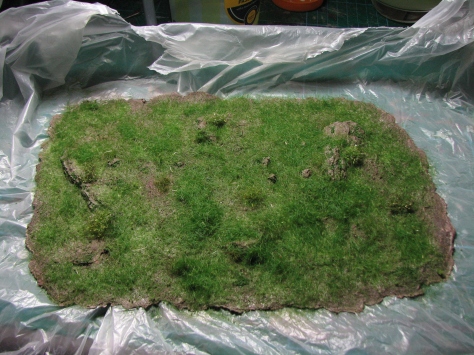
Voila, you have a realistic looking terrain piece that can be used to depict rough going or even a small grove if you add some trees to it. The picture below illustrates that you can also depict gentle hills if you use it as a photo mat.
Flexibility test
So, the big question is how flexible is this piece? Well, very flexible. A picture is worth a thousand words, so here we go:


I hope this tutorial inspires you to give it a try yourself. It is an easy technique that produces very nice results. There is no reason why one could not use it for villages, forest bases and hills. You could also combine different methods and have a solid core piece and only use the caulking to make the borders of a piece flexible. This way they can conform to your gaming mat or board.

If you have any questions, critique, praise or would like to share your own experiences with this technique please feel free to comment below.

If you would like a constantly updated, themed PDF terrain building, painting and roleplaying guide consider supporting me on Patreon. There also other choice rewards for supporters.
![]()
If you are not keen on Patreon, but enjoy my content and would like to see me well caffeinated so that I can publish tutorials, reviews and guides more frequently click below and buy me cup of dark, mellow goodness.
![]()

Wonderful tutorial. Using the joint tape is brilliant. I’ve used felt cloth as a base before but it adds extra thickness and stiffness. Embedding the magnets and bark is another technique I’ll have to try out.
LikeLike
Dear Brian. Thank you very much for your comment. Much appreciated. The joint tape does not interfere much with the flexibility of the piece, if at all. The bark and magnets will make it more stiff, but add interest. I’d say it is a bit of a trade-off ;).
LikeLike
I must admit I have never heard of this method of making terrain and its fantastic😀 Lovely tutorial.
LikeLike
Thank you very much for your comment. I am glad I was able to point you to some of the other uses of this technique. It is very versatile and can be used for antyhing, be it an entire gaming mat or very small terrain pieces, even thin, flexibel bases would be an idea, but I am not sure how well the edges would line up with other miniatures.
LikeLiked by 1 person
Beautiful result, and a great idea to use mesh tape to reduce the overall thickness of the piece.
On a side note, I’ve had good luck tinting caulk with latex house paint samples. These samples are dirt cheap here in the U.S., and I’ve not noticed any brittleness in the end product.
LikeLike
Thank you for your comment Arkiegamer. I did tint the caulk before, but realised it is not really necessary with this project. It could well be that I overdid it slightly the last time and got a rather brittle and stiff result (maybe too much sand, too). Is latex house paint similar to the Dulux wall paint? I thought that stuff is acrylic based?
LikeLike
Well, after a little research, apparently “latex” doesn’t mean much, these days, as latex paint contains no actual latex!
A quote, ” Latex paint is a general term which covers all paints that use synthetic polymers such as acrylic, vinyl acrylic (PVA), styrene acrylic, etc. as binders. This is what always used to confuse me, as the term “latex” is applied to most water-based paints, regardless whether the can says they are 100% acrylic, latex or vinyl styrene. It is only because natural latex and synthetic polymers share the property of looking milky when wet, and clear and flexible when dry, that they call this whole family of polymers “latex” in the paint US industry.”
The difference in our results, as you said, was probably the ratio of paint to caulk. I was tinting colored caulk, that was already fairly close to the color I wanted, so it didn’t take all that much paint. Maybe 1:10 ratio of paint to caulk.
LikeLike
I see, thank you for the explanation. I was indeed wondering why they would call it latex paint. The reason being the white colouring of the acrylic makes kind of sense….kind of ;). I think I put it way more than that. I might try some brown pre-tinted caulk and embed soil in it. If I am successful no painting should be required.
LikeLiked by 1 person
Excellent post. With your references and own ideas I have a few new projects to file away for future work.
LikeLike
Thats a great tutorial, good job.
LikeLike
Thank you! Glad it was of interest.
LikeLiked by 1 person
Very nice! Thanks for sharing!
LikeLike
Thank you for your comment. You are welcome.
LikeLike
This was excellent indeed. Only one question remains – did you try how much you can bend in two or more angles at the same time? If you attempt to create a hill, some of the materials used in caulk mats will either crease, or become otherwise unrealistic.
LikeLike
Thank you for the comment. The small piece is relatively stiff due to the bark and magnets. When I warp it at different angels I don’t get any creasing. Could be a problem if the piece is bigger or thinner. However, hills I would make the usual way with only the rim being fitted with caulk to make it conform to the underlying terrain board.
LikeLike
Great tutorial. I use this stuff for all my basing but but not without plastic or mdf underneath. How thick did you make the pieces?
LikeLike
Thank you for your comment. I think the thickness is about 2-3mm, more where I did embed the bark pieces. However I don’t think there is a limit really. It will only take longer to dry.
LikeLike
Looks great, question, do you get the material warping up at the does or does it have enough weight/flexibility to conform along the edges?
LikeLike
Thank you for commenting Smartwargaming. Unfortunatly yes, I did get some warping/curling. I think if you embed some chicken wire around the corners you should be able to make them conform to the table. Alternatively you could spread the caulking a bit more and cut away any bits that curled up after drying or make the whole piece thicker, so that its own weight presses it down. Finally you could also apply a bit of double sided tape on the plastic bag to keep the acrylic down while it is drying, but I might be difficult to get it off the piece.
LikeLike
The drywall mesh is a great idea. I’ve done similar with canvas drop cloth and made full mats that roll up for storage
LikeLike
Thank you for your comment frogimus. I made one of these, too. The first time I got the mix not quite right and it was all a bit brittle, still looked the part and was quite flexible.
LikeLike