

While we are spoilt for choice these days if it comes to miniatures, it still happens that I really love a miniature, but there is this one detail that really does not work for me. For instance the pose is awesome and the garments are beautifully rendered, but instead of a spear the miniature is wielding a ‘tree log’ or a sword is as thick as a wooden plank. With Bones miniatures (or any other miniature really) miscasts can be an issue and may ruin an otherwise wonderful sculpt.
Fortunately we have greenstuff and bits and bobs from other sets at our disposal to change or enhance the look of a miniature. In this first installment of a semi-regular feature on conversions I will talk about the basics and provide an example for making thin braids and wooden staffs. This tutorial is meant for the conversion novice, mainly because I am one also :P, but I hope future installments will add complexity.
Tools of the Trade
So, what do you need to convert a miniature?
- Most importantly sculpting tools. I use the following ones:

- A nice sharp knife. Could be an X-acto or better still a scalpel. The latter are cheaper in terms of replacement blades and the blades come in all shapes and forms. A scalpel is also excellent for removing mold lines working with Bones miniatures. However, NEVER, cut towards you and wear protective glasses and maybe even a thimble. I did cut myself and it is unpleasant, so rather avoid a blood sacrifice to the modelling gods.
- A pair of wire cutters.
- A pair of sprue cutters (optional).
- Pliers.
- Pin vise.
- Cutting matt.
- Dollar shop silicon baking sheet (to roll out and shape the greenstuff on).
Basic Supplies
- Super Glue or equivalent adhesive.
- Greenstuff (or any other putty with similar properties).
- Blue tack to keep stuff in place.
- Copper wire and steel wire.
- Water.
- Skin oil. Yep, skin oil. Just run over your forehead or nose to lubricate your sculpting tools. Works like a spell.
Initial Considerations – Materials
First off we need a miniature that we want to convert. It stands to reason to select a miniature that is already to your liking, so that the addition of a new weapon, a head swap or adding minor details is sufficient to enhance the overall look. However, if you rather want to gradually improve your sculpting skills it might also be an idea to select a miniature that you really dislike and transform it entirely.
Another thing to consider is the material the miniature is made of. Naturally metal is harder to cut and drill, but easy to file and scrape. You can also carve softer metal miniatures to some extend to refine a detail.
Styrene plastic is very easy to cut, drill, file and scrape, but not as sturdy as metal. Accordingly it is very easy to kitbash or convert styrene plastics, but you have to be more careful when handling the miniature. You might also have a box with bits and bobs that have accumulated over the years: Spare weapons, heads, arms and so on. Naturally you can also combine metal and styrene, but pinning is always advisable in such cases.

Finally PVC plastics, for instance Reaper Bones, have some advantages if it comes down to conversions. It is the sturdiest material of the three and can be easily cut, drilled and carved. However, it is flexible and thus harder to file or scrape. You will thus need greenstuff to smooth surfaces, which only requires a scalpel when working with metals or styrene plastics. For weapon swaps you might also need to account for the flexibility, has a heavy metal weapon might pull an arm down over time. Accordingly styrene plastic is better suited for detailing. Metal head swaps are normally no problem, but it is always a good idea to pin the head.
It is important to first remove any flash, smooth surfaces, drill, carve etc. and then wash the miniature to ensure no oil or release agent interferes with your paint or putty. Only then should you proceed to sculpting with greenstuff (if you use it). Fortunately greenstuff adheres to all three materials and its flexibility after curing comes in handy for the PVC plastics.
You can pretty much create anything you want out of greenstuff, but for intricate details and anatomically correct additions you need lots of practise. I thus follow the mantra: If you can use a pre-made part, do it! You can still change it to your liking, but there is not point in sculpting an entire arm or leg if you could just use one from your bitz box.
I also use other materials like balsa wood or copper wire. Balsa can provide a basic shape to drape greenstuff over and copper wire works well to depict ropes, strands of hair or bow strings. Copper wire has a high tensile strength while being almost as thin as a hair. Another important material for conversions is strong steel wire. You won’t use this for any detailing, but rather as a frame or support for your sculpting.

Working with Greenstuff
Greenstuff seems at first very hard to work with: it is sticky, it seems hard to smooth it, it sticks to your fingers, your tools etc. However, the following tips should help you with mastering this medium.
- Mix your greenstuff and don’t touch it for 20 to 30min. Now it is less sticky and you can work it better.
- You have a working time of about 2 hours. However, an hour is a more conservative estimate.
- Experiment with the blue to yellow ratio. You can also mix in Milliput or other putties to change its properties.
- You can speed up the curing with heat. Just place the sculpt under a light bulb.
- You can slow down the curing in putting the greenstuff in the fridge or freezer. It will keep for a few days.
- Only make enough greenstuff for the task at hand. It is easier to mix some new greenstuff than having to stress about getting everything finished.
- Use left over greenstuff for base stamps. Even if it is getting hard it still works for a base.
- When you finished a section or detail let it cure. Often you accidentally touch the miniature in the same spot if you work on another section and could destroy your hard work. Patience is key.
- If you want to sculpt some very delicate or complex details separate them into discrete shapes. For instance, if you want to sculpt a dragon emblem on a piece of plate armour, you would first sculpt the armour and let this cure. Then you come back and add the dragon emblem.
- Work on a silicon baking sheet. The greenstuff won’t stick to it.
- Lubricate your tools with water or body oil. Vaseline works, too, but do not use too much of it.
- Avoid getting any lubricant on the contact surface on the miniature. The greenstuff will not adhere properly if you do.
- Wash your conversion before you paint it to remove any residue.
Conceptualisation
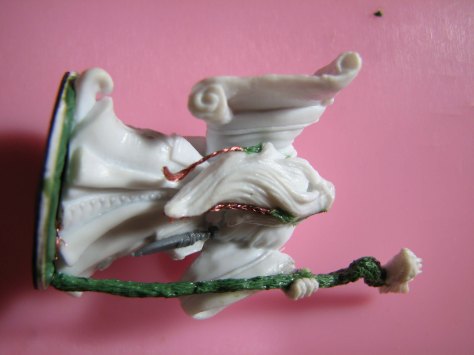
So, we have all the tools at hand and we have decided what materials we use. Now we need to get an idea what we actually want to do. I chose Reaper Bones Galladon by Bobby Jackson for this tutorial. I really like the miniature: a classical wizard with pointy head, staff and spell scroll. I intend to use him as one of the Frostgrave wizards I am working on right now.
However, the staff of the Bonesium version was slightly bent and even boiling him did not fix this issue. I also found the staff was too straight, but I really love the dragon head. The miniature is in general a very clean, simple sculpt with lots of flat surfaces that can be enhanced with freehands. Still, I felt adding some details would add interest to the miniature and individuality. I decided in the end to keep the dragon head, resculpt the staff, add braids to his beard and a dagger to his belt. A simple conversion that I felt comfortable with.
At this point I need to commend Reaper for releasing their PVC minis. I always felt slightly intimidated by sculpting and converting and with expensive metal miniatures you would normally be afraid to ‘waste’ a miniature. With the incredible Kickstarter price point of the Bones stuff (and if we are honest even at full retail they are dirt cheap) there is really nothing to fear. I can even use the very few miscast Bones I got to experiment. Bottom line: If you want to start out with converting minis or you look for the perfect ‘canvas’ for your custom RPG player character, consider Reaper Bones. Later on you can graduate to metals or styrene plastics (or stick with Bones, whatever floats your boat).
Let’s do this! – The Wizard’s Staff
- Remove any mold lines and flash with the scalpel. For tight spots you can use microfiles. Do NOT cut towards your fingers. I cannot repeat this enough *looks at bloody finger full of sorrow*
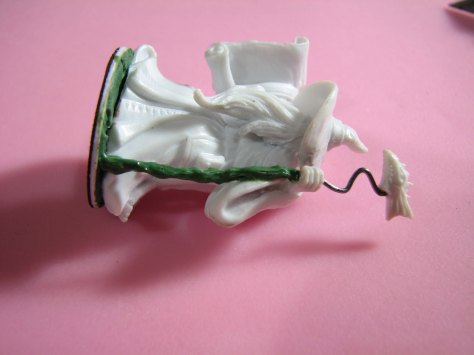
- As pictured above we start cutting away the staff with the scalpel and preserve the dragon head. I also found it useful to cut away the hat (which seems to be a separate part anyway) to better get to the face and beard. I will paint the face first and then add the hat back later on.
- Prepare some greenstuff and let sit for say 20 minutes to make it easier to work.
- In the meantime use the pin vise to drill out Galladon’s hand or just drill a hole through the remainders of the staff. It depends how thick you want the staff to be.
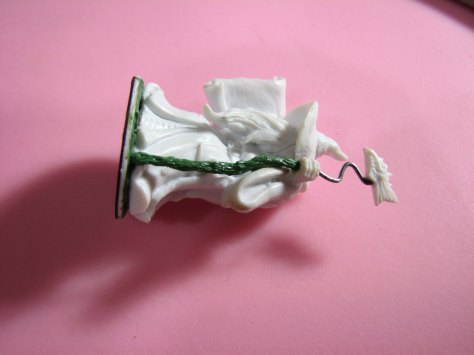
- Cut some steel wire to size, shape and glue it into Galladon’s hand/stick it through the hole. Most wooden staffs are not entirely straight, so you can add some bends.
- Drill a hole in the dragon head and attach it to the top of the wire. Here I had the idea of a twisted wyrm’s neck and shaped the staff accordingly.
- Shape the greenstuff to a sausage.
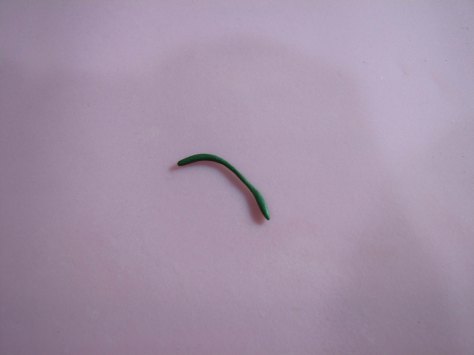
Pictured: A greenstuff sausage on a pink silicon sheet. Beauty to behold… - Using your hands (preferably with some gloves on to avoid finger prints on the greenstuff) roughly wrap the putty around the wire and form the bottom part of the staff first. I recommend to only make enough greenstuff for this part. Stress is not very conducive to sculpting details ;). Smooth the greenstuff out with a ball point tool. You can now begin adding a rough wood texture. Make sure all of the wire is covered. If the staff looks to thick take away some volume.
- Now we use the needle tool to further texture the staff. You can see that I reshaped the putty a bit to make it follow the bent of the wire. I also added some more intricate wood texture, gnarly parts and small knotholes. Make sure that the bottom of the staff is clearly separated from the floor and does not fuse into your base.
- Onwards to the top part. Prepare some greenstuff and let it again sit for about 20min.
- Just as with the bottom section apply the greenstuff and smooth it out. Allow for the neck to be thicker where it meets the dragon’s head.
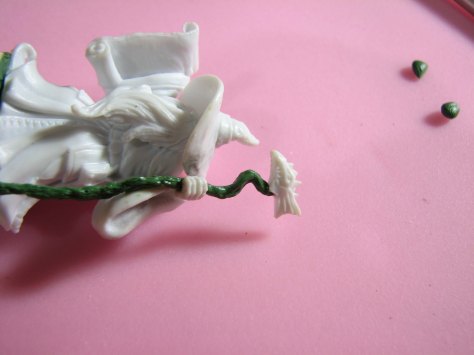
- Now we add a wood texture to this part, too. However, to add some interest we will add some carved scales to the neck. With the needle tool or better your scalpel blade lightly draw a cross-hatch pattern on the neck.
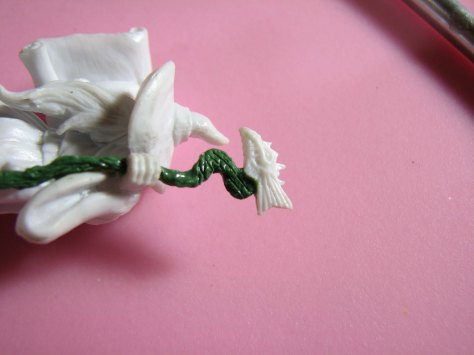
- Now use a small ball point tool and flatten slightly the separate scales. It is actually hard to work on such a small surface area and I did not manage to make the scales entirely even. I think this works alright for wood carving. For an armour piece I would need to practise more.
- Voila, our staff is finished. Set the miniature aside for 2 hours and let the greenstuff cure. If you continue working on it the risk of destroying all your hard work incrementally increases. Spare yourself the agony and do some other hobby stuff, have lunch or go for a walk to stretch your legs and back.


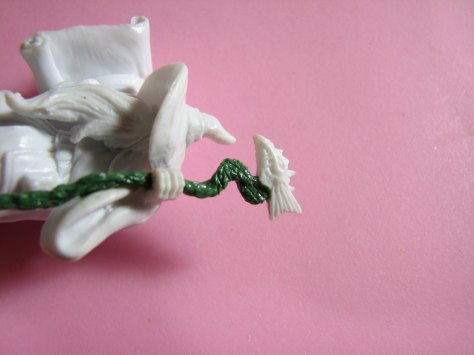
Braids, the Sign of a Refined Gentleman
- After a refreshing walk cut away Galladon’s hat.
- Fill in any seams around his beard.
- Now we get started on the braids: Cut some copper wire to length and separate it. Take 9 strains of copper wire and separate them into bundles of three.
- Twist the top part together and secure with super glue. Now embed this part in some blue tack.

- You may ask why we are not doing this with greenstuff? Well, I am sure there are some greenstuff wizards out there who can sculpt a very thin braid, but my attempts brought me to the brink of sanity, so I thought why not just braid some copper wire. The advantages are tensile strength, delicate finish and texturing all around.
- So, how do we do the braiding? I found some very easy to follow colour coded visualisation (given I never had to braid my hair initially my wife showed me, so kudos is due to her). We do exactly the same with the copper wire.
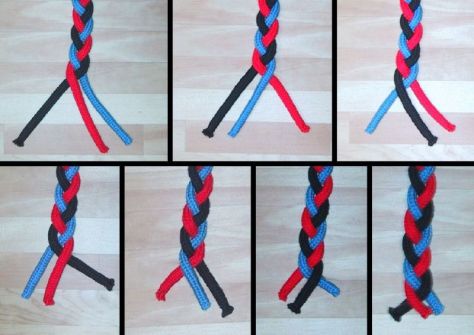
An excellent visualisation of how to braid by Chris 73 / Wikimedia Commons. 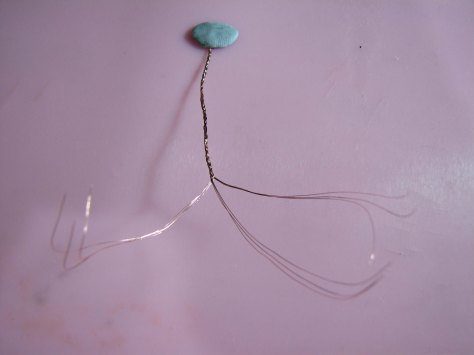
After each pass try to get some tension on the wire. If some of the braid is a bit loose don’t worry, just move along and use the best section. - Cut the finished braid to size and attach it to the miniature using super glue. I tried to let the left-hand braid conform to his beard, while the right-hand one is not quite as much affected by wind or movement.
- Now we need to hide the transition points between Bonesium and wire. Here again we use some greenstuff.
- This is also a good opportunity to add the dagger. I used a spare one from the Agema Republican Roman Legionaries set. It is short enough to suit a wizard and has some nice detailing on the sheath.
- You can also add a strap with greenstuff to attach the dagger to the belt. Shape the greenstuff on the miniature with the needle tool and smooth with a small ball point tool.
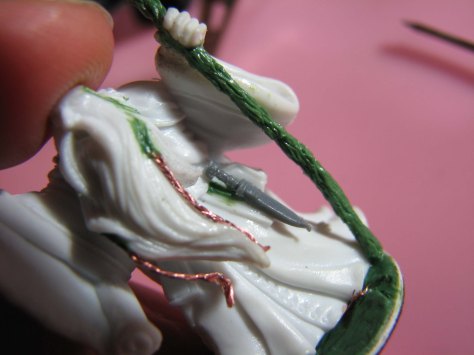
- To finish we add some end pieces to the braids, once again using greenstuff.
- Let cure and Galladon is ready to be primed! I recommend to apply a thin layer of acrylic medium on the copper wire to avoid beading.
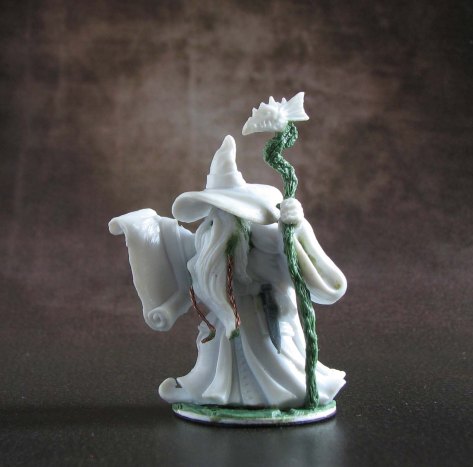
The finished converted Galladon.


Final thoughts
I hope this short tutorial was of interest to you and may inspire some of your own conversions.
The techniques used here have wide applicability and can be used on a variety of miniatures. For instance I made a cast of Galladon’s dragon head and altered Khael Stonekindle by Jason Wiebe a bit, as his staff was also quite bendy. I also added a thin fabric band around the middle of the staff.

Another example for the braid technique is my apprentice for Frostgrave: a heavily converted Reaper Miniatures Juliette by Bobby Jackson (sadly discontinued in Bonesium due to casting issues with her hand) combining both hair made of greenstuff and copper wire.

More on hair, fur and other accessoirs in a later post. Let me know below what you think of these conversions, share your own conversions and your tips for working with greenstuff.
If you would like a constantly updated, themed PDF terrain building, painting and roleplaying guide consider supporting me on Patreon. There also other choice rewards for supporters.
![]()
If you are not keen on Patreon, but enjoy my content and would like to see me well caffeinated so that I can publish tutorials, reviews and guides more frequently click below and buy me cup of dark, mellow goodness.
![]()

Some very nice stuff all done with that not so easy to use green stuff. For me the bit about using lubricant is the most important bit as it helps no end.
LikeLike
Thank you for your comment. I agree, my first attempts without lubricant were horrible. A lot of tearing. I am amazed what a bit of skin oil can do if you want to smooth out stuff.
LikeLike
This is a great tutorial, thanks for sharing! Now I’m inspired to try some conversion work myself…
LikeLike
Glad you liked it. I will look forward to your own conversions. Any specific plans already?
LikeLike
Well, I just started a Mexican Revolution project in 28mm (gasp!) – trigger was the Kickstarter for A Fistful of Lead… Western figures are fun and would lend themselves very well to conversions I guess.
LikeLike
Quite true. Especially if you want to have a group of desperados or something similar ;).
LikeLike
Nice work. I have had to replace some part on my bones figures due to miscasts. The braiding yuo have done is very good.
LikeLike
Thank you. Pleased you like the braids. I do wonder how this can be achieved in greenstuff, but ,aybe the pros use another putty that can be carved or emveaved after it is cured. While miscasts are annoying, I see it as a challemge to fix stuff and enhance a sculpt. I would be more unimpressed if the Bones would be really expensive. Which models did you work on and what did you change?
LikeLike
Very good tutorial indeed!!!
LikeLike
Thank you! Glad you found the tutorial of use.
LikeLike
Of course I did !!! Will try the braids out myself
LikeLike
Great tutorial! Looking forward to the next installment 🙂
LikeLike
Thank you John. I think next time I’ll look at bags, knapsacks etc.
LikeLike
Great work on this tutorial, and an excellent point about Bones models being the perfect base models to do such experiments on.
LikeLike
Thank you for your comment. I think Bones Miniatures are really quite inclusive (much more so than say highly detailed metal miniatures) and bring more people into the hobby. I am currently working on a full conversion/partial resculpt of Leisynn (the dude with the goat head helmet) into a Lich. Given I basically cut off most of the detail on his front I would never have done this with a metal model. So really, they inspire to take the plunge.
LikeLike
Having used Greenstuff myself for about 15 years now, I can only say that this is a great tutorial, which should help people a lot! And the sculpting is excellent, too!
LikeLike
Thank you for your comment Burkhard. I can’t say I am working with green stuff for 15 years, but as you say I hope the tutorial will be of use to people who just start out. Do you always use pure greenstuff or did you use it mixed with some other putties? If so, any results of import?
LikeLike
I always just use pure greenstuff, I just slightly vary the yellow – blue ratio depending on what I want to do. That is it.
LikeLike
Really nice tutorial, with some great delicate work on show D&B, conversion is a great part of the hobby and one that a lot of people treat with trepidation, but just like anything else the more you do it the better at it you get, this type of tutorial is great for getting people started but I think the best advise you came give is, just get out there and try.
Cheers Roger.
LikeLike
Thsnk you, glad you think the tutorial will be of help for beginners. I think Bones remove the last barrier, as they are really easy to convert and very durable. Nothing to lose, only to gain.
LikeLike