

If you are a Game Master it is always exciting to start a new campaign and let your players explore new shores, their peoples, customs and the secrets they hold in ruins old, mountains high and dungeons cold. To make it easier for your players to visualize this unfamiliar environment you may have provided them with a map of these lands, may it be as loot or after some negotiation with a Gnome in the local antique shop. A map may also come in handy for a wargaming campaign to show the position of warbands or armies and natural obstacles.
Often the first iteration of such a map is a simple hand-drawn sketch, but after more and more of the new area is discovered you may want to provide something with more visual appeal, add a background texture or even colorize your map.
I will show you some of my current exploits into the realm of map making that will be of help if you start out to make your own regional maps. I am still in the early phase of developing my drawing and coloration skills, but hope that the following ideas will be of use for your own development as a hand-drawn map artist.
I will show you my process of drawing a map by hand, scanning and cleaning it up and finally colorizing it using Photoshop. I will also provide you with some PNGs of elements such as ruins, towers and a city that you can use for your own creations as well as a generic parchment background. Future iterations will feature encounter maps, too.
A most useful guide to the Margravate of Greifshold
The margravate of Greifshold offers many opportunities for the intrepid adventurer. Deep under the holdfast of Margrave Elswyth Draca the remains of an elven temple can be found, one of the many remnants of the fiefdom of Oialriw brought down by Blightfang’s desolation. Little is known among scholars about this evil, yet the fierce but simple-minded nomadic tribes of this land consider the mountain range that forms the northern limits of Greifshold to be the fossilized remains of this being. A laughable notion, most likely based on folk etymology. We may have brought these barbaric people civilization, but they remain roughcast and superstitious.
On the foot of the mountains the overgrown stones of a temple lie west of the source of the Tears and beyond the range remnants of elven outposts offer opportunities to gain fame and fortune, but are equally dangerous for the unprepared. It is said cursed souls haunt these decrepit holdfasts since the devastation of Blightfang. One will need to cross the Weeping Forest to reach the temple and any traveler is well advised to follow either bank of the Tears to their origin in the mountains. There is no well-trodden path through the dense forest.
Little is known about the ruins extant beyond the Blightfang range, but they may be untouched by grave robbers and could tell us much and more about ancient Oialriw. Crossing the range is no simple matter, as Orcs and Goblins infested the mountains many moons ago. The margrave’s expeditions decimated them, but deep below the mountains, it is believed, old caves and mines offer them refuge. A pass leads to the Arc of Faelyn, but should not be attempted in the depth of winter. South of the arc the traveler will find Everantha, an elven outpost, now half sunken into the mire. Further north Herleva’s Stand, a crumbling human outpost, is the last sign of civilization before one enters the realm of the frost giants. A proud and callous people. Some scholars theorized that the great cities of the elves can be found in these frozen lands, but I found nothing during my studies to corroborate these claims.
Regis of Greifshold,
Cartographer of the Council
Initial considerations – historical maps as inspiration
If you just start out drawing maps I would recommend to first have a look at historical maps to get some inspiration for your own work. You can decide what appeals to you visually and stylistically and also make up your mind which style works best for your world. If it is high fantasy both medieval and renaissance style maps could work, if you make a map for a scenario with a historical background you could go so far and emulate a specific style.
The famous Tabula Peutingeriana can serve as an example for a medieval map. It is supposedly a copy of a Roman original, dated anywhere between 250 BCE and 400 BC. Below you see a facsimile version by Konrad Miller, however, an interactive online map viewer by Cambridge University Press allows to examine the original, heavily weathered medieval map, too.

The cities are drawn using a semi-isometric style that does not attempt to be absolutely spot on if it comes to accurately depicting the perspective. I could see this kind of map in a role-playing context, given that your players are often interested in how long a journey takes. The symbols for cities could be modified to add variation. Naturally this would also work perfectly for a campaign map if you run an ancients campaign.
Another example is the Carta Marina. Fashioned supposedly in 1539 by swedish scholar Olaus Magnus it is one of the earliest maps of the Nordic countries. It is especially noteworthy for its fanciful depictions of fantastical beasts both on land and sea. The James Ford Bell Library offers a website with an online viewer to examine the map close-up.
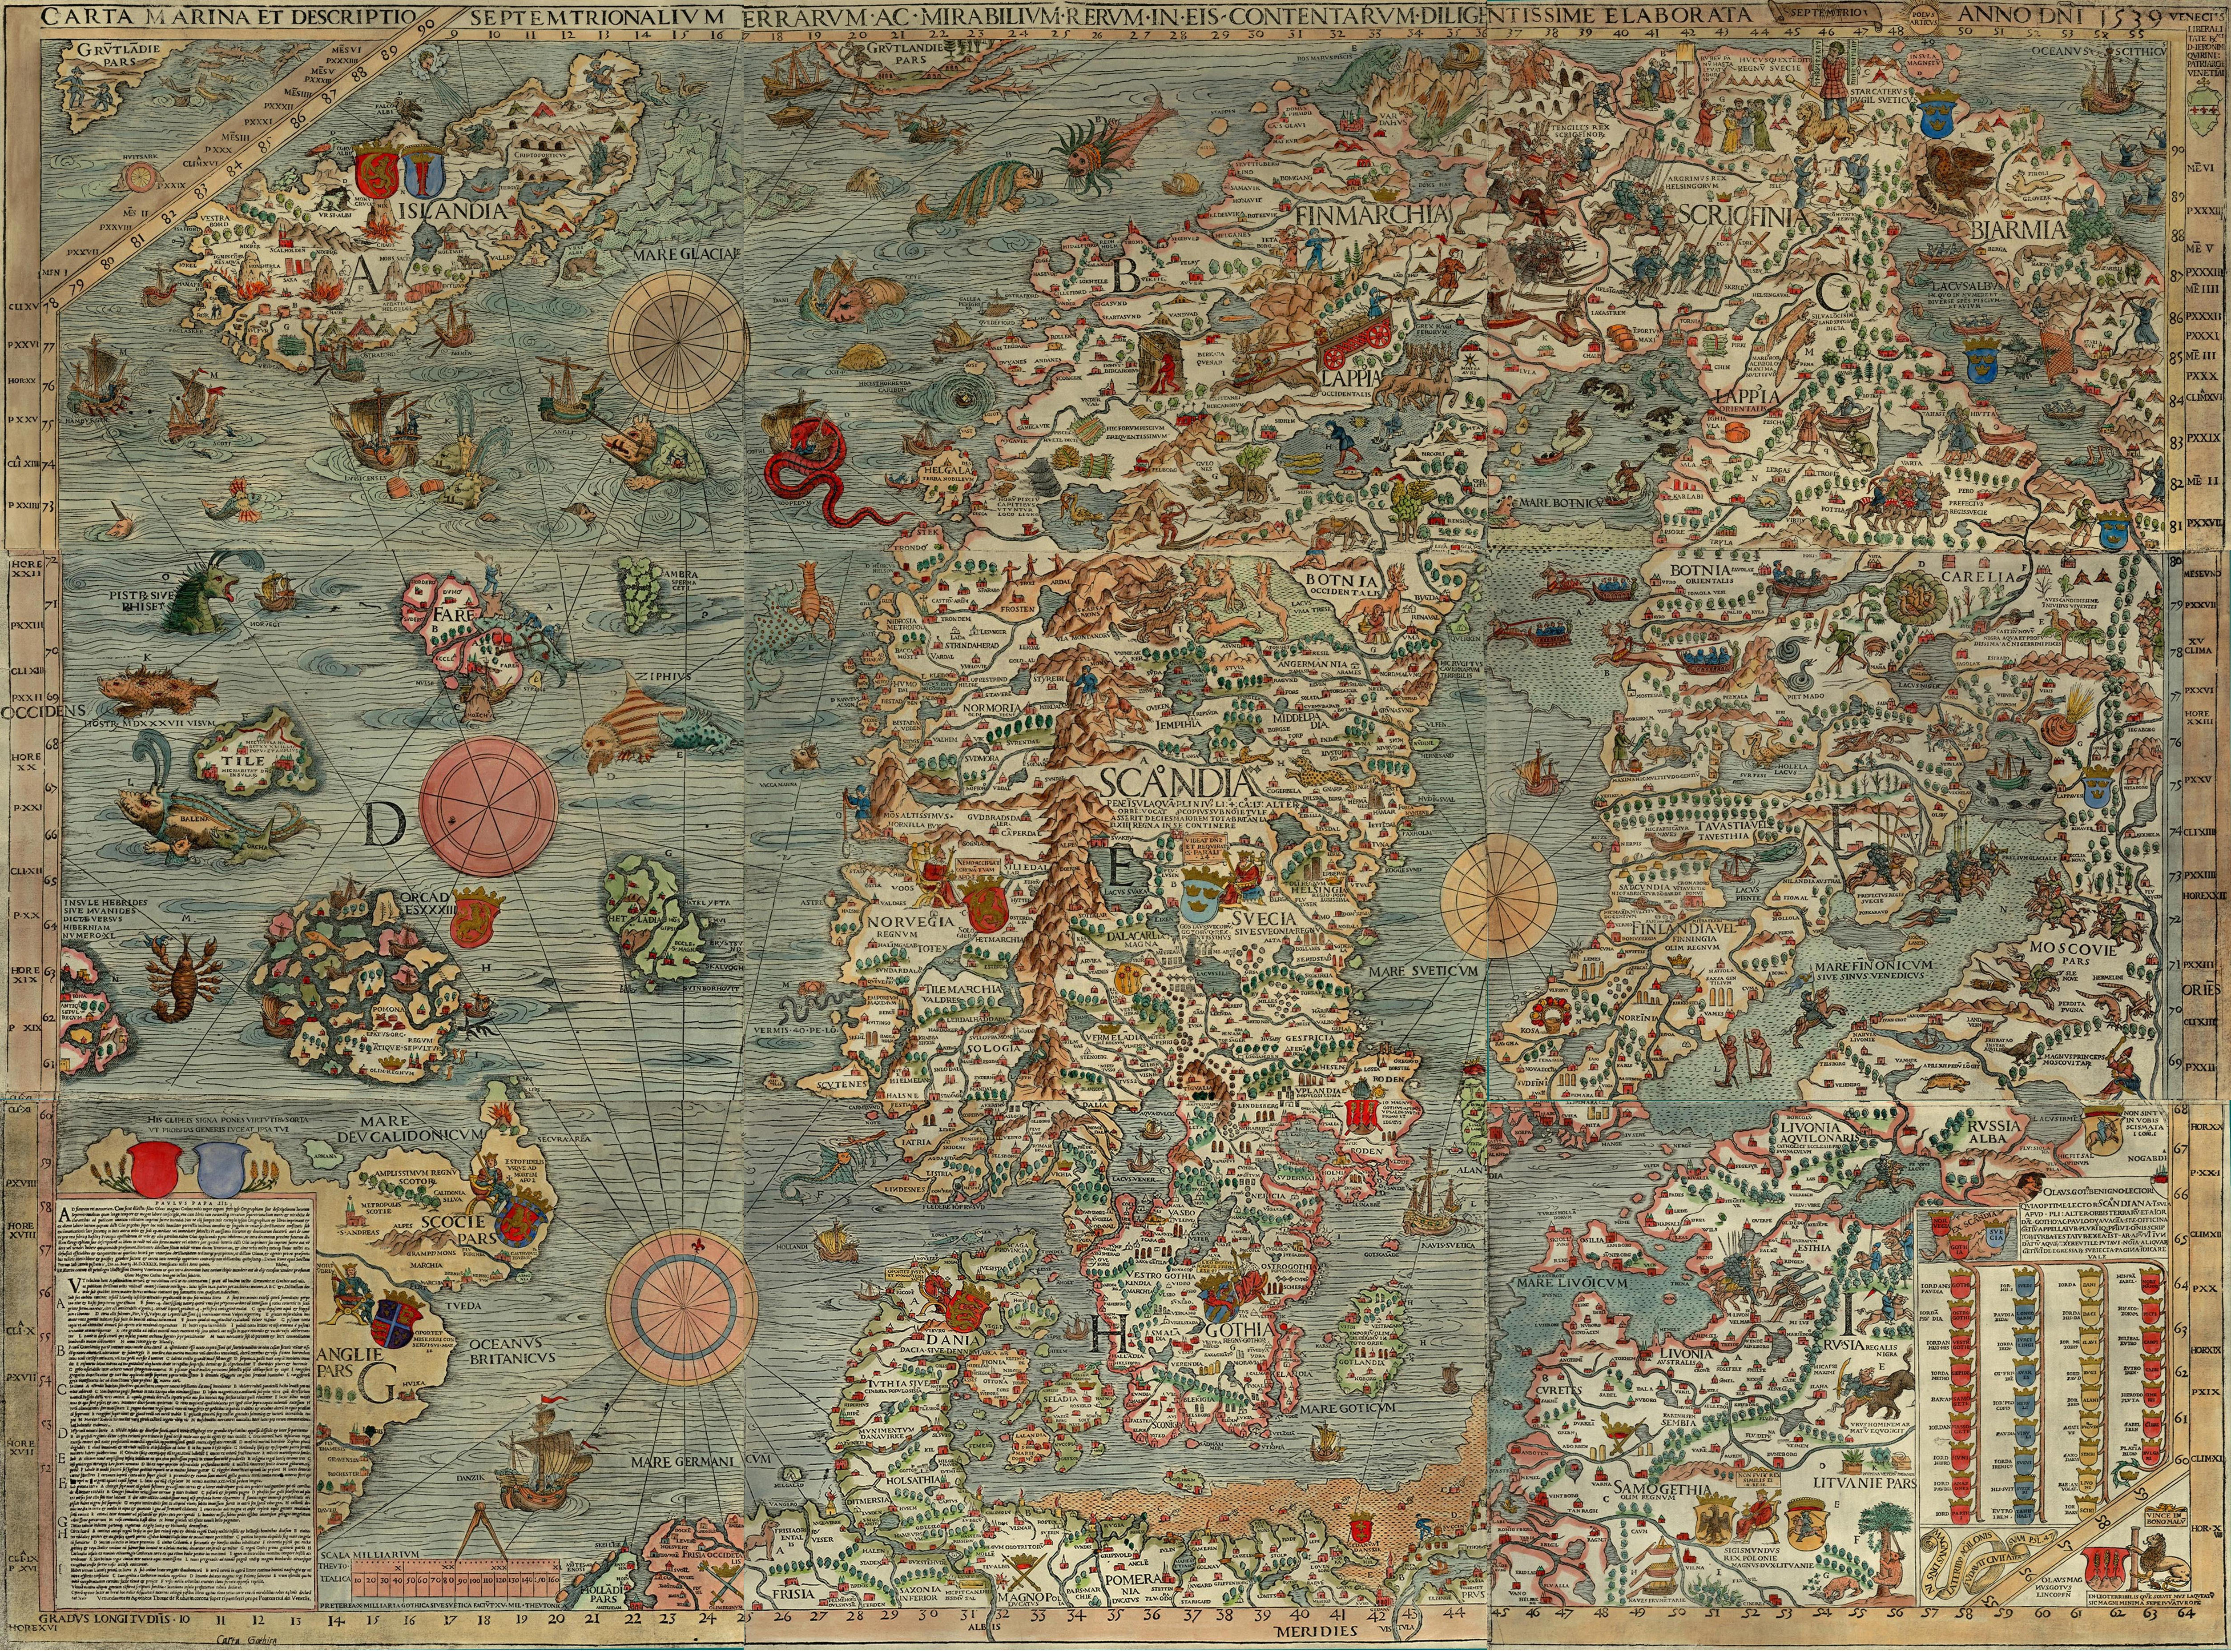
The Carta Marina features rich detailing with colorized rivers, woods and little vignettes that show people at their trade. The settlements are drawn in a simple style that once again goes for a semi-isometric look.
I took inspiration from these maps, but also wanted to experiment with different techniques to develop my own style. I am still in the early phase of developing my drawing and coloration skills, but hope that the following ideas will be of use for your own development as a hand-drawn map artist.
Map drawing supplies – nothing fancy here!
You don’t need expensive supplies to draw your own maps, nor will you need an expensive Adobe Creative Suite subscription. Drawing supplies are readily available at your local art store and you can use open source software like Gimp and Inkscape to clean up and colorize your maps. You can basically use any image manipulation program that allows you to use layers. It comes in handy to have a function that converts a bitmap into a vector graphic, but even that is not necessary when you start out. You can use Inkscape for this, which is the open source alternative to Illustrator, a vector drawing program.
I did use Photoshop and Illustrator for my map, mainly because I have these programs at my disposal, but the instructions work with any program.
So far so good, but what basic supplies do you need?
- A pencil or a set of micro pens. I use one with a 0.8 mm and one with a 1 mm tip respectively.
- White drawing paper. I use 80gsm paper for marker and pen rendering. It is smoother than your usual copy paper and the marker does not tend to run or smudge on this paper.
- Illustrator or Inkscape to clean up and vectorize your art work.
- Photoshop or Gimp to colorize your artwork.
You can see, if you don’t want to colorize or vectorize your artwork you only need pen and paper to start. Onwards to drawing techniques!
How to draw a map in five steps
My workflow to draw a map is as follows:

As you can see in six steps I scan the original, vectorize it, block in the base colours, shade and highlight the drawing and add a suitable background texture and environmental details.
Let the ink flow!
For starters take a piece of paper and just draw something. Hills, trees, a coastline etc. or if you already feel comfortable with more intricate designs try yourself on some buildings, maybe a farmstead or a tower. You can look online for some inspiration, but generally speaking I would focus on developing your own way to do things and let the map develop organically.
The best part is, that you can use any of these designs later and even combine them, after all we will be able to scan, edit and arrange them however we like.


Some general advise when drawing a map:
- I drew the natural and man-made features separately. Accordingly the latter turned out larger in size and more detailed than the former. To better match detail levels compare both set of drawings and adjust accordingly.
- Try to be consistent with regard to the perspective.
- If you want to colorize your map keep the shading subtle and leave lots of white space.
- Don’t draw the details too small if you want to blow the map up later on. This will give you a cleaner look.
- Nevertheless, I think it was a good idea to separate the two. It makes it easier to edit the elements and avoids problems with overlapping details should you decide to change them at a later stage.
- Having details such as trees and mountains as part of a design can be problematic. For instance if you want to integrate a ruin into a mountain range the line thickness may not match. I would advocate to separate them, too.
- When you start something finish it. If it looks off try again, but always finish your drawing. It gives you a feeling of accomplishment and seeing it through will also hone your drawing skills. I didn’t care much for the central tower of the fortified settlement, but still finished it. Later on I removed the tower and only used the surrounding elements.
Scanner time!
When you are happy with your first drawings scan them with a suitable scanner choosing the highest possible resolution, at least 600dpi. Depending on the scanner it may have a line art setting that will output a PNG with transparent background, which will save you a step. If that does not work remove the white background in the photo editing program of your choice or vectorize the drawing.
To vectorize your drawing Illustrator offers a handy function: Live Trace. This basically traces your pixel-based artwork, turns it into paths and removes any white elements. This not only cleans up your art work but makes it scale-able. Have a look at this tutorial if you use Inkscape and this one for Illustrator.
Feel free to use any of the PNGs and the parchment background texture featured in this post. They are licensed under a  license. Just include the following text as reference. “Title of Picture” by DaggerAndBrush Blog is licensed under a Creative Commons Attribution-NonCommercial-ShareAlike 4.0 International License.
The Markgraveate of Greifshold – A harsh land
For my campaign setting I envisioned a mountainous, forested land inhabited by nomadic tribes. Whalers, fur traders and lumberers from the southern kingdoms alike try to make a living in this harsh environment and trade wares from the fertile south with the tribes.
A mountain range can provide you with a natural barrier your adventurers have to overcome, maybe through a hidden passage or a winding pass. It can also force them to travel by sea or river.

The mountains are drawn in a very simple manner, you can obviously add more detail and texture if you desire.

The City of Greifshold
Greifshold is the only major settlement on the continent, at least as far as the colonists know. Greifshold is a young settlement, governed by a margrave and a council of merchants. Its coastal location in a sheltered bay makes it a suitable anchoring point for trade vessels and a place to spend the harsh winters when the storms prevent most travel by sea.
The city is actually a composite of different houses and towers I drew. Thanks to image processing it is very easy to combine, overlap and adjust elements and assemble them to a bigger structure.

Greifshold naturally has some docks, so I drew a simple representation to make this clear to players.

I also felt it would be surrounded by farmsteads that not only supply the city with produce, but also offer travelers a hot meal and simple accommodation.

Fortified Towers and the Wizard’s Abode
Fortified towers and archetypical wizard’s abodes are a good way to add points of interest to your map and can even be the place for a side quest or a location where your players meet an important NPC.

Given my enthusiasm for wizards the tower below is my favorite element of the map.

Crumbling Ruins
No map is complete without eerie ruins that hold riches and dangers alike for the intrepid adventurer. In my campaign they are the remnants of an elven fiefdom, brought down by a cataclysmic event. That said, the drawings are generic enough to depict ruins of other cultures, graveyards or temples.


I combined separate elements to create a suitable area map for my players. I did also experiment a bit with the size of elements making the ones in the background smaller than the ones in the foreground. This is obviously more of a surreal effect.

Colorizing the map
After the map is scanned we can now proceed and colorize it. For this we use layers and masks in your image processing program. Not unlike painting a miniature you first block in the basic colours. However, we don’t use any colour as such, rather we make a solid fill layer of the colour we would like. We then hide it using an opaque layer mask and proceed to remove parts of the mask to reveal the colour underneath. This allows us to change opacity and achieve smooth blends between different layers.

Per color you need a mid-tone, a shadow and highlight tone. There are obviously other ways to colorize a map utilizing different layer blending settings etc. but I kept it simple for my first attempt and will try other techniques at a later stage.

You can also add a background texture at this stage. Depending on your settings it will influence the layers above and make your map look more realistic.

Depending if you want texture on your man-made buildings you can also use a texture brush to remove the mask and thus add a light texture to stone, white-wash and roofs. Just try different approaches on different layers and see what you like best.
After the base colors are blocked in you add the shadows and mid-tones. To get a smooth blend you should use a soft brush and reduce opacity to 20%. Build the color up slowly.


What’s next?
After I drew my first map I had a look around the interwebs for inspiration and advanced techniques. I am very keen to use them in new maps that I will share here on my blog.
I have two projects to focus on: A map of a forest that will be a focal point of a current adventure I am writing. This includes a graveyard encounter and I will also draw an encounter map that will include both the graveyard and a connected crypt.
I hope you found this article useful and maybe it inspired you to take a pen and draw your own map. If you are looking for further resources check out the links below. But never forget to wield your brush with honour!
Inspirational Links
Fantastic Maps – How to draw a map
The Cartographers Guild – A forum for cartography enthusiasts
Deven Rue’s Twitter feed offers lots of inspiration for your own work
If you would like a constantly updated, themed PDF terrain building, painting and roleplaying guide consider supporting me on Patreon. There also other choice rewards for supporters.
![]()
If you are not keen on Patreon, but enjoy my content and would like to see me well caffeinated so that I can publish tutorials, reviews and guides more frequently click below and buy me cup of dark, mellow goodness.
![]()

Wow, awesome tutorial! I´m sure I can make some use when creating maps for Chain of Command mini campaigns, so thank you for the informations!
LikeLike
Thank you for your comment Utgaard. Glad you like the tutorial and found it useful for your on campaign project.
LikeLike
I love the little sketches of the towers, ports, ruins and towns. Very evocative!
LikeLike
Thank you Arkie, as always much obliged. Drawing those was fun, but I want to try to get a cleaner finish the next time. I was always taken with medieval illuminations, so this may be a style to look into for figures and beasts.
LikeLike
Excellent and inspiring post. Thank you.
LikeLike
You are very welcome Kawe, glad you found it inspiring.
LikeLike
It looks great! I don’t play d&d, but I can imagine creating and playing with maps looking like these really adds to the experience!
LikeLike
You should give it a go. DnD and other RPG’s are good fun and one can focus on both tactical combat or RP, dependin what is more to your liking.
I think maps not only add immersive qualities, they are also a good way to guide players and give them options without overwhelming them with an entirely open world.
LikeLiked by 1 person
I used to doodle maps of islands when I was very young but they were rubbish, unlike yours, which is wonderful, especially love the little drawings of places.
LikeLike
I’d say give it again a go. Maybe you enjoy it. I find it quite relaxing when you are in the “zone”.
Thinking about it, I drew stick men scenes when I was a child, e. g. a museum with different levels, visitors and staff, skeletons etc. I was also quite keen on tracing videogame characters and characters from the Mickey Mouse comics.
It feels quite nice to come back to such childhood endeavors. Might be why I feel so relaxed: It reminds me of rainy afternoons with a cup of Caro Kaffee. It is pretty much the German version of Ovomaltine. Suitable for a child, as I was obviously not allowed to drink coffee then. I made up for this now :P.
LikeLike
ovaltine is yummy but if i drank it now in my 30’s i would probably get very fat hahaha. very calorie heavy.i think if i did maps now id be tempted to actually make a scene for each location.
LikeLike
That is my master plan, making maps for each location and vice versa, not getting fat ;).
LikeLike
i’m thinking of actually making the inside of the mausoleum for one of my scenes. would seem a shame to have that entrance and never see whats within.
LikeLike
I agree, it would be a missed opportunity. Instead of building the entire structure it may pay off to make some modular tiles and accompany them with a map. This way you can reuse them in different configurations, yet the map would make them appear as a coherent whole.
LikeLike
well yeah, I did mean to have it as separate pieces. Just makes things easier and stops it ending up big if you wanted to do say three or four places.
LikeLike
Another great post. My last map was in 1984! Nice to know I could use your tutorial!
LikeLike
Thank you Mark, as always much obliged. As I wrote in my reply to alamandrablog: Get the pencils out and just draw something. Maybe something for a campaign, maybe something just for you. Its good fund and a nice way to fill a train or plane journey.
LikeLiked by 1 person
A lovely detailed tutorial for RPG map making. Reminds me of the maps my brother used to draw for his RPG campaign world back in the 80’s, though obviously with modern tools and technology added in a skilled manner.
LikeLike
Thank you for your comment. I think hand drawn maps have this nice nostalgia factor. I am working at another area map at the moment, depicting the “Weeping Forest”. It ties in with my tutorials, as each location on my map will eventually end up as a terrain piece/ encounter.
I posted a WIP in my Twitter feed, which you find to the right of my landing page. I ramped up the detailing and will go for a much less vibrant colour scheme. I have something akin to a story book in mind.
I had one about myth and legends when I was young (I think it is somewhere in a box back home in Germany) featuring arthurian legend, Beowulf, the Nibelungen saga etc. It had beautiful illustrations that potentially made me a life-long fantasy fan.
I guess I strive for this feeling with the maps: memories of formative years, nostalgia and harking back to a time when everything was hand-made. Well, that said, I still enjoy using digital editing to achieve such a look ;).
LikeLike
Very cool, and very useful. Great job, and thanks!
Cheers,
Aaron
LikeLike
Thank you for commenting Aaron. Glad you liked the post.
LikeLike