
It took several years, but finally my slightly converted Judas Bloodpsire by Reaper Miniatures is finished. Why did it take me so long, you may ask? Well, I was stuck with his fancy headdress and only recently found a solution to depicting the pearls. I also got a new miniature called James. He is extremely well cast and keeps us quite busy. So despite a creative draught and a new baby in the house, I managed to get some hobby time in.
I will elaborate on the headdress’s construction, colours used and last but not least show you the results of my new ring light and smart phone photo setup.
Precious pearls and fabulous feathers
It all started with a Judas Bloodspire miniature by Reaper. I swapped the weapon and the head, removed some skulls from the armour and so on. I detailed these changes in another post.

The headdress was a real headache. The basic shape was easy enough: The original head is from the Gripping Beast Late Roman set and sports a flattish cap. All I had to do was to add the cone shaped part with Greenstuff. But what about the horsehair /feather and set jewel that is clearly visible on the historical portrait?
Initially I used a random bit that looked like a set jewel (I guess it was a sword hilt at some point) and a feather from the Agema Romans. I was reasonably happy with it, but then my wife asked: You put so much effort in the hair, why not go all in and do the headdress as depicted?
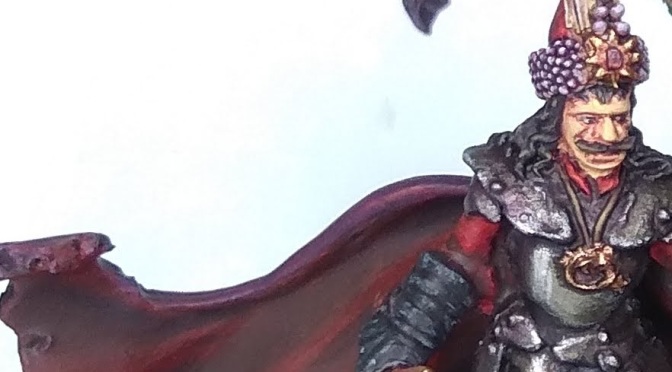
Challenge accepted! In the end I had to sculpt the set jewel (no star shaped bits), the five central pearls and order some nail art supplies for the smaller pearl band: Turns out metal microspheres to adorn nails are the perfect scale for pearls. I could see them being effective fruit, too.

I applied a thin layer of Greenstuff and gently pushed some of the beads in. The only way to get them out of their pot was a moist brush. Tweezers came in handy, too. I was unable to perfectly align them, but I can live with it.
A toothbrush supplied the feather or horsehair. I took a bushel of single strands, glued them together with a drop of superglue and affixed them to the pre-drilled hole in the cap.
Finally I made an attempt to sculpt the emblem of the Order of the Dragon. Fiddly at the scale, but I think it looks the part. I had to do it in stages. First the main body, then head and wings. The string came last.
This seasons colour: purple!
The paint job was fairly straight forward. I knew I wanted a reduced palette featuring purple and red. I also wanted to push contrast more then I would usually do and lastly I wanted to practice two-brush blending (one brush with paint, one just moist; apply paint and feather the edge with the moist brush).

Colours and mediums used
I used a mixture of Vallejo and Reaper paints, plus Army Painter and GW washes. I also use with all non-wash paints the Vallejo Glaze medium. It makes paints more translucent and slightly stretches the drying time out. usually I go for a 50:50 ratio. If it is not quite there a bit of water can help to get the consistency right.

My process
The process is as follows: I apply the base colours and then mix on the wet palette a lighter and darker tone than the base colour. I first apply shadows and go quite dark. Edges are feathered. Then I apply the highlights, once more edges are feathered. Not dark or not light enough in some areas? Easy, just go back in with the glazes until it is. With a wet palette this is a fairly relaxed way of painting. You only have to be quick feathering the edges, so work in one area at a time.

Controlled washes are your friend
I used the Army Painter Purple Tone on almost all areas, but restricted to the shadows. The idea was to draw it all together. So the face is shaded with purple, the red cloak has purple in the shadows, so does the armour.
Red, a difficult colour
You may know that red is actually a hard colour to highlight. If you add white it gets pink, when you add yellow it gets orange. So the trick is to go darker with your shadows and use a nice red as your final highlight. In my case Reaper Blood Red. You can add a finally highlight with a tiny bit of yellow added. At glaze consistency it won’t change the red to orange.
The shadows are a dark, cold purple mixed with black. The cold and warm colours work well together and increase contrast further.
I also added red to the outside of the cloak. Not in the shadows, but as a very subtle colour transition towards the top of the cloak. This is just a very thin glaze and adds interest.

Low tech, good results?
Since my Power Shot gave up, I experimented with my smart phone camera. Usually the light was a problem, so I got myself a reasonably cheap ring light that allows to change colour temperature and intensity. What can I say: Works very well. With my painting lamp from above and the ring light from the front I can achieve a well lit scene.
A dark piece of fabric allows pictures with a black background, too. I only had to do some minor corrections in Photoshop (brightness and contrast).

I hope you like how Vlad turned out after all this time. I was very pleased to learn that he was featured in a new Vlogcast format by Reaper Miniatures”ReaperLand”. The made up a cool alternative background story for the mini, so check it out. They also feature other paint jobs from the community in each episode, so lots of inspiration to gain.
I hope I can dedicate more time to the blog this year, so far I was actually quite productive. I also want to give the design an overhaul and consolidate some older content to make it easier to find stuff.
Until then wield your brush with honour!

Very nice job! I do wish you had bigger pictures so that we could see more detail
LikeLiked by 1 person
Thank you, glad you like him. I inserted links to the media.
LikeLiked by 2 people
Nicely done post and mini
LikeLiked by 1 person
Thank you Mark, much appreciated.
LikeLiked by 2 people
Very impressive – a really nice project in the end
LikeLiked by 1 person
Thank you very much. It took quite along time, but I am glad he his done and I am glad I did it in the first place. I intend to make a historical counterpart, too, using the Perry foot knight models.
LikeLiked by 2 people