Category Archives: Dungeon Crawl

Rome wasn’t built in a day – 3-D Dungeon tiles

We already took a look at my set of 2.5 dimensional dungeon tiles for some hearty Dungeon & Dragons sessions or some simple SoBaH past-time. I also recently completed a set of Hirst Arts castings to furnish the dank rooms of my dimly lit dungeon.

However, the tiles were not entirely finished and some of the features were still missing, such as door and wall elements, tiles with a wooden floor and a bigger room that is suitable for boss encounters. These also elevate the dungeon to the third dimension.

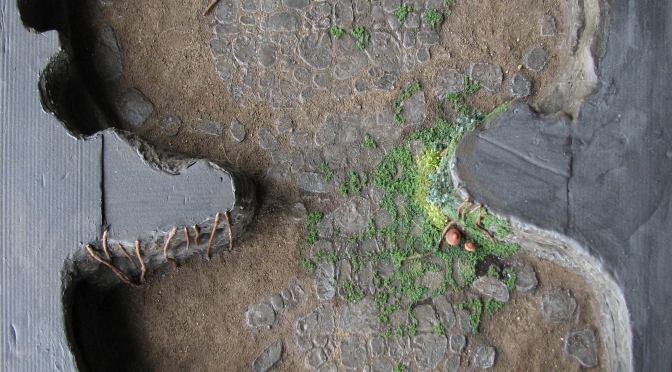
This post is mostly picture centred with some short comments about the techniques used. For a more comprehensive  how-to have a look at the older post.

Continue reading Rome wasn’t built in a day – 3-D Dungeon tiles

Pimp my Hirst Arts – The Cavern Accessories mold Part I

Bruce Hirst is known in the wargaming community for his high quality silicon rubber molds that, employing a system not unlike Lego, allow the construction of dungeons, egyptian tombs, roman temples and much more. So far I only own the Cavern Accessories mold 85.

I already made some attempts to cast this mold in plaster and achieved some nice results. Last week I did experiment with some resin casting and was quite pleased with the outcome: Almost no trapped bubbles, all details are crisp and mixing and pouring of the resin was easy.

The finished pieces on their own are simple, yet provide an excellent basis for further refinement. Making use of a number of techniques I tested creating my Crypt of the Damned I made a point of improving the designs by the addition of moss, roots, candles, scenic bases and the one or other detail such as critters and water effects. I finished with a garnish of weathering powders. Apart from showing you the finished pieces, this is also an introduction to / review of the accessories mold.

Continue reading Pimp my Hirst Arts – The Cavern Accessories mold Part I

Crypt of the Damned – a Soul Shattering Tutorial Part IV

The interior of the Crypt module is finished, but the sides and the top are still quite unsightly. Raw extruded polystyrene, even with a coat of grey paint, does not look the part.

Part I of this tutorial focused on the basic layout of the Crypt, Part II focused on vegetation (vines, moss, mushrooms and roots) and Part III on all the man-made details (skeletons for the alcoves, urns, candles and sacrificial offerings).

In this part we will use black styrene sheet (commonly known as plastic card) and black, self adhesive vinyl film to add a sturdy and visually pleasing finish to the sides and bottom. We will also make the top more appealing in adding a rock texture that matches the walls of the crypt. First I will point out some problems that came up during the construction process and possible solutions for them. We then proceed to a list of materials used followed by detailed step-by-step instructions.

Continue reading Crypt of the Damned – a Soul Shattering Tutorial Part IV

Crypt of the Damned – a Soul Shattering Tutorial Part III

The degree in interior design did pay off. The undead completed their new musty home without major incidents (only two groups of adventurers had to be driven off). All that remains now is the covering of the sides, bottom and top with protective styrene sheet.

In Part I of this tutorial the basic layout of the Crypt was created, covering the walls and the floor. Part II focused on vegetation, such as vines, moss, mushrooms and roots.

In this part we will add skeletons for the alcoves, urns, candles and sacrificial offerings.  The reasoning behind my design choices will be discussed and a list of materials used provided followed by detailed step-by-step instructions.

Continue reading Crypt of the Damned – a Soul Shattering Tutorial Part III

Entangled – Overgrown stone floor bases

Working on the Crypt module there was a surplus of roots, rough-hewn stone tiles and moss mixture, so I decided to make good use of the materials and created five matching bases. They also work quite well for an overgrown jungle temple environment or ruins of a long forgotten keep deep in the woods.

Continue reading Entangled – Overgrown stone floor bases

Crypt of the Damned – a Soul Shattering Tutorial Part II

The undead were diligent and not only completed a degree in interior design, but also branched out into botanics! In Part I of this tutorial we created the basic layout of the Crypt of the Damned module consisting of the rock walls, rough-hewn stone and dirt floor.

In this part we will focus on adding vegetation, such as roots, moss, mushrooms and floor and wall  creepers. Once again I will provide the reasoning behind my design choices, a list of all materials needed and detailed step-by-step instructions.

Continue reading Crypt of the Damned – a Soul Shattering Tutorial Part II

Remnants of the past – 2.5 dimensional Dungeon tiles

I already mentioned in my Crypt of the Damned tutorial that I have a collection of Dungeon Tiles I made about a year ago. They were my first attempt at Dungeon Crawl paraphernalia and intended to be used in our DnD 4ed sessions. They are based on the cut-out templates of the free game Dungeon Plungin’. I had a read of the rules and found the selection of tile shapes suitable for a variety of scenarios,  encounters and rule systems.

I will present my collection and also provide a brief “How to”, including materials needed.

For more pictures, some more finished tiles and room configurations check out the second post, too.

Continue reading Remnants of the past – 2.5 dimensional Dungeon tiles

Crypt of the Damned – a Soul Shattering Tutorial Part I

With a playable group of heroes and foes already finished, only the   proper surroundings for a first adventure are still missing.

I started out creating some modular floor tiles, but they lacked a three-dimensional feel given I did not integrate walls. Building a layout using these tiles during a RPG session also proved time-consuming, as they were too many small bits. Looking around on the internet and searching different fora I finally decided to go for something resembling the beautiful Dwarven Forge dungeon sets, only with a more rigid room design. Have a look at the short clip below for an overview what we are going to built.

In this tutorial I will document the creation of my initial module, the Crypt of the Damned, providing the reasoning behind my design choices, a list of all materials needed and detailed step-by-step instructions. The crypt’s design is inspired by the video game Skyrim and its long forgotten burial mounds, featuring skeletons and mummified bodies in small wall alcoves garnished with urns, sacrificial offerings, spider webs and overgrown rough stone floors.

Continue reading Crypt of the Damned – a Soul Shattering Tutorial Part I

Under Pressure – Original Sculpey and Fimo Soft press molds for walls and bases tutorial

Last week I put quite a bit of work in my  Dungeon project and also had a look what else I can do with modelling clay apart from sculpting one-of pieces. I came across  some very good resources outlining the use of pressure molds for creating brick or cobblestone textures on bases or duplicating bits (you’ll find a list at the end of the post). Most guys use greenstuff for the molds, but given that greenstuff is quite expensive I was wondering if I could use either Original Sculpey or Fimo for such molds and then make casts using the two kinds of clay or even cheap air-dry clay.

The plan was to make molds for different styles of brick walls to fit out my dungeon and some cobblestone bases for my Bones miniatures. I also made some molds of Hirst Arts pieces and some other bits just to see what results I could get.

Continue reading Under Pressure – Original Sculpey and Fimo Soft press molds for walls and bases tutorial

Knock on wood – Tavern base Tutorial

After a good Dungeon raid all that loot needs to be invested wisely in drink, gambling and a good sleep. The best place to find those things and maybe even a new quest or some entertainment is the local tavern. Without the proper basing you can obviously not enter an upmarket tavern, so that is where this tutorial comes in handy.

Continue reading Knock on wood – Tavern base Tutorial